I have new inventions to report! Wow, I’m so excited!!
Well, to be fair, they are not brand new inventions of mine, but rather adaptations of my existing sewing machines to do new things. Still exciting though!
The chain stitch
Single thread chain stitch is the original knitted stitch perfect for sewing jersey because it stretches exactly like the jersey. However, only very few machines offer it (see my separate post on this).
I have a Frister+Rossmann 804 which is a standard forward-facing vertical oscillator, and which comes with a chain stitching adaptor.

I was keen to teach my other forward-facing oscillators to chain stitch, in particular Haid & Neu Primatic “Dragonfly” which is a much better machine and is my main machine really.

I found that it I could use the F&R chain stitching hook and adaptor with the Dragonfly, as it is the same type of machine, but I needed to adapt the needle plate to chain stitch properly.
If you are using the standard needle plate, you can still chain stitch, but you have to raise the thread tension to incredibly high levels which gathers the material and breaks the thread. The special chain stitching needle plate has a vertically elongated needle hole that is required to pull tight the stitch at a normal tension.
Of course, Dragonfly didn’t come with sich a plate, but it did come with a straight stitch one. So armed with my drill and some fine metal bits, I drilled out the needle hole so that only a narrow bridge remained intact, then I smoothed and polished the edges with a little dremel (we are not building a thread cutter!).


It’s amazing! It works! The Dragonfly chain stitches!!
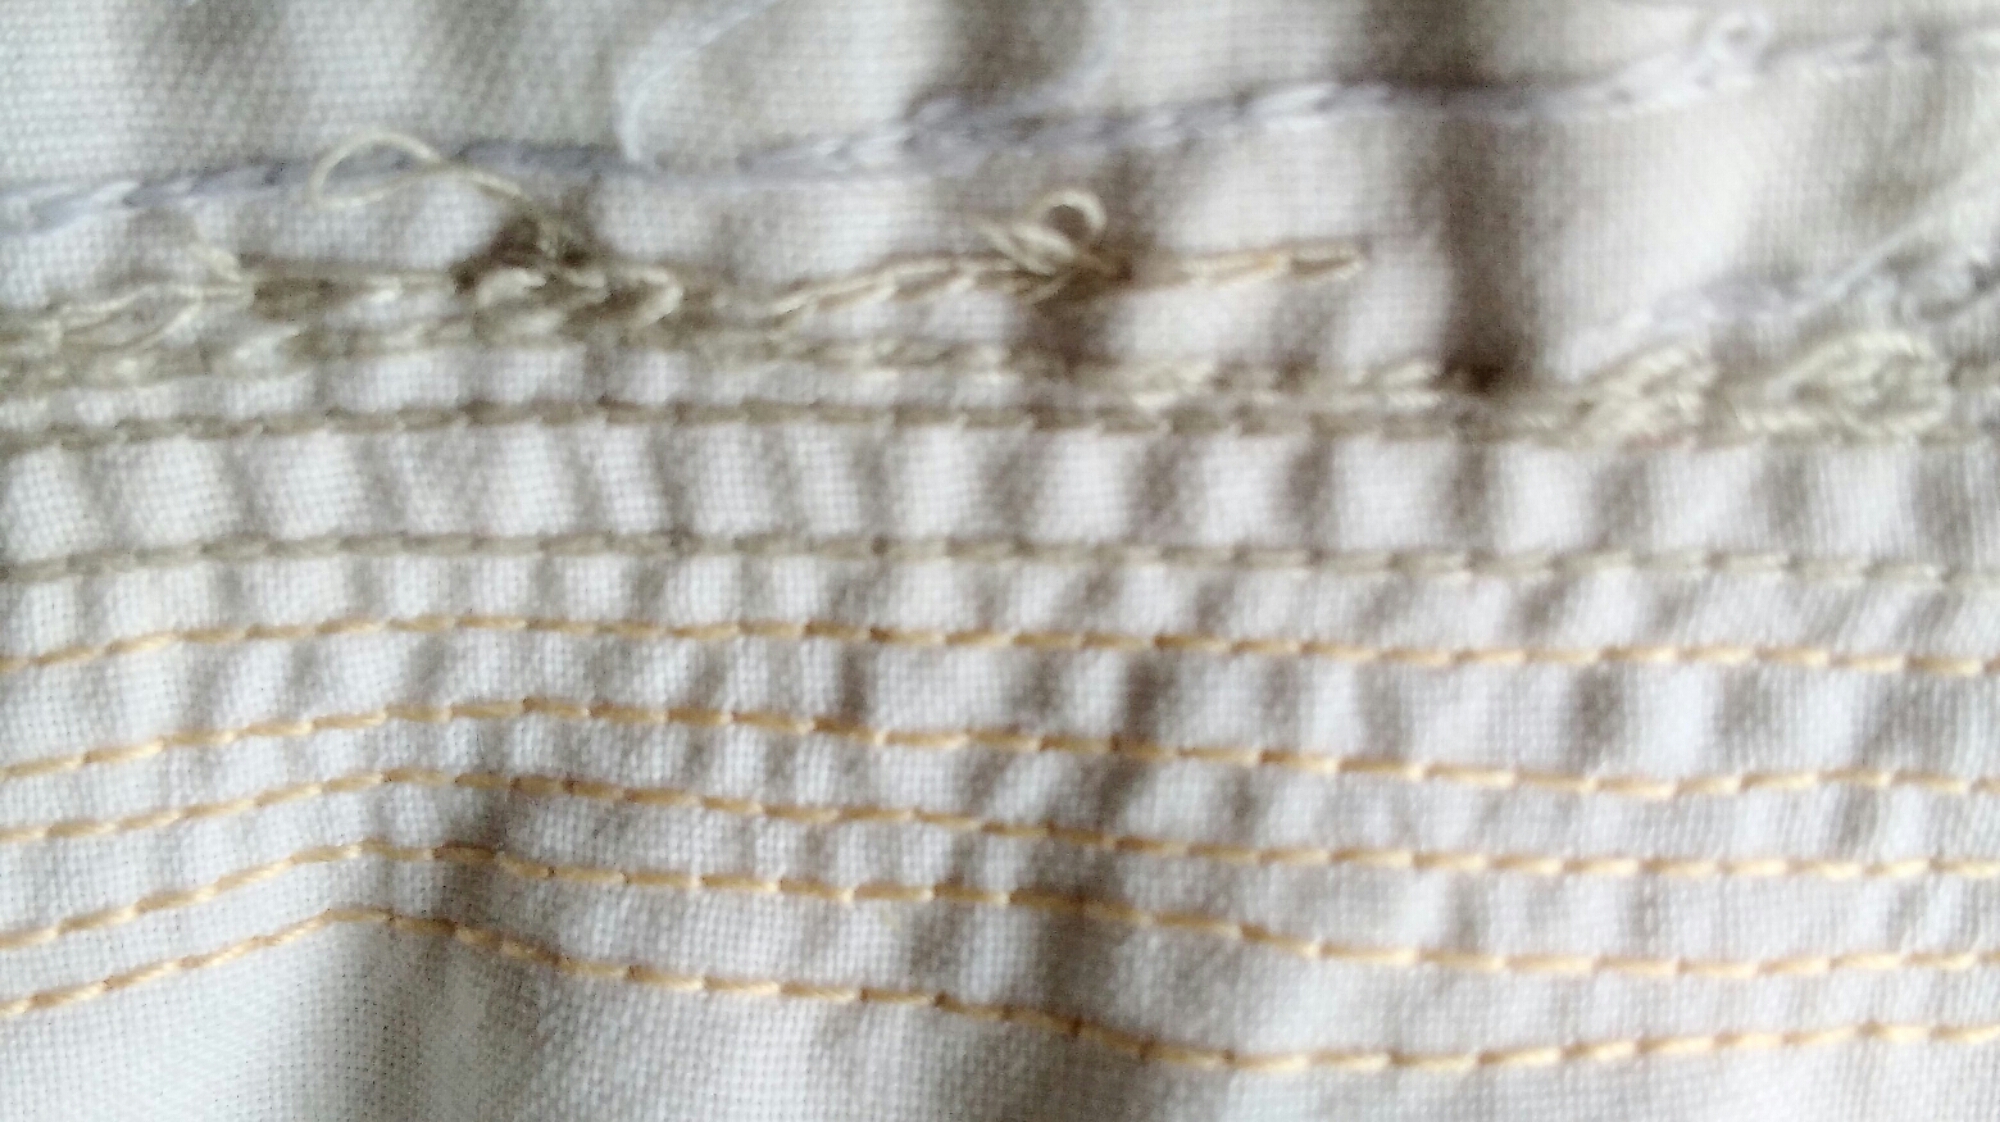

Here are some chain stitching samples, shown on both sides of the fabric. First, you see the very loose stitching when I was trying to use normal tension with a regular needle plate. Much too loose. I kept raising tension until it became almost impossible, and that’s when the stitches got formed but of course the fabric was gathered. Then I went away and made my new chain stitching needle plate and tried again, progressively lowering the tension. It went down to normal levels that I would use with regular lockstitch! Success!
Double needle double step stitch
That’s what I call it because I invented it!*
*Since the writing of this post, I learned that Necchi had already invented the same thing over 60 years ago. But I had never seen a Necchi machine at the time, didn’t know about side-facing double needle sewing from anywhere else, and so I honestly re-invented this for myself. But obviously someone else was using it too, or I would not have been able to find that special needle plate.
You know how side-facing machines cannot sew with a double needle because instead of two rows of stitches you’d get a singe row of two stitches on top of each other. Well, may be that’s not such a bad thing…
My New Home 580 “Blue” is such a side-facing facing machine, it’s a vertical oscillator.

The biggest difficulty with using a double needle sideways, is finding a suitable needle plate. But here a chanced upon one at Helen Howes’ shop that was exactly of the right size and had a large square needle hole that could take sideways double needles!! Wow, what a stroke of luck!

I’m using a 3mm wide double needle here, and it’s like the plate was made for it! Well, may be it was, who knows. 😮
I still had to find a foot that would extend far enough to the back so as not to collide with the back needle. A zipper foot would of course always work, but here I found a straight stitch foot that miraculously worked too.

I must note here that this foot is a bit strange – it is too thick, so it exerts too much pressure onto the material and I never use it. Except for my new double step stitch where extra pressure is required!
This turned out to be a very interesting stitch. Depending on the relation of the stitch length to the needle-to-needle distance, you get different effects.
On the top side, you always get a row of double stitches, as expected. But they are not always synchronised – it depends on the stitch length.

As you can see, depending on the tension, the bottom thread will or will not poke through. I think it rather should not.
On the underside, the thread must meander between the loops from the two needles. I think it’s best to let those loops show as little dots, that would also make the stitch stretchy.

When the stitch length is smaller than the width between the needles, the bottom thread must loop back onto itself. It looks a bit messy, but is beautifully stretchy and suitable for sewing jersey. A nice strong stitch with the double thread on top.
When the stitch length is larger than the width between the needles, the bottom thread also loops about, but to a lesser degree. The stitch is less stretchy, although still suitable for some types of knits. On the top, the stitches appear displaced with respect to one another.
When the stitch length is the same as the width between the needles, the bottom thread lies practically straight. This stitch can be sewn with a higher tension, making it tighter, but at the same time less stretchy.
I tried it on some jersey – it stretches! You need to find the right tension to balance the size of the loops on the underside with the amount of stretch that you need in the seam.
Time will tell how this stitch can be used, but I think either as a decorative top stitch and as a stretchy stitch for jersey, or may be both at once! With 2mm and 3mm wide needles I should have a lot of useful stitches. And for thin fabrics, fine needles with just 1.5mm distance could also be interesting, in particular when used with thin embroidery thread.
Ooh, the possibilities! 8-)

I am in awe of your ingenuity and tinkering! The modified needle plate for moving chain stitch to non-chainstitch-capable machines…I’ve seen people change out the hook but not the plate (it might have been mysewingmachineobsession but don’t quote me) from one Kenmore to another but not to another make entirely.
LikeLike
🙂 Thanks! I found that the needle plate was essential for being able to use non-lethal tension. 🙂 It still requires too much tension on thick fabrics, so I’m going to drill it through completely and solder on a wire on the bottom to replicate the Jaguar design (both of those F&R and Kenmore machines were made by Jaguar, Japan). As for using it on a different make, well, they are all based on Singer model 15 anyway, and the hook is identical in all non-chainstitch respects, so why wouldn’t it work. I have half a dozen of those hooks from god knows which machines, forward-facing or side-facing, and they are all identical except in their quality of manufacture. I keep an emergency supply in case I break a needle and scratch one, then I can just exchange it and postpone the polishing until later. 🙂
LikeLike
My 1954 vertical, side-facing osciilating hook BU Mira came with a special plate and foot expressly designed for in-line double-needle stitching and a section of its instruction book is devoted to various applications of it. Later iterations of the Mira, and the Supernovas which came later, also featured twin-hole thread guides and a two-thread tensioner. All of them, including the Mira, have double eyes at the last thread guide directly above the needle for two threads.
LikeLike
Thank you, Jane! At the time of writing I had never seen a Necchi machine, so didn’t know about it. I have since acquired a Supernova and was amazed to see “my” invention on it. 🙂 I have updated the post with this note.
LikeLike
I have a Necchi BU Mira with that needle plate. The machine came with that needle plate in and a double-needle. I had no idea what was going on with it. I am definitely going to experiment on knits! Awesome that you designed one!!!
LikeLike
I’ve been using this for top-stitching with two threads out of step and for double needle embroidery. Also, it makes a cross stitch if you set it to zig-zag! Since writing this I got myself a Necchi Supernova which has this feature – the manual proved invaluable! 😃
LikeLike