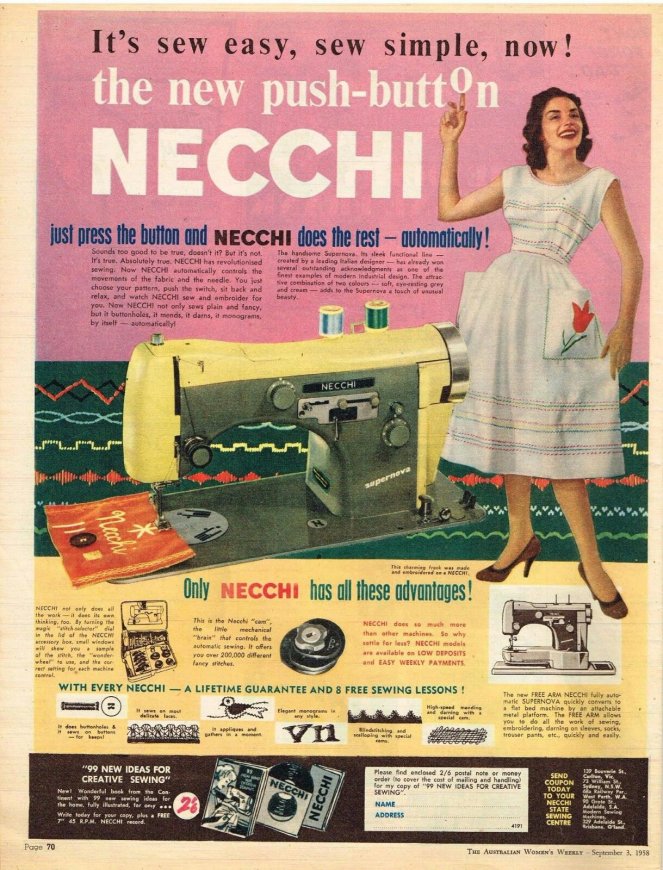
Necchi went Supernova in 1955 – there was a big bang but the world survived. 🙂
It says lifetime guarantee on that ad, I wonder if I can pop my Supernova to a local Necchi dealer for a free repair? The balance wheel clutch is still stuck.
Hello!
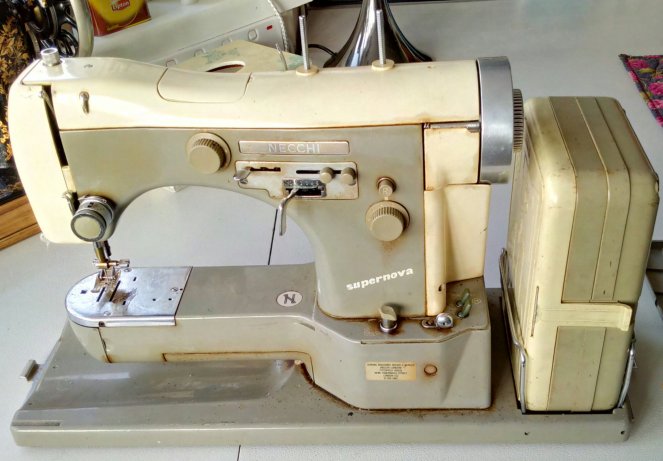
This is my Necchi Supernova Automatica C, Italy, 1955. This is the original first edition, as far as I can make out. It has complicated knobs and all steel gears. The motor was smoking and the exterior was in a bit of a state when it arrived.
The interior was also in a bit of a state with rust in places.
But the accessories box contained a full set of cams, and even some extras that the original owner had bought separately, plus a new buttonhole cam with lever bought in 1969 to replace the original chipped one, which is also present. A circular sewing attachment, a needle plate for a twin needle (set sideways! – they’ve gone forward in time by 60 years and copied my recent invention), a feed dog cover for embroidery (even though we can drop the feed dogs too), a manual and a project book, but no feet, which is ok except for the one special foot for the twin needle, but I was lucky enough to find it lurking in Helen Howes’ shop, where it is lurking no longer.
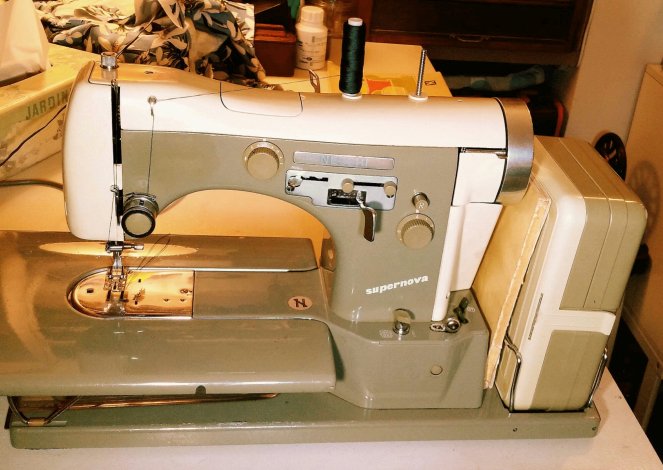
The Supernovas came in several variants: straight stitch only (BF), zig-zag (BU) and zig-zag with cams (Automatica). They could be delivered built into a cabinet, or with a stand-alone base, but Automatica also came as a free arm! And that’s what I’ve got. 🙂
Soon after the first edition, Necchi brought out an updated version – Supernova Ultra. As far as I can tell, the only difference is in slightly fancier knobs and a few gadgets…
So, here is my Supernova Automatica C – all cleaned up.
The machine was generally working as it came to me – the previous owner seems to have cared for it very well, up into late 1970s, but then… Owners don’t always age as gracefully as their machines, and this Supernova was spending increasingly much time in some dusty and humid environment – a garage, perhaps?
So, there were some problems. Fortunately, nothing serious, just requiring tuning and adjustment.
The “drunken sailor” problem
Firstly, she would not sew a straight stitch – it came out distinctly zig-zaggy! 😮 Turns out, there was rust and gunk (but mostly loose rust particles) clogging up the zig-zag assembly, which is quite complex on this machine. I was lucky to find a service manual for a similar model (downloaded free from freenecchisewingmachinefiles.weebly.com), and although my zig-zag mechanism was even more complex than that, it was a very good start! The cam module clips onto the zig-zag module, so you can unscrew it and move out of the way.
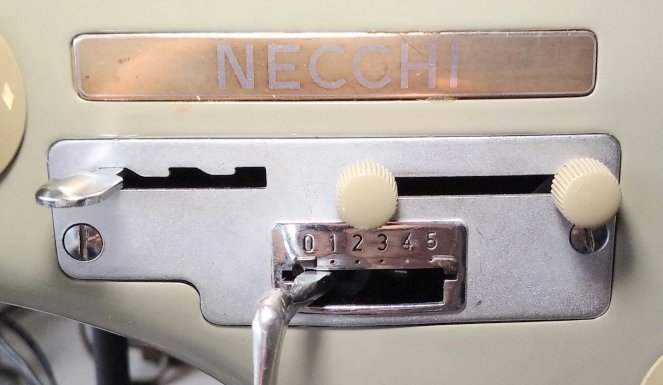
Also remove the frontal plate through which the needle position and zig-zag width levers are protruding. This gives access to the mechanism.
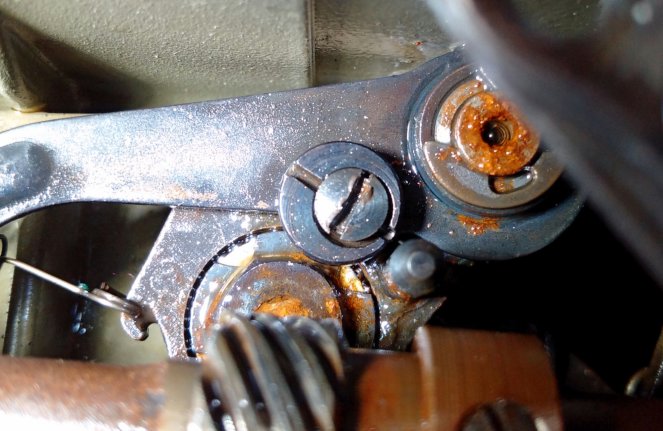
Move the zig-zag width lever all the way to the right to bring forward the regulators. It’s a three-tier construction and the groove in the middle tier is upside down! I would have never thought to oil there! And look at all the rust…
The really sensitive bit is the one with the ball bearings visible from the top.
But beware: it’s double layer ball bearings as is revealed in the manual. You can’t get to the lower level ones without disassembling everything which I didn’t want to do. So I resorted to drenching the top layer with oil and hoping it would seep through to the lower layer all by itself.
The little asymmetric screw cap in the above photo is a regulator of needle bar position. It rests against the little pole next to it. Set the needle position central and adjust it until the needle is exactly in the centre of the needle plate.
But it still wouldn’t stitch straight. 😦 Play around with the mechanism and observe that there is a sweet spot at a certain position of the zig-zag lever where indeed all lateral motion of the needle bar stops to get that elusive straight stitch. But that sweet spot is not in the left-most position of the lever! If you go too far left, you get zig-zag again.
The solution was so simple, it’s painful. Set the left zig-zag limiting knob exactly at zero. Oh!
But I want to be able to move that knob, and don’t want to fish for the sweet spot every time I go back to straight stitch. I’ll need to install a block on the back of the plate to prevent going too far left.
Putting everything back together and closing the lid, I realised that there is just one oiling hole in it – surely not enough for all those moving parts? But it’s enough if you’ve got a whole dispensing tray attached to it on the underside! 😀 I’ll make sure to keep that filled.
The “lazy dogs” problem
Then I tried some fancy stitches – they are so very fancy that I’ll be writing a separate post about them, although with infinite possibilities (according to the manual), it is bound to get pretty long. So bear with me. 🙂
Now then, the fancy stitches. The manual has some 150 examples, just to get you started 😉 so I tried a few. They came out very squashed, as if the machine wasn’t feeding properly. Back to plain straight stitch – definitely not feeding properly! The maximum setting gives a 2.5mm long stitch. 😦 It should be 4mm!
Such problems are usually caused by the build-up of lint around the feed dogs, so let’s see!
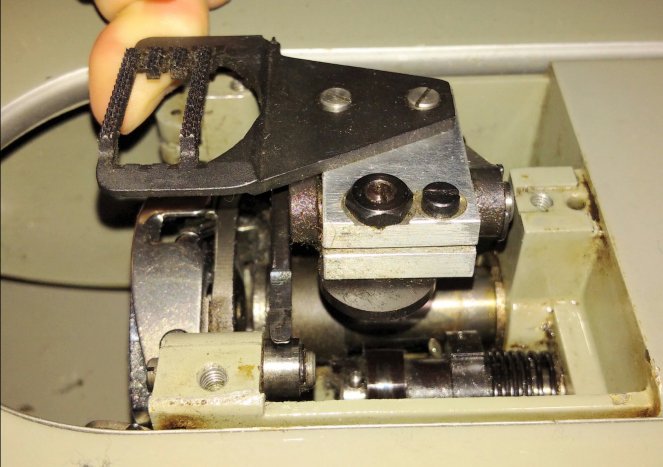
Remove the needle plate and simply lift the feed dogs out of the way! Wow! There’s a spring there, squashing up my finger.
Nope, no lint. Or anyhow, not enough to cause any trouble. Which means that I’ll need to raise the feed dogs. The service manual says they should come up above the needle plate “to the full height of the dogs”. And what does the “full height” mean, exactly? Is it just the shaped bit or does the base count as well? 😐 I think it may depend on your machine.
Anyhow, in my case they were just barely coming above the needle plate, so needed raising.
Looking at the feed dog assembly from the side, it’s the left disk-bolt-nut contraption that regulates the height. But be careful – it’s fragile.
I had to experiment with different height settings, testing them with straight stitch. Set too low, the machine doesn’t feed well and the maximum stitch length is too short. Set too high, the feed dogs bang into the needle plate – that’s obviously wrong. But then it can still be too high, even without banging – stitches get skipped, in particular at larger stitch lengths. Eventually I found a good setting which resulted in a 4mm maximum stitch length, exactly. Now, why didn’t I just measure those stitches before?
So then, back to fancy stitches. Ah yes, much better! Not squashed and almost like the photo in the manual, except that the reverse seems to be feeding too much now…
The “fancy reverse” problem
The upper mechanism of Necchi Supernova very much reminds me of Jaguar‘s which I have just been sorting out last week. Obviously, Necchi was first, by some 20 years. 🙂
Jaguar machines have variable stretch stitch, that is the amount of reverse motion in fancy stitch designs can be adjusted with a knob. Necchi doesn’t have such a knob, but it could have!
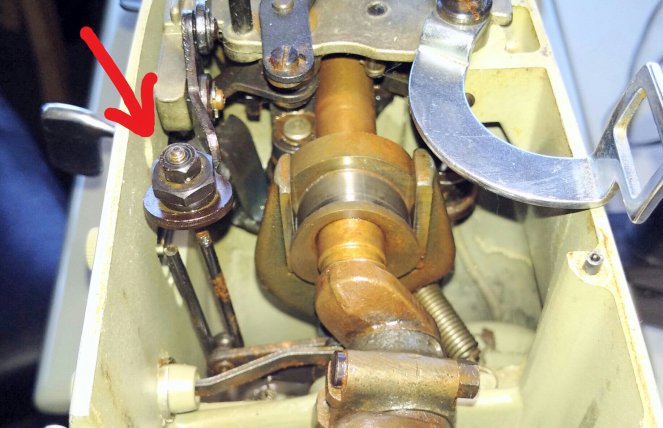
That double nut contraption bolts onto a sort of paperclip that hooks the reverse lever. Shortening the “paperclip” results in proportionally more reverse – just screw the nuts a bit further. But be careful – the “paperclip” is fragile! In particular on the threaded top end, mine is very rusty.
It would be quite easy to add variable stretch stitch to a Supernova. Just drill a hole in the top cover above that set of nuts and come up with some clever way to regulate the length of the “paperclip”… Well, may be in a Supernova E edition. 😉
But in this edition, I have to regulate the reverse once and it should work for all stitches. So I prepared several pattern cams for testing to make sure I get the same results as in the manual.
Supernova’s fancy bits
This machine has some remarkable features that don’t look important at first sight – you only realise how clever they are once you start using it.
My Supernova is a free arm model, so it comes with an extension table similar in design to many other machines. Usually such a table is a real pain though – you have to remove it to get to the bobbin. This is true for all those front-loading machines – it’s really awkward if you try to keep the table on, you can’t see a thing, stuff gets in the way, and fumbling with it by touch is difficult when you need to insert the bobbin case pushining forward.
But the Supernova is side-loading, so access to the bobbin is unobstructed under the table, and you insert the bobbin case by pushing it to the right – so much more convenient! In fact, you can do everything – including replacing the needle plate and cleaning the feed dogs – without removing the table.
She can drop her feed dogs, yet also comes with a cover plate for free hand embroidery. It clips onto the needle plate saving you the hassle of replacing it.
The foot is raised in two stages: first, raise nearly to full height but don’t release the thread tension; second, raise fully and release the thread tension. You can feel the lever clicking into the first stage so you could stop there if you wanted. What is it good for? For turning corners in awkward places without having your thread pulled out, or for turning corners when sewing with a double needle, as you cannot pivot on two needles as you would do on one.
And of course it’s got a free moving lever for zig-zag width that can be limited at either end independently. This is great for free hand zig-zag embroidery and monogramming.
And then there are the fancy stitches… No utility stitches though as we see with most other machines, no, the Supernova is an artist – there’s the buttonhole maker set, and the rest you can do manually with the zig-zag lever. But utility stitches on cams are so very useful, also for an artist… So belatedly, Necchi brought out some additional fixed cam triples to give you blind stitch, overcast and stitched zig-zag – you know, the boring stuff. 🙂 Of course, I’d rather have a bunch of extra cams to combine with all the existing fanciness, so I broke up the fixed triplets that the previous owner thoughtfully purchased, giving me five new cam designs and some duplicates of what already was in the set. But I’m leaving that for another post. 🙂
And last but not least: the Supernova has an on/off switch! Don’t laugh at me now – it is such a silly little thing, but most machines don’t have it, so the only way to ensure that your cat is not going to sew your dresses, is to unplug the machine. But plugs are tough to pull out and push in, and then those loose cables hang around the place entangling themselves into tight knots the moment you turn away (I’m sure that’s what’s happening). I would rather leave everything plugged in, with cables in a tidy, and just flick the switch to turn it on and off… So simple, yet so often denied to us…
And what’s that other switch? Oh, the motor speed can be halved for delicate work…
Could a girl ask for more?









 Buy me a coffee 🙂
Oh my goodness I just adore your vintage sewing machine collection! It seems like there isn’t a vintage sewing machine issue or challenge that you find daunting – you just open it up and take it on! You honor these old machines who could have ended up in a landfill!
LikeLiked by 1 person
Thank you, Tierney! 🙂 And you haven’t seen the best of Supernova yet – the embroidery. The project book suggests to embroider your leatherwear to match your dress – your gloves, your handbag, your shoes. SHOES?!!
LikeLiked by 1 person
Just wanted to add: I am pretty confident I can fix most mechanical issues, assuming I don’t have to replace parts which are no longer available (although I solved one such problem with a timing belt). Mechanical things may be complex and baffle me for a bit, but ultimately all you need to understand how it works, is right there in front of you. There are no electronic boxes doing mysterious things – which is why I stay away from electronically controlled machines.
I’m sure there will be a mechanical contraption that I won’t be able to understand or fix. But so far so good, and I even got a very large vintage Meccano set for my birthday this year – hubby dear making sure I have stuff to practice with. 🙂
And yes, I hate it when good things end up in a landfill!
LikeLiked by 3 people
I really enjoyed reading this. I always learn so much from your posts. I hear you on the bobbin issue. I truly despise fishing for it under the table. I’d love an on off switch. I sewed an oversized canvas cover so that when I unplug the pedal and cord fit under it on the sewing table. Have fun stitching up samples! I can’t wait to see them.
LikeLiked by 2 people
Thanks, Tony! 🙂 Yes I wonder why we don’t get on/off switches on sewing machines. 😐 I started on the samples. I’m trying to understand the logic of making up stitch patterns using available cams. There are 24 cams that can be combined in triples, where each position has a different function, so set 1-2-3 makes a different pattern from set 2-1-3, for example. Each cam also has four alignment options. That makes 884,736 possible stitch patterns. And then there are three continuous modifier knobs (scaling, stitch length, zig-zag width) and one discrete (needle position – left, centre, right). That makes too many designs to test! And most of them will be useless anyway, so I’m trying to come up with a more feasible approach. 🙂 Those modern computerised wonders that offer “a wide range of stitches” just make me laugh. 132 stitches? Ha!
LikeLiked by 3 people
That is laughable! I’m sure you’ll sort it all out and figure out how to do your samples.
LikeLike
Elena,
This is the post I’ve been looking forward to and it didn’t disappoint.
I take my hat off to you thinking of your own custom mods to the mechanicals!
I’ve seen a couple of your comments on the Necchi Yahoo Group. Have you got a copy of the Supernova Service Manual from the associated Necchi Sewing Circle file site ? I’m sure it’s better than the manual in you link, although I’m surprised how different the mechanicals are on yours from my Supernova Julia.
Regards,
Dan H
LikeLike
Thanks, Dan! I have not joined the Circle yet. I don’t normally use service manuals because I like to figure things out for myself – I enjoy the challenge. 🙂 But in this case I didn’t want to disassemble too much because a lot of parts got rust on them making them fragile. I just wanted to see an “exploding diagram” of the zig-zag assembly, and the older Nova/Mira service manual was close enough – very close on that point, actually. So I didn’t look any further.
I’ve heard that Julia was significantly different from the original Supernova. After all, there have been two versions in between: Ultra and Ultra II. I’ve also read in the files on the Necchi group that Julia takes different cams than its predecessors. Is that true? I seem to remember seeing the same kind of boxes with Julias as with the older Supernovas, so not sure what’s going on.
LikeLike
Elena,
I would come out in a cold sweat taking apart something as complicated as one of these Necchi’s without some instructions! I’m pretty sure the adjustment of the zig zag zero position is covered in the Supernova service manual by the way…..
Looking at the photo’s of your machine I think the rust is all purely cosmetic. I’d be putting rust remover everywhere if it were mine…..
Various types of cams are shown in the photos/albums part of the NecchiSewingmachineclub Yahoo group. You have to scroll around a lot. I may be wrong but I think the Supernova cams are interchangeable regardless of model. Other Necchi “series” models certainly have different cam designs.
My understanding is the mechanics of the Julia are very similar to the other Supernova’s apart from the automatic mechanism, which is more complicated on the Julia. I haven’t been brave enough to disassemble or remove the automatic mechanism on mine even with the manual!
The free-arm models do seem to be bit different though – in the way the feed works for one thing. There’s not much service documentation I’ve found on them..
Regards
Dan H
LikeLike
Dan, if the zig-zag adjustment is covered in the right service manual, then this is exactly the reason why I do NOT want to consult it. I don’t repair machines for a living where the result is the most important thing. I don’t even repair them for other people, I do it exclusively because I enjoy solving mechanical puzzles. Of course, the puzzle is only solved when the machine is working perfectly. 🙂 So I am not afraid to spoil or break things, although I do take proper precautions – I don’t want to ruin things by brute force either.
Regarding rust, yes it does look just surface rust here. But those parts are thin, so if too much of the surface has corroded away, and in particular if that corroded layer has been removed, the part may just snap – too thin. I know you’ll tell me that the sitting rust is not helping to reinforce a thin part, but actually it does – it provides cushioning. I have obtained experimental evidence to support this quite a few times, and my uncle the car mechanic says the same thing. 🙂 So I only remove LOOSE rust particles if they clog things up, except of course in cases where the whole thing rusted together – there rust works like glue and needs removing.
I know my approach is not “proper textbook” but it works for me, and that’s all I need to worry about. This is the joy of tinkering, not professional repair. 🙂 And equally, I’m not afraid to modify my machines either. I still haven’t finished my conversion of Vesta transverse shuttle to triple needles because life got in the way and Vesta has to wait, but I already have a Singer 48K cylindrical transverse shuttle queuing to undergo the same transformation. The Vesta was always meant as a prototype, but the Singer will be the real deal for me to use. Mind you, Vesta is coming on beautifully too, so will be a perfectly working machine for someone else to use.
Anyway, the variable reverse motion knob on Supernova E will have to wait until Vesta is finished – trying to avoid having too many projects on the go here. 🙂
LikeLike
Yes, free arm machines always have something different in the bottom part because of space constraints. Sometimes it requires changes to the upper mechanism too.
LikeLike
I agree rust remover on thin, stressed parts like springs is a bad idea – keeping the parts coated in oil would then be my choice.
We obviously have different approaches to repairs and adjustments – my technique is to try and get as much information in advance of starting as I can, to get to the solution quickly and with the minimum of cursing and swearing when I can’t work out what the heck is going on. You seem to enjoy that bit!
LikeLiked by 2 people
That’s it – you nailed it! 😀
LikeLike
Reading a manual before attempting a repair is like looking up the crossword answers before tackling the puzzle – where is the fun in that? 🙂 But your method is of course much wiser if it’s the result you’re after rather than the process of getting to it.
LikeLike
Hi Elena!
Thanks so very much for visiting my blog! Like you, I like tinkering with these old machines and saving them from the landfill. You have a wealth of information here and I am glad I found you! I have a suggestion for your machines that lack the on and off switch.I put things like that on a heavy duty power cord with an outlet box with a switch. Then I can use that switch to control the machine. I usually put the switch on the floor close enough to reach with my foot and I have “one toe” control…Best wishes on your excellent hobby!
LikeLike
Thanks, Toni! Yes, I have them all plugged into an individually switched plug bank (plug list). There’s a switch next to each socket. 🙂 But I only have to do it because they don’t have on/off switches on them!
LikeLike
I have the Supernova Mark II freearm! pretty much like you machine. So rare to find them in the wild. Unfortunately mine does not have the embroidery plate or the extension table 😦
I have an embroidery example book if you want to see it, as in cloth with pretty embroidery in a booklet.
LikeLike
Thank you, Flavia, but I think I have the same booklet – they call it “The Project Book”. I haven’t tried any of the more involved embroideries from it yet though.
LikeLike
Please, which three cams, in what order, make up the overcasting stack? Thanks so much for sharing your work. I really appreciate it.
LikeLike
Hi Jane, the Supernova doesn’t do utility stitches, I’m afraid. 😦 Although a few utility cams were made later, they are fixed cam stacks – stitched zig-zag and blind stitch of sorts – and they are not very good. The only overcasting that the Supernova can do, is plain zig-zag – without any cams.
LikeLike
Yes, I understand that; what I am asking about are those later utility cams. What numbers are they?
LikeLike
There isn’t one for the overcasting stitch, sorry. Or at least I’ve never seen one. I’ve only seen stitched zig-zag and blind stitch – both without the reverse motion.
LikeLike
The Supernova cannot make a looped overcasting stitch like other machines do because the Supernova has a very different way of making fancy stitches. It does not synchronise needle and feed motion on a stitch-by-stitch basis, but rather it superimposes a general pattern of feed motion onto a general pattern of needle motion. None of the cams are stitch-by-stitch, which is why those later utility cams are so inferior.
LikeLike
According to my manual, the overlock stitch is just to zig-zag on raw edges.
LikeLike
It’s more than simple zigzag; it also includes forward/reverse to loop the stitches over the edge, used with a special foot to extend the loops.
LikeLiked by 1 person
Hello Elena,
I really enjoyed your article on the Necchi Supernova; this sewing machine has been in my family for over 40 years. My mother loved to sew and was very good at it. I remember in the 80’she made us ‘bermuda shorts’ as kids when this style first arrived. I also remember my mother and I tried to make a pair of sweat pants and jump suit for the family dog during the cold winter, but didn’t account for how skinny our dog was and the pants simply fell off!
I’ve since inherited this machine and have kept it in my garage wrapped up for many years now. The time has come for me to make a hard decision to let this go. Can you suggest some options I may have to find a new home/owner for my mother’s vintage sewing machine?
LikeLike
Hello Roland, the options really depend on the country you are in, as well as on your preferences. Here in the UK I use eBay, but other people prefer local classified ads, for example. Sorry I cannot be more specific.
LikeLike
Hello Elena, I have been Googling and can’t find the answer – do you know how many cams the Necchi Supernova Ultra Mark 2 is supposed to come with? I have seen an ad for one. It’s such a nice PINK with a circular needle plate I am very interested in it! LOL Is there anything I should watch out for with this machine if I do get one someday?
LikeLike
Hello Linda, the cams come in their own accessories box, so just make sure that every slot is filled. I don’t know how many that model has. Beware that it has plastic gears in most places, so make sure they are in reasonable condition as spares are not to be found. This is one of the reasons I stick to the original model – no plastic gears.
LikeLiked by 1 person
Thanks for the info! The fellow was advertising it as an “all metal” machine!
LikeLike
Well, it could be either way. I’ve never had one myself, so my information is second-hand and could be wrong. But I have also seen all too many machines on eBay advertised as “all metal” but in fact having plastic gears. It’s all metal except for a few bits! 😉 Perhaps you could ask him for some photos of the mechanism to get an idea.
LikeLiked by 1 person
Good idea! Then I’ll see what the real deal is! Thank you!
LikeLike
Hi, If your Supernova’s balance wheel is still stuck, here’s what works for my old SM “finds”: I use my hair dryer and tap gently around the wheel with my largest French wooden spoon and a rubber mallet. Warm the balance wheel and tap, warm it again, working around the wheel a little at a time. That gentle tapping and warming has released 4 badly stuck Supernovas and other vintage SMs without causing any damage. Before you do that, let it sit overnight “bathed” in Tri-Flow. For gear grease, I use grade commercial mixer grease. Your Supernova’s close tolerances will “thank” you for using Tri-Flow instead of regular SM oil! 🙂
LikeLike
Thank you, Mary – I use similar techniques. It is long fixed. 🙂 We don’t get Tri-Flow here, but I use other oils with success. Not sure what you mean by “regular SM oil” – we don’t get that either. I usually buy light running industrial SM oil, and that is indeed light running. I use Liquid Bearings oil for gears – so much better than any grease, including commercial. It all depends on what you can get locally.
LikeLike
Dear Elena, I really enjoy reading your review of the Supernova and all other reviews about the vintage Singers too. Many thanks for sharing your experience. I’ve recently come across the Husqvarna CL 21A, I was wondering what you think of them and how they compare to the Necchi Supernova. I’m looking for a good machines with decorative stitch and the ability to do slow speed of these machine really appeals to me. Your advice is much appreciated! Many thanks. Ann
LikeLike
Thank you, Ann! Unfortunately I’ve never had a Husqvarna CL 21A or a similar Husqvarna model, so I have no opinion of them.
LikeLike
Dear Elena, I found a link with a photo here, there are several versions of this machine in case you want to have a look, and also some history too 🙂
https://www.fiddlebase.com/swedish-machines/sewing-machines/
https://www.fiddlebase.com/swedish-machines/
LikeLike
Thanks, Ann, I know of them, I just never had one myself, that’s all.
LikeLike
Hi Elena, I`v just purchased a Supernova BU covered in yellow grime, what product do you recommend to clean it safely?
LikeLike
Hi Patricio, that depends entirely on what that grime is and what kind of varnish you have on the machine. Avoid alcohol or white spirit if you want to be on the safe side because some varnishes are dissolved with that. If unsure, I usually just start with soap – something like a concentrated floor cleaning liquid. A little of that undiluted on a sponge and give it a try on a corner, see how the varnish reacts. Wipe off with a slightly damp cloth. Do not rub on the decals as rubbing will likely take them off. Use a lot of elbow grease! 😉 Good luck!
LikeLike
Thanks for the post.Really looking forward to read more. Keep writing.
LikeLike