Skip to the updates:
- A project begins
- Vesta is here!
- Conversion to modern needles, single and twin
- The offset foot
- Intermission
- The stitiching test
- Additional tension units
- The final stitiching test
- The verdict
A project begins
17 August 2017
Cover stitch is an extension of two-thread chain stitch where the top thread lies flat like in a lockstitch, but the bottom thread is looped around it with a special looper akin overlocker loopers. Such chain stitch does not stretch due to the tension in the upper thread.
Cover stitch is made in the same way, but instead of a single needle, we use two or three needles, making parallel stitches on the top and one looped stitch on the bottom.

This allows to lower top thread tensions, so that the cover stitch stretches.
It’s a good stitch, were it not for the bulky looping on the underside.

The alternative is of course double needle sewing with a regular lockstitch machine, so you get zig-zag on the bottom. Unfortunately, round bobbin machines cannot do it with low tension, so the stich does not stretch (and in many cases it even pulls up producing a raised tuck).
My go-to mechanism for low tension sewing is vibrating shuttle. However, it uses a side-facing needle, so it cannot possibly be used for making those parallel lines – you need forward-facing needles for that.

Ok, may be not quite so many threads. 🙂

But you get the idea.
The predecessor of the vibrating shuttle mechanism was the transverse shuttle where the shuttle moved in a straight line from left to right (and back), serving a forward-facing needle.

Transverse shuttle machines are abundant in the UK, in particular Singer model 12 and machines based on it. The mechanism below decks is sound and works well, but above decks is a different story. Oh, it all functions, but is not very handy, in my opinion.

For starters, these machines use 12×1 needles which are no longer being produced, and there is no modern equivalent. The needle bar is square rather than round as in later models, so cannot be just swapped out. The foot lifter lever is a bit awkward and the upper tension control even more so. All the things that got improved in later models…
Which is what Singer did with model 48K introduced in 1900. But for some reason they didn’t pursue their improved TS and after 12 years this model was discontinued.
But German manufacturers kept producing and improving transverse shuttle machines well into 1930s while everyone else had long switched to round bobbin machines. So why did the Germans persist? Because TS machines make such an excellent stitch! 🙂

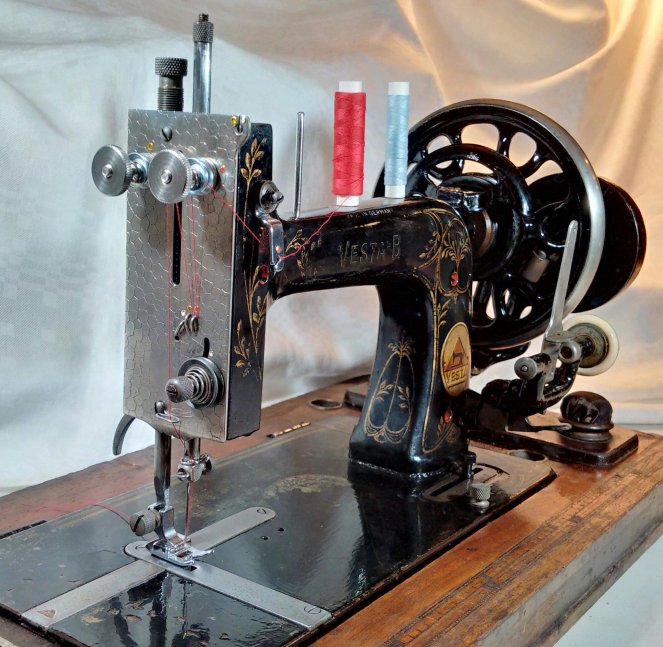
This is Vesta B by L.O. Dietrich, I just rescued her. I’ve been told it’s not working! Just an ornament! Ok, ok, I can see the rust. 🙂
This is quite an early model because it has a “high arm” body type – that was later changed to the same rounded shape as in vibrating shuttle machines. But the tension control and the foot lever are already modernised here, and the needle bar is round, not square, so I hope this machine already takes 15×1 needles. If I’m lucky, the shuttle will have been improved as well, but I don’t even know if this girl has got one. We’ll see. In the worst case, even an old Singer 12 shuttle should work, so I’m not particularly worried.
Looks like I got myself another tinker project there! 🙂
Vesta is here!
26 August 2017
Vesta arrived yesterday. She is rusty, as advertised. She was stiff and not moving, but 3-in-1 oil got her to stitch in under half an hour. She’s complete! There’s a shuttle and four bobbins, also some feet.

The shuttle is similar to Singer 12 – still an open “boat” type, but the tension is regulated by a spring, not by wrapping thread around a pin. 🙂

The underbelly is reasonably rust-free, and the shuttle is in pristine condition! The rest will need some rust eater!
This machine does not take standard 15×1 needles, it takes Singer 12×1 or 13×1 needles, now extinct. 😦 But not to worry, I’ll do something to the needle bar – I’ve got a drill. 😉
I rather like this “high arm” body type. It is 3/4 size, exactly like the vibrating shuttle, but it is a lot lighter because it’s thinner. This machine is truly portable! Here you can see how thin the walls are (and how rusty the gears!):

Now for the tricky bit: the feed dogs. This is not something that can be moved or replaced! It is actually a large part with a bar coming down all across the front (please excuse the rust eater gel).

There is a needle channel in the body, as expected.

The needle comes quite close to the feed dogs, there is no space on the left at all. So, I think the way to go is to the right. 🙂 Since I’ll have to modify the needle clamp anyway to convert to 15×1 needles (needle length is similar), I’ll extend the needle channel and the hole in the needle plate to the right. The shuttle runs much further still, so it should work.
Initially I was going to get the machine to sew with one needle first, as it was intended. But since I cannot get 12×1 needles any longer, I’m going to work on the conversion to multiple needles straight away. Then I’ll try it with one needle first. 🙂
I was thinking of simply replacing the needle bar, but although it is of the right diameter, it has a longitudinal cut for the take-up lever, and it drives that lever. Newer machines have a different – more complex – lever drive.

So I think I’ll do something for the needle clamp. Thinking cap on!
Conversion to modern needles
28 August 2017
The first thing to do is then to convert Vesta to modern 15×1 needles. Bring out the drill!

This is a little dremel set, a simple hobby/DIY thing for budding tinkerers like yours truly. 🙂 But look at all those attachments! May be one day I’ll use more than two…
My plan is to grind down the needle bar to widen and deepen the needle channel. The needle length of 15×1 needles is almost the same as of 12×1, so I’ll be able to slightly raise or lower the needle bar for the correct fit. This means I don’t need to worry so much about the height of the needle channel, only about its width, depth, straightness, verticality and bumplessness. Piece of cake! :-s

I’m starting with the little ball grinder, it’s about the right diameter for the new needle. The 12×1 needle is round, so symmetrical, but 15×1 has a flat side that should face to the back, so the groove needs to be displaced to the front to compensate.

Furthermore, since I want to use a symmetrical twin needle here, the actual needle position has to be displaced to the right. I would now need to do four things in conjunction with each other to make it work: 1) make the groove in the needle bar minding its depth; 2) widen the needle channel in the base; 3) make the needle clamp work properly with this channel (solder a little tin on the inside so it would grip); 4) drill the needle plate to make the hole elongated like on zig-zag machines.
Since the maximum width of the needle channel is limited, I start there and make it as wide as possible.

Here we go! I took off the feed dog for convenience. It took a while grinding this down, but here it is:

A 5mm wide channel that takes a 4mm wide twin needle. 🙂 Ok, this photo is a bit of a fudge because the needle bar is not fully sorted out at this point yet. You can see how the needle is a little off-centre. But the channel is good and I can drill out the needle plate to match.
Admittedly, I did not manage to produce a perfect groove in the needle bar from the first go. I had to tin it over and start again. Also, I realised that it had to extend into that hole, otherwise the needle could not be clamped properly. That meant that the needle bar would need to be lowered, and I had to check just how far it would go, and then I had to tin over that hole and drill out exactly the right amount…

Now I had to lower the needle bar so that the shuttle would cross the needle about 1mm above the eye. It was quite a big difference – the needle bar had to be lowered by 3mm!
This needle bar is hollow and takes a rod that has a thumb nut at the top to help secure the rod (I think that’s what it’s for). This rod pushes down on the take-up lever making sure it dips far enough on the down stroke. So now that I lowered the needle bar, I had to raise this “dipping rod” to keep the take-up lever well-behaved.

Lowering the needle bar so much does mean that the needle clamp comes quite close to the foot at its lowest point.

But it worked out in the end, also for the twin needle that is limited by the plastic block both in how far up and down it can go. It’s tight but it works!
It does not interfere with sewing, but you can’t lift the foot fully when the needle is at its lowest point. I don’t see another way of balancing this, I think it simply comes from the fact that this machine was designed for different needles.
And then there was the needle clamp. It’s perfectly circular, like all such needle clamps. The curvature of the needle bar however is designed such that with the needle placed in the groove, the clamp would press on it firmly when it is being pulled to the right by the tightening screw. So the needle needs to poke out of the groove by exactly the right amount for this to work. Since my groove is deeper usual, the clamp doesn’t grip. So, I’m soldering a little tin to the inside of the clamp.
And look at that widened hole in the needle plate! I made it as wide as I dared without cutting through the edges. That little grinder is a great tool! 🙂 So now everything is in place, and it fits!

The offset foot
Since I opted for the use of pre-fabricated twin needles, my single needle position had to shift to the right, so I can no longer use the original straight stitch foot that came with the machine:

That cleaned up well, didn’t it? 🙂 The nickel coating got completely eaten up by the rust, so we’ve got plain steel here, as far as I can tell. This is Vesta the Warrior Princess, with her bare steel and upgraded features. 🙂
But back to the foot. Besides having an offset centre, it also appears that the presser bar has a non-standard fitting – it is too wide. So generic low shank feet cannot be mounted properly – see how the foot doesn’t get pushed all the way onto the shank. This makes the offset even worse!

This standard zig-zag foot should have worked with the single needle, but it doesn’t because it sits too far left on the shank.
The only feet that work here, are the adjustable ones, like this one:

Great fit with that 4mm twin needle! 😀 The foot can be moved left-right on its back rail, so it always fits.
But of course I wanted to use all the normal feet as well, so out comes my grinder again to file down that presser bar at the foot mount and ensure proper fit for standard low shank feet.

Ah, that’s better! 🙂 Note that wider feet are better for this machine because they cover all of the feed dogs.
With the foot on, I could do the all important sewing test. It worked! She stitches!! She even does reverse*! By accident, design or a lucky coincidence, when you set stitch length to minimum, she goes in reverse, with small stitches. Perfect for backtucks! 🙂
*The mystery of reverse was later solved – the feed dogs had been set too low, and reverse was an intermittent side effect. No, she doesn’t do reverse.
I also noticed that in this mechanism, when the needle is down and the shuttle is picking up the loop, the needle remains stationary for the time it takes the shuttle to cross my 5mm wide needle channel. The needle only starts going up after the loop has been picked up! May be this is the secret of the superior stitching of transverse shuttle machines. But anyhow, it is perfect for using with a twin needle! 😀
Intermission
28 January 2018
Five months have passed… After my last entry, I continued with the installation of two additional thread tensioners, more precisely with drilling holes in the face plate for them. Then the battery in my drill died. And the charger turned out to be in the car parked three streets away because that’s where it broke down some time ago. While waiting to be towed to the garage for repairs, it got broken into, so a huge trunk with my husband’s tools got stolen (less costly tools but lots of them!). Hubby depressed. 😦 No charger for the drill. 😦 No car. 😦
But by now most things got sorted, and I even found the charger in the back of the wardrobe safely at home! It was there all this time!
In the meantime I also got myself a Singer 48K which has all those other improvements that my Vesta-B doesn’t have. So Vesta is going to be a working prototype, and then when I’m happy with it in all respects, I’ll do it all over again on the Singer.
So, back to Vesta. 🙂
The stitching test
Now that the single needle set-up can be used, I decided to do some serious stitching to see if there were any problems lurking beneath the rust. After all, the machine was in a very poor state when I started!
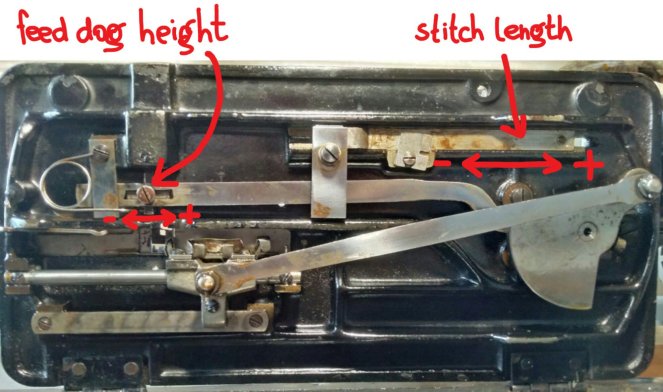
She was stitching, not skipping anything, so the timing was good. She could adjust stitch length from zero to about 2mm, but it should be 3mm to 3.5mm on this machine. Her tension, both on the upper and lower thread, could be adjusted from high to crazy high. Her automatic tension release mechanism was supposed to engage when the foot went up and disengage when the foot went down – it did that, sometimes. Hmmm… This would need some work!
The stitch length depends on the feed dog height, and these were set too low. The correct height is so that the feed dogs are completely submerged when the needle is down, but not too far submerged – they should just be under the surface. Fixed. The maximum stitch length is now 3mm.
The lower tension is regulated by the shuttle. Here we had the usual problems of dirt and disformed springs (this shuttle has two). Yet the lowest tension remained rather high – something else must be going on, and the only remaining thing was the bobbin.
Boat shuttles are very fuffy about their bobbins – they have to fit exactly, and there are many slightly different shuttles out there with similarly slightly different bobbins that still only fit into their own shuttle properly. Vesta came with three rusty bobbins in the drawer and one good looking one in the shuttle. I assumed they were all good to use. Wrong.

The rusty bobbins from the drawer were the actual Vesta bobbins – notice the little pointy pips. The nice bobbin inside the shuttle had longer and thicker pips, and they pressed on the holder too hard, so the bobbin was not spinning freely. And this gave the extra tension to the thread.
The upper tension is regulated by the usual tension unit – you turn the thumb nut to push the spring along the groove in the screw so that it increases or decreases the pressure onto the tesion disc. But in this case the groove in the screw was clogged, so the spring could not move freely. Clean that up – problem sorted.

The tension release mechanism here was, well, not very well designed. It’s a curved lever attached to the back of the face plate and resting on the presser bar lifter. When the foot is up, the lifter pushes up its end of the lever, so that the other end inserts itself between the tension discs releasing thread tension. Then when the foot goes down, the far end of the lever is free to move down as well, using the force of gravity alone. This doesn’t always happen, no matter how well I lubricate the pivot screw. They should have put a spring there or something. What actually happens, is that the lever remains stuck between the tension discs so that you end up sewing without upper tension at all – big mess. And in fact that lever is not even releasing tension on foot up consistently. It is not big enough, it does not always manage to lift the tension disc. So all in all, it gives more grief than benefit, and I decided to just remove it.
Additional tension units
With basic sewing sorted, I could look at adding two additional tension units – I wanted dedicated tension conrols for each thread, and was going for 1, 2 or 3 upper threads.

Yes, something like that. 🙂
I’ve tried a few different parts here, so the final version has smaller tension discs, but otherwise it’s the same. Here is what a tension unit is made of:

- Drill a 6mm hole in the face plate, countersink it if possible.
- A countersink screw M5 25mm long.
- A thin nut M5 with a 8.5mm flattened crimp ring put around it to give a solid base for the tension discs.
- Two screw caps size 8 (5.5mm inner diameter) to act as tension discs.
- A finished spring 9mm inner diameter, 10mm long, 1mm wire diameter.
- A thumb nut M5.
Note that the hole is a little bigger than the screw – it is just a small difference that allows to sink the screw into the plate a bit, yet not allow it to wobble. You can’t use a regular pan head screw because the head protrudes too far out into the cavity and interferes with the pressure adjuster on the presser bar. Also watch out where you place the tension units – there isn’t much room inside.
I started out with real tension discs and “beehive” springs but those discs had a much larger inner diameter and they kept wobbling about the screw, so then I tried screw caps and they come in many sizes and make brilliant tension discs. 😀 And you can also get short strong springs with the right diameter to work with the screw cups.
I added guides above the original tension unit so that all three threads could be lead into the take-up lever from the same side in order to prevent them entangling. However, I’ve done some sewing tests, and it appears that it works just fine also without the guides.
Here are the thread paths. When using a single needle, any path can be used.

Left thread path – white – the original path: unchanged, apart from a couple of extra guides: spool -> eye -> down to the tension unit -> up through the left guide into the take-up lever from the right -> down to the big guide on the bottom of the face plate -> down to the guide on the needle clamp -> down and through the needle eye (left needle).
Middle thread path – red: spool -> front guide -> top right tension unit -> down through the right guide from right to left -> up into the take-up lever from the right -> down to the big guide on the bottom of the face plate -> down to the middle guide on the needle clamp -> down and through the needle eye (middle needle).
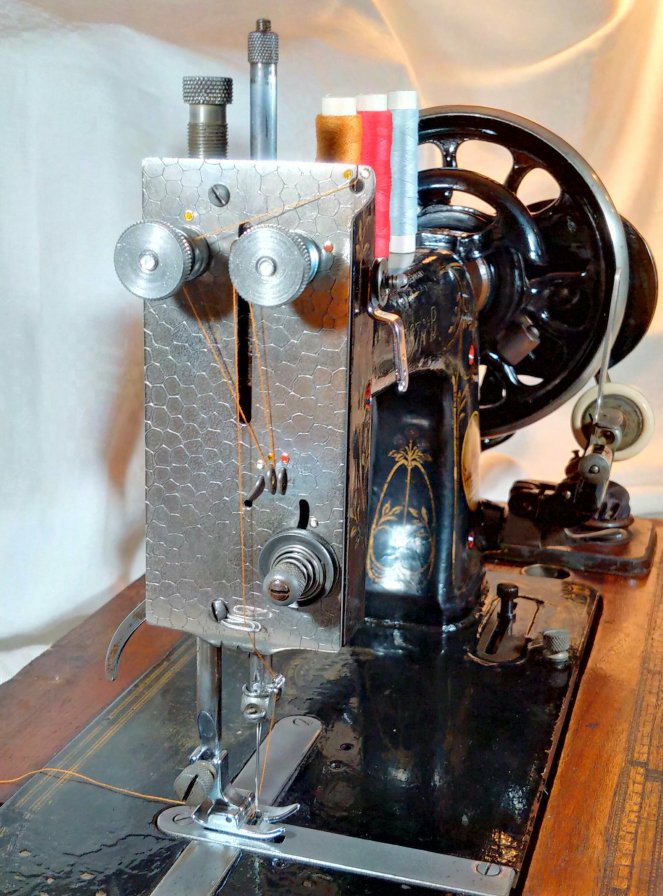
Right thread path – yellow: spool -> eye -> top left tension unit -> down through the middle guide from left to right -> up into the take-up lever from the right -> down to the big guide on the bottom of the face plate -> down to the right guide on the needle clamp -> down and through the needle eye (right needle).
The final stitching test
I have been stitching away on my little Vesta. I started by stitching with single needle using the other tensioners. It works! With or without the additional guides. I think I might choose a lighter spring for it next time, though, to make it easier to regulate tension.
Then I moved onto a twin needle. It works too, no problem. But the bottom tension is still too high, and all you get here is the same raised tuck as you get with any other sewing machine with a twin needle. Not the effect I was after. 😦
Triple needle also works, but again, lower tension is a problem.
Lower tension remains a problem also with a single needle, so you get a perfectly good stitch on most fabrics but not on the finary – the tension pulls the fabric together. That is, you can work anything from cotton poplin and up, but not chiffon, and I would not use it on lawn either – it’s not awful but also not brilliant, similar to an average mid-range domestic machine, old or new. But now that I’m so spoilt by the perfect stitch of my vibrating shuttle machines, I am not keen on this Vesta.
And the reason for the tension problems is the shuttle. No matter how well I clean, adjust and condition it, the thread takes a long and winding path, and that alone introduces tension – the lowest tension that this shuttle can deliver, and it is too high for delicate fabrics or jersey.

The verdict
My little Vesta cannot deliver coverstitch for jersey fabrics, and it cannot sew fine fabrics to my standard. 😦
However, she certainly can sew with 1, 2 or 3 needles to the standard of any “ordinary” domestic machine. She is just not top-notch.
This means that my proof of principle has succeeded. 🙂 I converted a single-needle transverse shuttle machine to multiple needles and it worked.
I am not that convinced about additional tension units though. Yes, overlockers have them and those fancy multi-needle industrial machines have them, but domestic machines just add a separator disc to their single tension unit, and mostly get away with it. When I needed different tensions on the two threads previously, I used a pre-tensioner – a small and light tension unit meant for bobbin winding located very conveniently along the way. 🙂

I also found that building a tension unit from scratch is really difficult. So many things to consider! And even with my final design, I would probably be fine-tuning it over time – changing the spring, trying different tension discs, polishing out the threading on the screw just where the sewing thread wraps around it to get a smoother surface, etc., etc. I have a whole new level of respect for tension units now!! 😮
So I think in my next design I’ll forgo the extra tensioners but will install some little nifty pre-tensioners instead.
But will there be another design? And what about Vesta?
Yes, there will be another design, another attempt at a transverse shuttle coverstitch – a 2 or 3 needle stitch with straight stitch lines on the top, zig-zags on the bottom, lying completely flat and folding top threads into the fabric so that they show as little dots on reverse – and this will make it stretch and be suitable for jersey. That last bit is what makes it different from your garden variety twin needle sewing which cannot deliver sufficiently low tensions. Just like my Vesta. Ah.
My next attempt will be with Singer 48K – a transverse shuttle machine with the personality of a vibrating shuttle. It takes modern 15×1 needles, so no messing about with the needle groove, and it has a straight version of the bullet shuttle found in vibrating shuttle machines – with the same fantastic ability to deliver very low tension, and using the same VS bobbins, so again no messing about with ever so slightly different pips that ruin the show.
The Singer 48K is now clean, varnished, motorised and ready to sew. But before I start on any modifications, I shall do some serious sewing with it. I need to experience the transverse shuttle, to get the feel for the mechanism, to learn how it behaves in practice, find its strong and weak points, get to know it in everyday life – and then we’ll see.
As for Vesta, well, she won’t end up on a rubbish pile. 🙂 In the very least, the machine works. And I don’t need to decide her fate right now, do I? 🙂

Wow! I learn so much reading your blog! I never heard of the transverse shuttle cover stitch or saw machines like the ones on this post!
LikeLike
Transverse shuttle machines are just old lockstitch machines with one needle and a boat-shaped shuttle with a long bobbin. It is me who wants to convert one into a multi-needle machine. 🙂 Not quite with 12 needles like that industrial beast, but just 2 or 3. Twin and triple needles are widely available, so I would not need to change the needle clamp at all – it’s still a single shaft to be clamped. I’m bound to run into various obstacles, of course. But step one will be to bring that old Vesta back to life, with a single needle – and it will be already a feat considering how rusty it is! But fun. 🙂 These “improved” TS machines are not awfully common, so a bit pricey, and I wanted to start with a cheap one in case I botch it up!
LikeLiked by 2 people
Following along to see where you take this. I have a handful of German TS machines that I enjoy using. Would love to convert one to a coverstitch. Will you just cut a new wide opening needleplate?
LikeLike
I think it’s more involved than just the needle plate, but I’ll only know for sure when my Vesta arrives. But I expect to have to cut a wider opening in the cast iron base as well – I think the needle goes into a channel there, or at least it does on vibrating shuttle machines. And then I’ll have to see whether the feed dogs need moving or possibly upgrading to symmetrical ones on both sides of the needle. And finally there’s the adaptation to the upper tension assembly and thread guides. I may also install additional tension units so that tension could be adjusted individually for each thread, like on that Prazak machine. We’ll see!
LikeLike
After taking a quick look, I agree that is will be quite involved. I see the need for widening the needle path channel, adjusting or shortening the feed dogs to allow room on the longer teeth side, use alternate presser foot to allow for width, in addition to the change in the needle plate. Still a very intriguing idea! Thanks for posting great info!
LikeLike
It will all depend on how much space is there between the needle and the feed dogs. Twin needles are at most 4mm apart, so if there is 2mm space between the needle and the feed dog, nothing needs to be moved. I might simply start with a narrow twin needle that does fit, so I’d only need to cut the needle plate and the needle channel. The foot is easy – just use a standard zig-zag foot. 🙂 I think it will be worth while though, I expect satin stitching on the underside! I’ll be posting progress updates, but for now I’m still waiting for my Vesta.
LikeLike
Amazing little machine! I bet if anyone can get her going, (and do the modifications you want to do) you can!!
LikeLike
Wish me luck! I think I’ll need it. 🙂
This Vesta is actually exactly the same size as your Singer 128, only the body is shaped a little differently – it has a slimmer column and “rump”. Later models had exactly the same body as the 128, I think here they were just using up these older bodies that had already been produced for the previous model without the modernisations. That’s why I’m so keen to get her to work as she’s a bit unusual. 🙂
Vesta was a Roman goddess of heath and home, by the way – very becoming! 🙂 She normally appeared to people as the fire in the hearth. Sometimes that would lead to the lady of the house conceiving a baby from the phalluses appearing in the flames… Go figure. But what a great excuse! No, it wasn’t the milkman, it was Vesta! 😮
LikeLiked by 1 person
Good luck! It’s always so cool learning about these machines from you. 🙂 And about Vesta!!
LikeLike
Respect! I think you’ve done very well with the grinding tool. I wouldn’t have tried that without a milling machine. have Hope you get the tension sorted.
LikeLike
Thanks, Dan! My naive “advantage” is that I don’t even know what a milling machine is… 😉 That little grinder proved quite remarkable. Apparently those tips are diamond coated engraving tips, and as I ground down two of them, I just bought a replacement set of 30 for a princely some of £3.77, including postage (from the UK, not by ship from another planet). I’m sure a milling machine would be a ted more expensive. 🙂 I was inspired to try a hand tool when I read that Haid & Neu made their first machines using only simple tools (http://www.singersewinginfo.co.uk/antiques/haidundneu/), and they produced some of the finest machines in existence (their zig-zag Primatic is my main general purpose machine). I must say, it was surprisingly easy to work the steel with the grinder – much easier than with a drill (I first tried to enlarge the hole in the needle plate with a drill bit, but quickly switched to the grinder).
LikeLike
I came across your blog while researching my own Harris Family No 2 TS machine (made by Stoewer). I am in awe of the work you do!!! I’ve only just got the upper thread to take up the lower, and managed to thread the bobbin correctly. Still that’s success for me! A question – where did you look to date your Stoewer? I’ve looked all over the net but can’t find anywhere.
I have a copy of the manual for my machine – if you’d like a copy I can send one.
LikeLike
Thank you, Lizzie, that’s very kind! We all begin small, you know. 🙂 Then you just go and play… 🙂
To date your Stoewer, you can contact the people at Stoewer Museum in Germany at stoewer-museum.de. Send them some photos, in particular with the serial number, and they’ll date it for you based on their records. They are very friendly and speak English. 🙂
Actually I’ve got the manual from them, although it’s in German (but I don’t mind). But thanks anyway!
LikeLike
Oh thank you Elena! I had looked at the Stoewer site but hadn’t thought to ask them about dating, but I will now.
I’ll probably ask ISMACS if they’d like me to send me a copy of the manual as they haven’t got it on their site.
LikeLiked by 1 person
I contacted the Stoewer museum and have found out that my machine is not in fact made by them! They told me that the sign that it’s a Stoewer is if it says “Made in Stettin” but mine only says “Made in Germany” so it’s not a Stoewer apparently. If this is correct then Needlebar has it wrong. Does your Stoewer say “Made in Stettin”?
Now I have to find out who did make it!
LikeLike
Yes, mine does say “Made in Stettin”. There were some 300 sewing machine manufacturers in Germany before the war… But it was probably made by one of the better known ones.
Have you tried SewMuse? See http://sewmuse.co.uk/german%20sewing%20machines%20introduction.htm.
LikeLiked by 1 person
(Can’t reply directly to your comment in response to my question about my “Stoewer”)
Thank you – yes I have looked at Sewmuse but will go back and have a more detailed look. You have to be a bit of a Sherlock Holmes sometimes with this hobby…
LikeLike
That’s half the fun, I find! You can also ask people on the ISMACS mailing list to help.
LikeLiked by 1 person
Wow! You are a master mechanic indeed! Looking forward to future updates.
LikeLike
Thank you! 🙂 Although I’m not so sure about the “master” bit… But I was having so much fun!!
LikeLike
Elena,
It seems such a shame that too much bottom tension on the host machine limited the success of all your hard work. I take my hat of to you for achieving so much. It is truly impressive. I’d never have attempted making a tension unit from scratch! Is it not worth persevering with seperate tensioners for the next attempt though? I would have thought set up right they’d give better control and used units aren’t that expensive?
Dan H
LikeLike
I couldn’t use an existing tension unit because it is supposed to be mounted into a cavity on the body, and there is no room for it here. I haven’t thought of looking at Singer 15 units that are mounted in the outside! I did look at industrial and overlocker tensioners that are also mounted on the outside, but they all require mounting provisions on the inside of the panel that wouldn’t work here – no room inside the head, so nothing short of a countersunk screw could fit. Which is how I ended up with my own units.
I have also realised that I shall probably be able to move my adjusted needle bar, presser bar and the whole face plate from Vesta to Singer 48K, so that work won’t be lost. 🙂
And then, there’s something definitely wrong with Vesta’s shuttle because I did have TS machines before (one by Stoewer and one by Frister & Rossmann), they had similar boat shuttles and they were able to deliver low tension. Hmmm.
LikeLiked by 1 person
Elena,
I looked up the Singer 48 http://www.sewalot.com/singer_48k.htm
If this info. is correct, isn’t it too nice/rare a machine to alter? There are a couple on Ebay at the moment but at over £200 each, would you not be bettr off with something like a 27?. And according to that link, the 48 also has a reputation for a “tight” stitch, which would imply the same issue as you’ve had already – inability to reduce the bottom tension enough to get the results you’re looking for. Your idea of giving the 48 a good check-out seems like a sensible idea…..
Dan H
LikeLike
The 27 won’t work because VS is side-facing – the needle must be forward-facing like on TS. The 48K is not that rare – it has come up on eBay every three weeks recently and it sells for under £40. Better look on needlebar.org.
I don’t trust “reputations” because they are often too generic. I should not think that the 48K would have a tight stitch – it’s got the good VS shuttle. But many people don’t know how to adjust them, so it’s not exactly the fault of the machine.
I shall be testing the 48K extensively first anyhow, with a single needle as intended. There will be a post on that! I expect the same stitch quality as with a VS machine.
LikeLike
The link for Singer 48K on needlebar.org is this: http://needlebar.org/nbwiki/index.php/Singer_48K.
I was originally planning on testing Vesta with a single needle first, but when I discovered that it took those old 12×1 needles, I had to do the conversion before I could do any testing at all. :-p
LikeLike
But you are right – the 48K is a lot less common than, say, 12K or 28K, which is why I wanted to do a prototype on a cheap old rusty machine first, and that Vesta filled the brief. 🙂 The German machines that have all of those improvements like in 48K are also less common and fetch about the same – around £40, so they too require a prototype work first.
LikeLike
Hmm, quite a different perspective on how many 48’s were produced there. I didn’t appreciate the way the mechanism works – it really is a straight line the way the shuttle moves on these machines- your ideas on multiple needles now makes more sense!
Dan H
LikeLike
Yes, all TS machines move the shuttle in a straight line along the bed. But there was another variant – a VS rotated 90 degrees: Hengstenberg machines, see eBay item 263354858766. But I thought a straight line would be easier to work with.
LikeLike
A replacement for Singer 12×1 needles are the Groz Beckert 459 R system, NM 80 or 90
LikeLike
Interesting. Have you tested them yourself?
LikeLike
This is a very informative site on sewing.
LikeLike
Thank you! 🙂 Glad you like it.
LikeLike
Thank you for the review of this TS Vesta. It seems to have a boat type shuttle. I have seen a very similar machine for sale nearby, but the decades are different, so perhaps it is different. The machine for sale looks like the machine here and the seller also got the 48k. http://www.sewmuse.co.uk/dietrich.htm
LikeLike
Vesta TS had different models. This one is Vesta B, it has a boat shuttle.
LikeLike