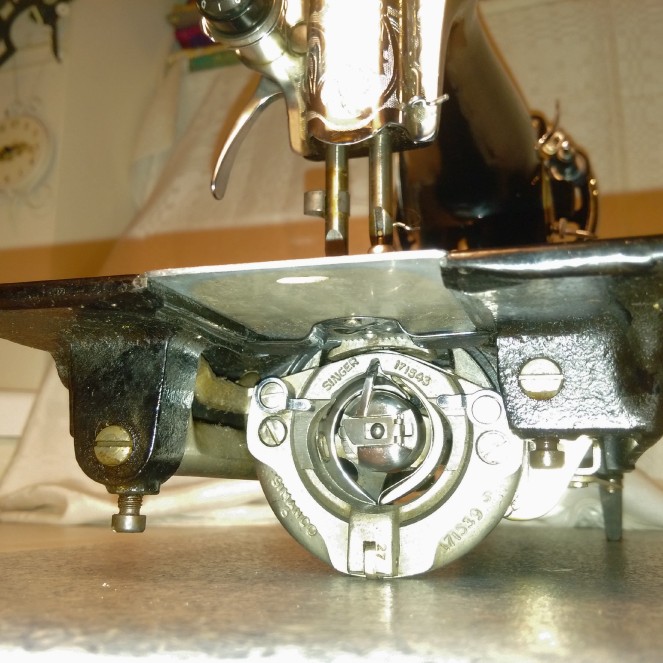
Vertical oscillating hook is based on Singer 15 which was originally a side-facing straight stitch hook.
It is now perhaps more familiar as a forward-facing hook in many domestic machines. There is even a rotary hook derived from it, one variant is found in Husqvarna Viking machines from 1950s, another in Janome machines from 1970s, and there must be more, I’m sure.

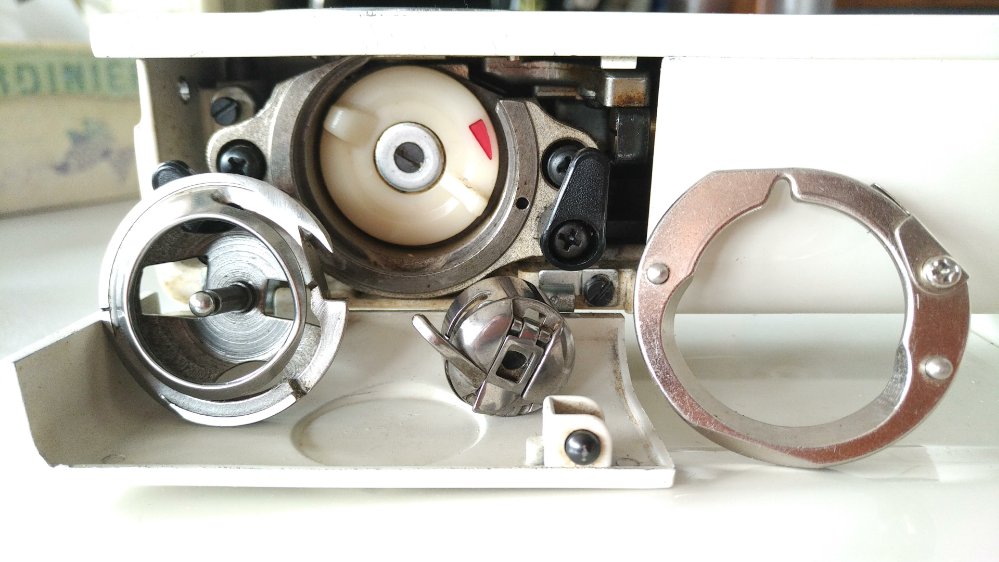

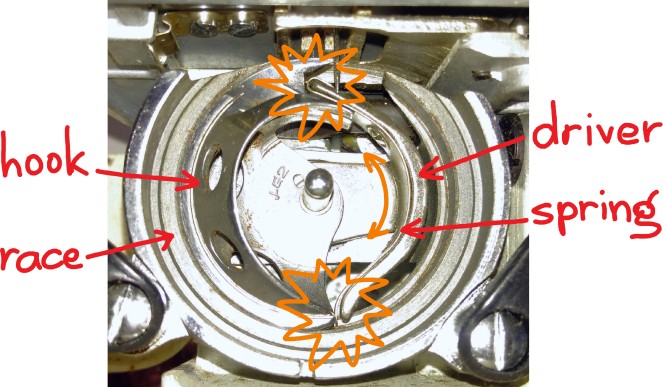
The vertical oscillating hook is a removable hook that is pushed about the race by a driver – either a solid steel one or one covered with a spring. Either way, there is a gap between the hook and the driver through which thread must pass as the loop goes around the bobbin case. The size of this gap greatly influences the timing of the hook and the type of thread that can be used on the needle.
Removable hooks have a bit of “play” in them because the hook can wobble in its cradle. But the oscillating hook is special: the need to have this gap between the hook and the driver also allows for an instant adjustment of timing without turning any screws. The rotary hook, although similar and removable, does not offer this option!
So our dear familiar and well and truly domesticated vertical oscillating hook secretly offers an absolutely wild possibility to have a collection of slightly different hooks to be used with different and often forbidden thread weights and needle sizes without any change to the timing setting. Just swapping over the hook can also instantly transform your medium-tensioned machine into a low tension or a high tension one for special applications like sewing coats and jersey (low tension) or puffed quilting and heavy duty work (high tension). What madness! 😵
The downside is that you have to be very careful to select the right hook for the project and you have to maintain the race and the springs in it meticulously for the hooks to work as expected. Lesser quality machines often have a less precisely manufactured hook, and combined with less precise assembly and adjustment at the factory, such machines turn into a lottery – how many stitches will it skip today?
Not all hooks are born equal
Of course, the hooks from different manufacturers are all very slightly different but not labelled as such – that would have been too easy. But you can measure the gap between the butt of the hook and the end of the driver (or its spring). There can be quite a difference!
For example, my 1955 Haid & Neu Primatic is a forward-facing vertical oscillator manufactured to very precise specifications.

It has its timing set at the factory with pins instead of screws, so it cannot be knocked off but also it cannot be adjusted. It usually works fantastically well with its own native hook. However, if I want to use a thicker thread with a twin needle to do bold satin stitch embroidery, it gets a bit too thick and starts jamming the hook. Well, I’ve been buying various hooks from different machines and have quite a few of them in my draw. They are all supposed to be identical, but of course they are not. When inserted into the race of my Primatic, the difference is clearly visible. The maker’s name or logo is engraved inside the hook.


Why do the Jaguar and Janome hooks leave such large gaps? Because the driver spring in those machines is shaped differently. Here is a Jaguar hook, notice the spring curl at the butt end.

The hook action in one of these machines is quite different from the original Singer. The fit can be made tighter than in the original because the spring can be depressed to make extra room. These hooks can also be quieter than springless hooks. In my experience however the original Singer 15 machines – with or without the spring – still win in stitch quality simply due to the superior quality of manufacture of Singer machines. The springless hook may be a bit louder because a larger gap is needed in this design, but my 1920 Singer 15K sews an impeccable stitch on a wider variety of fabrics than any less well made machine with a fancy spring in its hook.
Some makes use positioning screws rather than permanent pins to set the timing of the hook. Such hooks often slip when you get a thread jam or try to sew material that is too thick. This is annoying because you’ve got to reset the timing to get it to work again. On the up side however, you can play around with such machines and set the timing to work with the hooks in your collection. There’s a silver lining everywhere. 😁
The hook affecting tension
The title here should rather be: swapping the hook for the one more suitable for the type of thread and fabric allows to keep the tension unchanged between projects. But that’s a bit long for a title. 🙂
Normally when you switch between significantly different fabrics or types of thread, you need to re-balance the tensions, or at least adjust the upper tension. I noticed however that using a different hook can produce a balanced stitch without touching the tension knobs. I tried to come up with a general rule or a full explanation, but it seems that there are many factors at play here, so it is not straightforward. However, in most cases use a tighter fitting hook with fine materials and thin threads, and a looser fitting hook with heavier materials and thicker threads.

I love all the wonderful technical information on sewing machines you provide!
LikeLike
Thank you, Tierney! Those are all first-hand discoveries, too! 🙂
LikeLiked by 1 person
Elena,
Thought provoking again! My thought about the hook to driver clearance is that it needs to be just enough to clear the thickest thread to be used without causing friction. Any more space creates more noise. Have I got it right your suggestion is reducing this clearance further by using different hooks such that there is friction? Often the hook spring is supposed to be adjustable using screws, although on the one or two machines I have tried to adjust, the screws have been stuck fast. I’ve resorted to bending the spring, which has worked, but hit and miss in terms of making fine adjustments. That does mean the clearance ism’t something that’s adjusted often.
I can see swapping hooks is a quick way of adjusting that clearance by a known amount.
I didn’t have success on my Singer 15NL swapping hooks, but that was because the race was of poor quality and other hooks just jammed in the race. I overcame that by changing hook and race from another machine.
I like the Janone variation – making a rotary hook out of an oscillating one!
Dan H
LikeLike
Dan, you need to have a good race to begin with, as you discovered – indeed! 🙂 As for the spring on the driver, firstly, not all drivers have it. The original Singer 15 did not have a spring on the driver, and my 1920 one doesn’t have it. I am not sure when it was introduced. If you do have a spring on the driver, the screws are not always adjustable – they are fixed in my Haid & Neu for example. But even if you can adjust the screws, this is only part of the story. The shape of the spring differs – just look at my photos and compare to your machines. Necchi Supernova has a differently shaped spring as well, with a very small clearance which explains the length of the hook (length along the arch of the race).
I think that the clearance between the hook and the driver (or the spring) is not supposed to be adjusted by the user at all. I think that the screws that are stuck are fixed on purpose. Every machine has its limitations, so if the thread you are trying to use, is getting stuck in the hook, then the machine is simply not meant for such thick thread. What I am doing with swapping out hooks, is going beyond the original specifications. There are limits there too, of course – I can’t very well thread it with garden twine. 🙂
I am not suggesting to reduce the clearance – that would likely make the machine jam. I am suggesting to *increase* clearance so that thicker thread could be used, especially on twin needle. The noise is a good indicator: if there is too much clearance for the thread you are using, the hook is noisy. However, a large clearance used with thick thread does not make the hook noisy because the clearance is filled with the thread! 🙂
LikeLike
Elena,
service manual for Singer 15/91 says clearance from heel of shuttle to heel of spring should be 10-14 thousandths of an inch. Necchi Supernova says clearance of 12 thou. Interestingly neither manual talks about how to adjust the spring – screws seem to be retaining, not adjusting screws. Bending the spring seems to be the only way to adjust. I imagine 12 thou suits the thickest thread the manufacturers thought people should be using and users get a bit more noise with fine thread. You’re fine tuning the factory specs!
Dan
LikeLike
I think it would be very difficult to manually bend the spring in order to achieve exactly 12 thousands of an inch clearance. It’s 0.3mm, which is I guess what I have on the Supernova. However, clearance on my 1920 Singer 15K (15-30 or so) is about 1mm – and no spring. That’s about 3x Supernova’s (with a very tight spring). As for noise, I also noticed that the shape of the butt of the hook is mostly responsible for the amount of noise – with or without the spring. Some hooks have a flat butt, others have a pointy one, and of course the flat one is a lot louder. This does not seem to be standardised at all. from each manufacturer, I have several supposedly identical hooks, but each hook has a slightly different butt. Go figure.
LikeLike
Very interesting thing inside this sides! Im impressed!
LikeLike
Thank you, Tor!
LikeLike
Thanks for this very informative article. I have a Kenmore 1802 with a J-G2 hook. It is noisy, perhaps noisier since I re greased the gear box behind it. It stitches great and is in time. What can I do, if anything, to quiet the rattling? The clearance is about 25/1000. Thanks again.
LikeLike
Oil. That’s it, just oil.
LikeLike
Funny story: I recently discovered the gap between the hook and the driver and figured that the machine would be quieter if that gap didn’t exist. So I grabbed my pliers and *gently* bent the driver’s prongs towards the center. (This one doesn’t have a spring.) Then I discovered the machine doesn’t work so well anymore. 😀 No harm done, the modification was easily reversed.
LikeLike
Oh yes, I had the same experience with removing a similar gap in a rotary hook. The machine got very quiet on a dry run, but sewing with thread didn’t work that well. 😉
LikeLiked by 1 person
I have three Class 15 Singer sewing machine’s. They function Excellently. Thank You for your Article, very interesting.
LikeLike