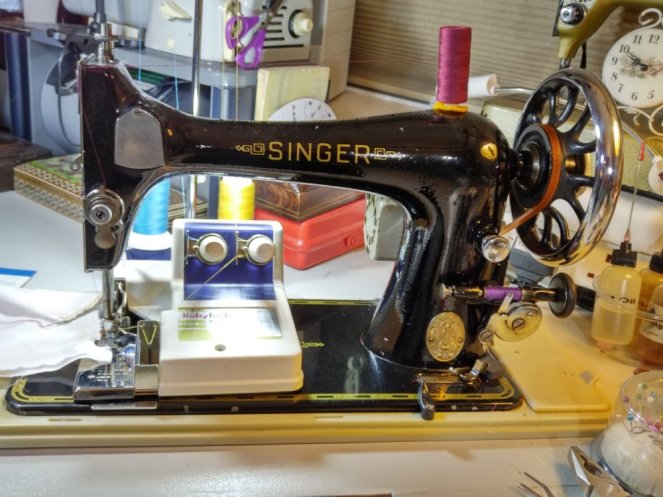
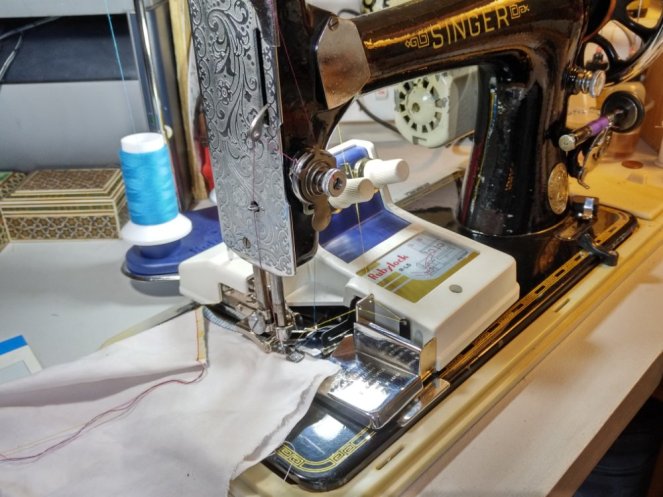
Not a mock-overlock stitch and not a zig-zag, this attachment makes a proper overlock stitch with two additional threads, incorporating a real sewn stitch into it. Rubylock overlock attachment really allows you to sew and overlock in one operation, and it works even on old straight stitch machines.

Ruby is trade mark of Toyo Seiki Industry Co., a.k.a. Toyota. Ruby zig-zaggers and buttonholers are well known for their quality, so when I saw this rarity, I obviously had to get it. £10 well spent!
This attachment mounts onto a sewing machine instead of the foot. It is driven by a fork fitting around the needle clamp like any other active attachment. It can be used with virtually any machine as all it needs is straight stitch. It comes with mounting brackets for low shank and high shank machines, plus brackets for left-set and slant needle machines can be ordered separately… well, may be not anymore. 😉
I thought Rubylock must be from 1960s-1970s because it came with a bonus zigzagger. But of course it couldn’t be that old since overlock had only been introduced to home sewers in 1967 with Juki’s Babylock! A bit of research shows that trade mark “Rubylock” was first used in 1989! It was filed for registration in USA in 1994, so this attachment is from 1990s!! And I thought nothing good came out of that decade. 😉
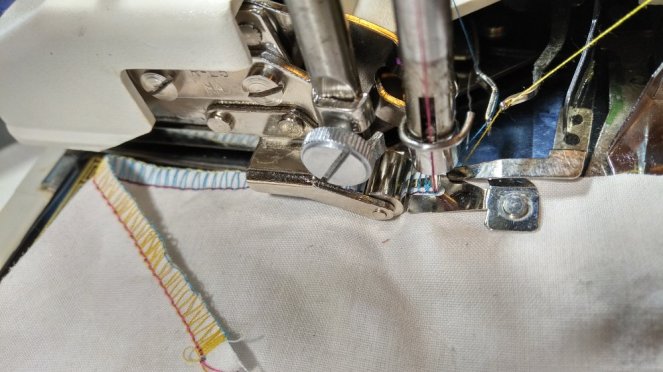
The sewing machine is sewing its usual straight stitch, and Rubylock cleverly weaves the two additional threads into it wrapping them around the edge of the material. This is real overlocking, in the sense that the wrapped threads lie loosely on the fabric without pulling it. They interlock on the edge.
The resulting stitch is really very good. You control the straight stitch as you normally do on the sewing machine, and you control the overlock with the tensioners on Rubylock. Besides the classical overlock stitch, you can also get wrapped edge if you change the lock thread tensions such that one is much looser than the other. The tighter thread then blends with the sewing machine thread making for a bolder stitch on one side of the fabric. This can be on either side!
The mechanism
Rubylock has two loopers that weave the thread around the sewing machine thread.
It is a very lightweight mechanism – it must be because it is driven by the needle clamp! It’s recommended to run it at low speeds – this is not a fully fledged overlocker machine! Don’t abuse it, and it will perform beautifully. I found it to work well at my normal sewing speed for clothes – with short seams, you don’t get to neckbreaking speeds anyway, not like with making curtains, for example.
Usefullness
Will I use it? That’s the real question, isn’t it – the proverbial eating of the pudding. Well, I think I will use it.
Rubylock attachment is of course by no means a replacement for an overlocker machine, and I would still use a separate overlocker in most cases. But sometimes you just need to do a short overlocked stretch, and setting up Rubylock is certainly quicker than an overlocker, plus you don’t need three extra spools of thread but just two. Why not use zig-zag in such cases though? You certainly can, if you are on a zig-zag machine, but I normally use straight stitch only machines for straight stitch. Besides, zig-zag, even when done with an overedging foot, is still not as good as this overlock, and you need to change machine settings for it. With Rubylock you just swap the foot for the attachment and you don’t need to change machine settings in any way.
In my comparison of zig-zag and overlock, I found zig-zag to be very useful for overedging fine fabrics where even 3-thread overlock is too bulky. Rubylock makes a lighter stitch than 3-thread overlock, and although zig-zag is still less bulky, Rubylock overlock has the advantage of already containing the main sewing straight stitch in it, so the total sum of straight stitch and overedging with Rubylock is pretty much the same as straight stitch with zig-zag overedging. The two stitches are of course done in a very different manner, and I would imagine that the preference will vary depending on the fabric. It’s nice to have options though!
Another application for Rubylock that I foresee in my sewing room, is decorative overedging. By regulating the tensions on Rubylock, you can get the overedging stitch skewed to one side – without pulling the material. You can then use differently coloured thread to get an embroidery effect of one stitch inside another. And if you set the tensions for wrapped edge, you can use woolly nylon for wrapping and silky top stitch thread for the topstitching, all in one and the same operation as sewing the main stitch and without changing any settings on the sewing machine (except may be stitch length). This is rather better than wrapped edge with 2-thread overlock stitch on a regular overlocker.
In a word – I am impressed. This looks like a very interesting new option for occasional overlocking, for narrow seams on delicate fabrics and for decorative overedging. This attachment is certainly not for high volume heavy duty work, but if used correctly, I believe it to be robust enough to last a very long time. ☺


 Buy me a coffee 🙂
I’ve never seen an attachment like this before but I wish I had one now that I’ve read your post. It looks much easier to use than a standard overlocker and it takes up much less room! I look forward to seeing what else you do with it.
LikeLike
I’ve never seen one before either! It takes some getting used to, of course, but it does a good job. You’ve got to slow down your stitching, but actually since you are sewing and overlocking in one operation, you are probably still done quicker than sewing and then overlocking separately. I definitely intend to give it a go in real sewing (as opposed to doing samples).
LikeLike
Elena,
I’d never heard of this before either! Must be the biggest, heaviest, most power hungry attachment out there. Is there a danger of damaging the host machine with all that “gubbins” attached to the presser bar?!
LikeLike
No danger at all, Dan! The underside is covered with soft foam, so it doesn’t scratch the bed, and the whole thing is remarkably light. It is also very light going, so not power hungry either. It is comparable to the ruffler, and is may be even a little lighter! Of course it means that it is not particularly robust, hence the speed restriction.
LikeLike
Forgot to say: my expectation was exactly like yours – I thought this attachment must be a monster. I was wrong! 😀
LikeLike
Another item for my wish list! This looks like a really fun thing to have. Forget how useful it must be; it looks fun. :p
LikeLiked by 1 person
It is fun! 😀 I thoroughly enjoyed myself playing with it. 🙂 I didn’t actually expect it to be useful, but it surprised me. Even better!!
LikeLiked by 1 person
😮 ooohhhhh… You know I want that! I will absolutely be on the lookout. That could be a very useful.
I wonder how many other of these more complicated types of attachments are out there? I have another, an Automatic Decorator, that does some decorative edges and hem stitches. That post in the queue for sometime in the next couple weeks.
LikeLike
While searching for answers, I came across mentions of Rubylock 2 and 3 – in Japanese only. 😦 There also seems to be a Ruby Cut & Sew attachment that is more complex than the no-name Cut & Sew attachment. And I suppose you know Ruby buttonholer? Some say it’s even better than Singer’s – it certainly looks beefier.
LikeLike
I can’t even find a mention for the Rubylock and I’m usually very good at finding things online. I do see several Lock Cutters and some more simple versions. I think I’ve heard of a Ruby buttonholer, but not seen one. I could almost swear the one I have is a Greist. It’s quite beefy, with metal cams.
LikeLike
I’ve just updated the post with dating info: Rubylock is from 1990s! First mention in 1989, filed for registration in the USA in 1994, see https://www.trademarkia.com/rubylock-74512997.html. You need to tell Google to show you non-English results too, and not to try to translate. Then you get Japanese texts. I don’t read Japanese, so have no idea what they are on about, but there’s “Rubylock” in them! I also found a few on auction in Japan (Japanese eBay sort of thing, it seems).
LikeLike
Thanks for the tips!
LikeLike
Ruby buttonholer that I mean, is not with cams. It’s for straight stitch machines – there are Singer and also Greist buttonholers like that. They make much better buttonholes than the ones with cams. Ruby is of that type, apparently they still use them on industrial machines!
LikeLike
Interesting about them still being used on industrial machines. Mine is for a straight stitch machine and makes lovely button holes
LikeLike
Oh I didn’t realise there were cam-based buttonholers for straight stitch machines! I thought all the ones with cams required zig-zag. I’ve got one like that, but I use my Singer for straight stitch.
LikeLike
My Kenmore can only zigzag with a cam and for almost the first year I couldn’t find that cam anywhere. It also didn’t come with the step by step button hole foot that I think it did originally. I was pretty excited when I found out about the buttonhole attachment. I think it’s type #1 that’s for straight stitch. The attachment moves back and forth, making the zigzags, which is weird at first. You can either use a special plate underneath or my machine can drop its feed dogs. I believe I have 9 cams for the attachment, including an eyelet
LikeLike
Zig-zags made by moving back and forth? That’s definitely weird! My Singer buttonholer moves left-right for zig-zags, plus forward and then reverse for the two legs of the buttonhole. What is your attachment called? Is it “Greist Rotary”? You know that I’ll have to find one now, don’t you? 😀
LikeLike
Sorry, back and forth, meaning side to side. And forward/back for the different parts of the legs. It’s so uneven seeming though. The first time I used it I thought the results would be terrible or not where I expected, but it works perfectly once you figure out how to place it correctly.
LikeLike
Oh I see, that’s like mine then, except mine doesn’t take cams. You set everything on the buttonholer itself: zig-zag width, zig-zag density, distance between the legs and of course buttonhole length. It makes rounded buttonholes – very nice indeed.
LikeLike
Found them! The Rubylock, that is. From what I can tell the type 2 has only one stitch finger and cuts. I think type 3 may be the same configuration, but there must be a difference. Only type 1 has two stitch fingers
LikeLike
URL please? That definitely wasn’t in Japanese! 😀
LikeLike
I might be wrong. There is only one tension dial, but two coned of thread
LikeLike
That’s weird! Where does the other thread go? 😮
LikeLike
No idea. I am looking at a type 2 on Facebook in Spanish
LikeLike
There must be a second stitch finger, but three tension discs in the dial for two threads? Like you’d have for a twin needle set-up
LikeLike
But then you would be forced to have the same tension for both threads. Good for interlocking them in the middle, I suppose, but no more wrapped overedging! 😦
LikeLike
Right. I think only type 3 cuts
LikeLike
Isn’t it the one called Lock & Cut? Or is it something else again?
LikeLike
It says “Rubylock III Cutting Type” and also overlooking stitching and cutting
LikeLike
Well, stitching and overlocking is what type 1 does, so add cutting then for type 3 and combine two dials together for type 2? I’m not keen on cutting on a sewing machine – if it is still needle clamp driven, there isn’t much power in it. Or, on a different machine, plenty of power so that the needle clamp screw breaks. 😦 I have a Cut & Sew attachment and that has been my experience with it.
LikeLike
That makes sense about there not being much power for cutting. Type 2 seems to be the most common. I see at least three different boxes and the gizmo had at least two different color schemes. The type 1 appears the least frequently.
LikeLike
People must have complained that it was a pain to have two extra tension dials to deal with. So they combined them.
LikeLike
Oh dear – I now want one. Will have to start looking!!
LikeLike
😀 If you look through the comments, you’ll see that there were three types made. This one is type 1, then type 2 has the two tension dials combined, and type 3 has separate tension dials again plus a cutter. Mine was advertised as a 4-thread overlocker, which I couldn’t believe. 😉
LikeLike
To add to the confusion, I’ll share what I’ve learned from photographs of Rubylock types 2 (R-L21) and 3 (R-LC31) on Japanese auction sites. Both of them do actually have two separate tensioners, but only the right tensioner is of the same size as on type 1 with the large plastic knob. The left tensioner is half the diameter, is rather flat, and is to be adjusted via a screwdriver slot.
LikeLike
Wow, I’ve never seen one of these before! I love how you showed the inside of the mechanism, because I’m one of those people who always wants to take everything apart.
My main sewing machine is actually a vintage Kenmore, and I’m a huge fan of it.
LikeLike
Thank you – the inside is where the fun happens. 😁
LikeLike
I just acquired a Rubylock 3 (cutting type), but there isn’t a manual with it, so I don’t know how to thread it up. Can anyone kindly tell me how to install it on my 1960’s Singer treadle machine (model 15 ML). Thank you!
LikeLike
Sorry, Alison, I don’t know about the cutting type. Mine simply mounts like any other active foot, for example like the ruffler (see your Singer manual for that).
LikeLike
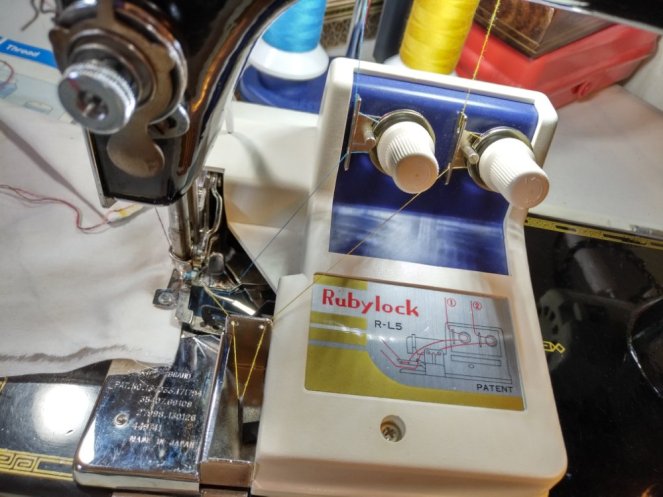
As for threading, you can see it in the photos. Hopefully, yours threads the same way.
LikeLike
Thank you for your prompt answer. I can see from the picture that one of the spools winds around the first tension dial, through a few eyelets and then I assume to the needle. The second spool winds through an additional tension dial closer to the presser foot shaft and it goes through its own eyelets,but what does it do after that? Does it also get threaded through the same needle? Does it go into the bobbin? Do I still use a spool on the top of the machine as normal in addition to the interlocking machine? Do I still use a full bobbin in addition? I apologize if these questions are silly… I haven’t used any attachments with the sewing machine yet, so I’m new at that.
Thank you so much again.
LikeLike
Hi, you can see the threading in the second photo from top. Neither of the overlocker threads go through the needle or bobbin – you thread those as usual. The overlocker threads go through the little holes on the tips of the loopers. This way you have four threads working when sewing – two threads from the usual sewing machine threading, and two from the overlocker loopers. It is similar to a real overlocker.
LikeLike
See also photo 4 for a close-up of how the threads go through the loopers.
LikeLike
Quick question. The overlocker came with two spools of thread already attached. These spools are unusually shaped and the left hand one has a metal disk at the top. The manual seems to suggest you can use other shapes and even bobbins. So do I need to find similar spools of thread or not? Thanks
LikeLike
You can use any spools you like. Just make sure that the thread comes off easily from the top of the spool – some spools have notches to stop thread unravelling when stored, so always set such a spool with the notches on the bottom, otherwise the thread may catch on them.
LikeLiked by 1 person
Thanks – I’m new to sewing let alone an overlocker so lots of advice needed,
LikeLike
Hi Just bought a Rubylock type 3 after reading this post. Bought off a Japanese auction site via an intermediary (From Japan) since my Japanese isn’t that good. 10 mins to work out the threading from the pictures in the manual. Cuts and overlocks perfectly without any adjustments. Wonderful!
LikeLiked by 1 person