I’ve been playing with some options for hem finishes on several recent projects, and thought I’d put them together in one post. There are so many ways to make a hem – it’s mind-boggling! And after you read this, you’ll be thinking up even more!
Stitched overlock hem
I needed a way to finish several volants, some of which were made of Ponte Roma interlock jersey, and others of double crêpe. A volant is a ruffle that is cut on a curve rather than gathered, see here for example how to make a spiral volant.
In this project, I also had spiral volants, and had to finish the hems. Because such volants are cut along a spiral, the thread direction is all over the place, as is the fraying on the crêpe. 😝 It makes any kind of turned up or rolled up hem finishes a real pain to make, so I needed a decorative finish for a straight raw edge, wide enough to contain the fraying.
Like this one. 🙂 I call it “stitched overlock” because it is firstly a narrow overlock hem done with three threads (one needle), which is then stitched with straight stitch on a sewing machine.
The overlocked narrow hem is quite dense as you can see, set on the shortest stitch or nearly the shortest. I had to keep the needle thread tension quite low to prevent thread breaks and skipped stitches. Here is what the hem looks like as it comes off the overlocker:
You see the needle thread forming a ridge on the back, but the front is smooth. Keeping the needle thread tension low, also helps to avoid stretching out of the material along the edge.
Fancy buttonhole stitch for hems
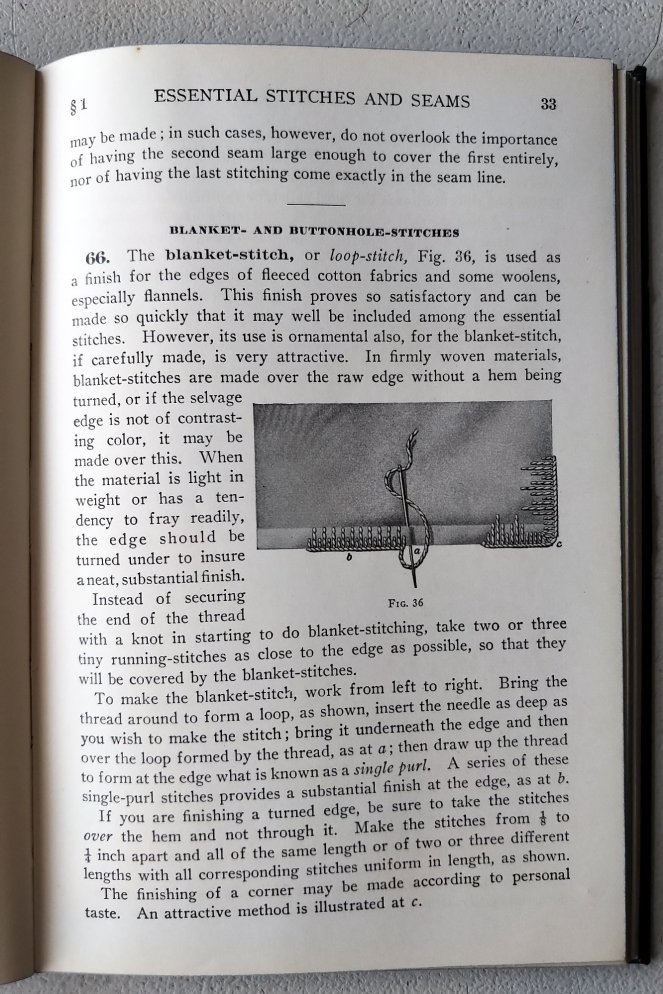
This is a manual technique that I came across in a 1927 book by the Woman’s Institute entitled “First Steps in Dressmaking”:
Here is the illustration again, enlarged:
It is recommended to turn up the edge on light or easily fraying materials. And you can make designs almost like satin stitch embroidery by varying the height of the stitches – which would also help to secure those rolled up hems on difficult fabrics.
Satin stitch rolled hem
Studying the buttonhole hem technique gave me an idea for a turned up or rolled hem secured with satin stitch embroidery. They didn’t have such machines in 1927, but now in 2018 we do! 😀
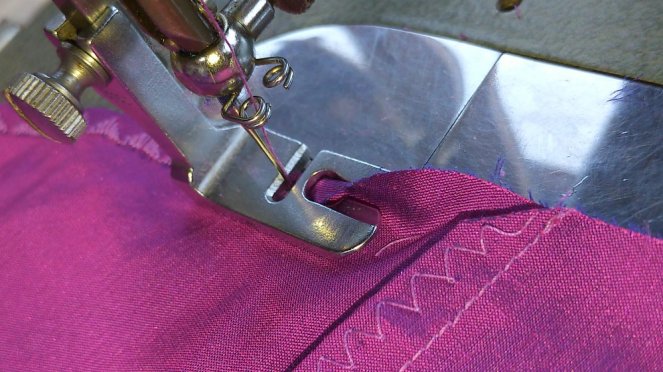
Here are some options that I’ve tried. Depending on your hemmer, you stitch immediately over the edge or some distance from the edge, plus you can flip the stitch pattern either to have a solid stitched edge at the edge of fabric like the original buttonhole stitch, or to have the solid stitches at the edge of the rolled up hem. Here is the reverse showing how the hems are secured.
In the top hem, the solid edge of the stitch pattern falls exactly on the edge of the rolled up hem. This allows to only turn it up once rather than twice and get a smoother hem altogether.
But how do you get your rolled up edge exactly in the right spot under the needle?
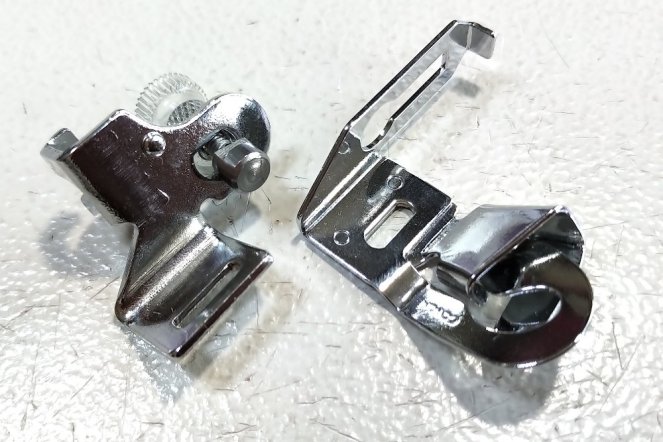
This is an adjustable hemmer foot. It consists of a mounting bracket or shank and the actual foot that can be adjusted left or right on the bracket.
Absolutely genius! I have a collection of such feet as well as a collection of brackets, so the same set can be used on all of my weird and wonderful machines which otherwise just want their own original feet, thank you very much. 😃
Note that you are embroidering on the back of the fabric. This means that in order to get nice stitches on the front, you need to reverse the thread tensions: make the bobbin tension loose and the needle tension a bit higher, so that the stitches are pulled up a bit on the top, which is the “wrong side” of your garment.
I haven’t got such a foot…
If you haven’t got the genius foot, there are other options to try, although they are harder to use.
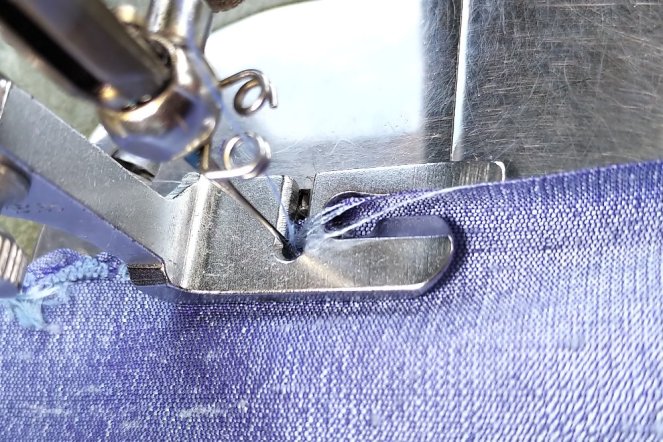
For a single turned up hem, try a felling foot. It looks like a narrow hemmer with a scroll except it hasn’t got a scroll.
This foot works well on tightly woven materials or on reasonably straight edges on any material. But when you are hemming a volant where thread directions are all over the place, you start running into trouble.
Threads from the material get sewn in and dragged. Arggh! Stop, cut the threads, continue carefully.
The material may start curling the wrong way around! This technically means that you are feeding too much material into the foot and it can’t lay it flat, but on a curve it happens automatically! Double arggh! There is no proper solution here – you can stop and try to turn the fabric the right way around hoping it would make a rolled hem, but it rarely happens. I tend to fudge it as I can and then just pretend it never happened and continue. Miraculously, the finished hem usually looks just fine.
Except when it doesn’t, and the only solution here is to use a narrow hem foot instead, or a bed-mounted hemmer.
How to start a rolled hem
The hardest bit is how to start a rolled hem, assuming you want to start at the edge of the fabric and not in the middle of it.
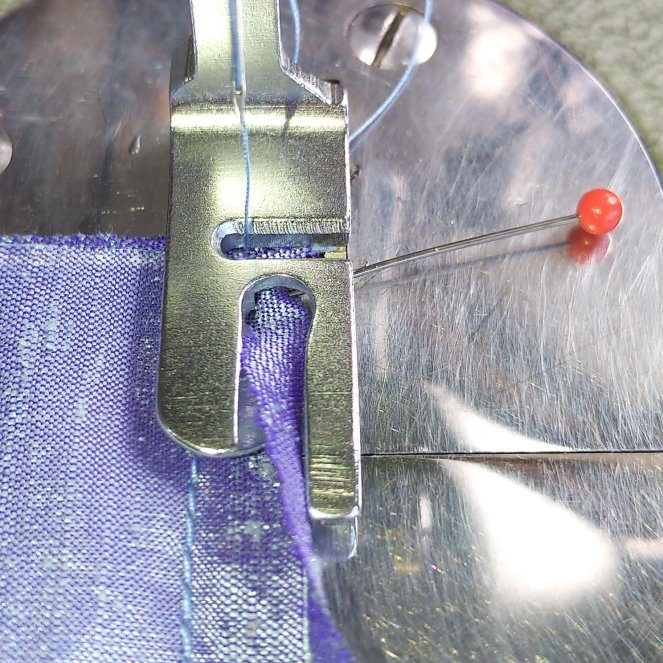
I use the pin method. Fold the hem by hand and pin it sideways close to the start.
Put the hem under the foot so as to start at the edge. Arrange the fabric in the scroll – the pin prevents it from flipping open again. Put the foot down.
Remove the pin, hold the thread ends securely and start sewing, pulling on the thread ends slightly if needed – you are sewing right at the edge of the fabric, and many machines will try to pull it into the bobbin case. Don’t let them. The first few stitches are crucial, after that let go of the threads and sew as usual.






 Buy me a coffee 🙂
No matter how hard I try I cannot get to see any images of this.
I would like to see the hemmer foot and how the material is folded into/under it.
Starting a rolled hem neatly has always puzzled me.
Pete
LikeLike
Peter, this is very strange! 😦 Are you reading it in the reader or through a browser? Here is a direct link to the picture of the hemmer foot, for example: https://vintagesewingmachinesblog.files.wordpress.com/2018/11/img_20181105_11593304740889873278644650.jpg
Could you please try it just to see if it works. If it doesn’t, I’ll email you a PDF of this post.
LikeLike
Peter, any luck seeing the pictures? I’ve also added some info on how I start a rolled hem. You’re right – that’s the hardest bit!
LikeLike
Dear Elena,
No pictures!
It may be that I am using an Android mob phone. I do not know.
I would very much like to see how it is done to start off and then to continue the rolled hem through 90 degress a la hankerchief ( now frowned upon ) but more so on a table cloth?
Kindest regards
Peter.
Ps. Still have not had the courage to start my all linen shirt.
Am working on a design.
But I love the 100 % linen.
Question re vintage machines.
Have you tried a Elna Lotus yet?
I have one almost pristine and I love it.
Small but by heck it can get through some thick stuff!
LikeLike
Lovely hem finishes! I do want to dabble in making clothes someday, your blog inspires me!
LikeLiked by 1 person
Dear Elena.
Finally got the pictures and blog.
My goodness you are a serious seamstress!
Those overlocked and double stitched hems are to die for.
It just shows though what can be done on our darling vintage machines.
I always thought it so.
It is lovely to have a vintage machine with fancy stitches ( I am guilty) I have two vintage Janomes, but to witness your hems is just beautiful to see what can be done with a vintage.
I also have sewing books within my collection which portray the most exquisite hand stitching.
They are a delight to our passion.
Sadly , I bought them for pennies at car boots because nobody else could see the beauty nor the knowledge behind it all.
I enjoy your your bloggs Elena.
Please keep me inspired!
Peter
X
LikeLike