A knitted dress is by its nature a stretchy garment that can quickly grow stretched out “bags” around the more protruding parts of your body. And if the dress is long, that includes your knees! A very effective solution to the problem is lining. If you wear a slip under the dress, the knitwear will glide along the slip and will almost not stretch out – the difference is immense. But I like to wear a cotton T-shirt with a thick woolen dress, so don’t want to bother with a slip over a T-shirt – bah! The solution is to line the dress.
Clearly, the lining must stretch with the knitwear, otherwise all the comfort of a knitted garment will be lost to the constricting lining. There is stretch lining out there, and the really stretchy kind is actually fine polyester jersey with a slippery finish. Perfect! – or so I thought until I tried it. It feels exactly like wearing a wet suit – zero breathability. 😝 So no, that went to the bin. Now what?
Of course, there is no shortage of lovely viscose or acetate lining out there – soft, silky, breathable. But it is all woven, without stretch. Ah! But of course (again), any non-stretch woven fabric becomes quite stretchy when cut on the cross… Yes!! 😃
But what about the pattern? That’s the easy bit, in fact. Soft knitted garments have very simple lines and are usually flat with a bit of shaping along the sides. If your knitted garment has a complex structure, this method won’t work very well – you’ll need a proper pattern.
With simple garments I don’t bother with paper patterns and just use the garment itself as a pattern. 😁 Remember – it all stretches, so small mistakes will not matter! 🤗
Cutting
Fold the garment in half in the length and straighten it out on the table.

Take a nice big piece of lining and fold it on the cross. If the piece is not square, the corners won’t meet. That’s ok – shift the fold line so that you have the same amount of single material on each side, then fold on the cross again.

Put the folded lining over the garment, fold line on fold line, with the point upwards. The question now is where you want your lining to start. You’ll need to sew it to the dress, so pick an area where your stitches can vanish into the knitted pattern – it can be anywhere from the empire line (just under the bust) to your hip line, although the higher the better. In my dress I’m going to stitch at the base of the yellow stripe.
If your dress is long, like this one, there may not be enough length in the folded lining to cover the whole area. There are two choices here: either shift the lining up so as to get the needed width at the stitch line, and then add a volant to the skirt; or shift the lining down to where you want the hem and make a separate top portion. Which method is best, depends on the piece of lining at hand.
I choose the second option.

Cut the lining along the edge of the dress leaving generous seam allowances – an inch or so. Shape the hem.
Now for the top bit. You can either cut across and make a separate top bit, or – if you haven’t got that much lining left – you can just cut off those single layer “flaps” at the top and get a pointy end. I haven’t got enough lining for a top bit, so I go for the pointy option.

Using left-over corners from the skirt, I fashion a piece to attach at the top of the lining, still cutting on the cross.

This piece has a seam at the centre, which is on the cross. However, the long seam that attaches the top piece to the skirt, is in fact along the grain of the material, making it a strong connecting seam that won’t spoil the stretch of the lining.
Obviously, you need two such pieces – for front and back.
Sewing the lining
The first thing to do is to attach the top bit to the skirt starting with the long straight seams. I always use strong flat seams for lining – I’ve had enough lining repairs in my life, thank you. 😉


Once the two straight seams are done, the central seam that is cut on the cross, naturally falls into place. You now have complete front and back pieces. Sew the side seams and hem the lining.
But there’s no zip in it? No. There’s also no zip in your knitted dress! The lining stretches and will easily go over your head without a zip.
Attaching the lining to the dress
This is where the real magic happens – how to do it invisibly, or at least not very noticeably.
The answer is zig-zag. It mimics the appearance of knitted stitches and stretches with your materials.

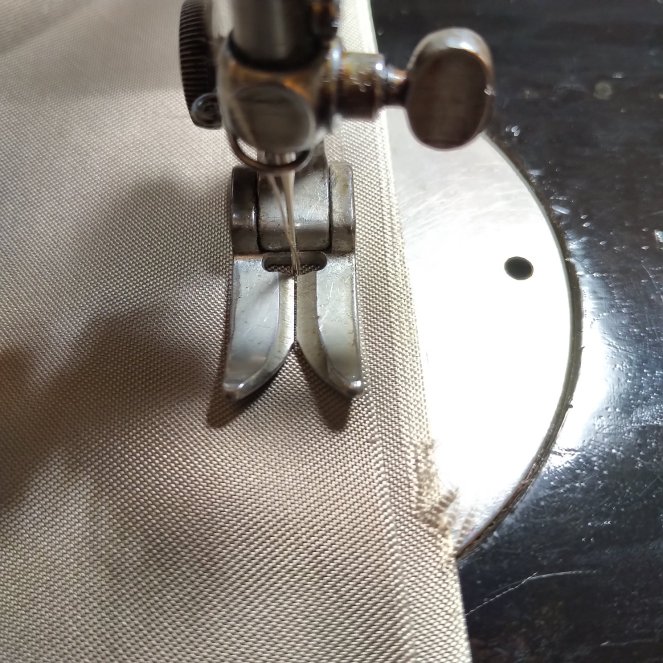
Fold the top of the lining and stitch with fairly narrow zig-zag along the edge.
This is no trivial task and looks rather like this:

But the suffering is worth it and here is the result:

Originally I was going to cover this stitch with some satin stitch embroidery, but in fact it came out better than expected. 😁 I might just leave it like that.
While I was wrestling with the knitted dress under the sewing machine, Roxy was chasing the cats around the sewing room. Now she’s exhausted! 😄


Amazing job, great information, adorable kitty ….. Thanks so much ❤️
LikeLike
Puppypuppypuppy! 😍 Lying on a tiger, she caught a cat in the end! Lovely knitted work – did you make it (guessing that’s a yes) with all the different patterning. I’ve requested a cable jumper from my mum – I think she’d give me a funny look if I asked for a skirt, let alone a dress! LOL.
LikeLike
Thank you! 😀 That’s the dress that I wrote about last week or so – “Fair Isle is not my thing”. Took me bloody six years to knit! 😜
LikeLike
LOLz!!!!!!
LikeLike
What a great idea! I have been struggling on how to line a knit fabric for my daughter’s wedding and have already bought non stretch – this may solve my problem!
LikeLike