As I reported before, I got myself a Jones Family TS machine dating to 1883.
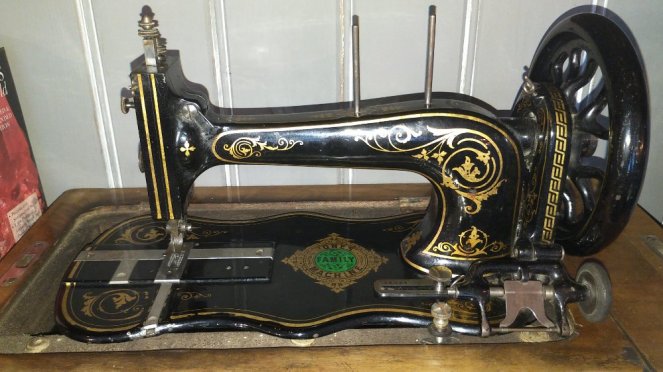
Yes, I know I first said it was from 1882 based on the serial number 26569 according to sewingdownmemorylane.com. However, fiddlebase.com found a document allowing to date the machine based on the Jones logo engraved on the slide plate.

According to this information, my machine dates between 1883 and 1892. So then it must be from early 1883.
This is a lovely machine, the varnish looked like new! So I thought may be it wasn’t used much. But no, it took me a good few hours to clean the mechanism – there was a lot of “felt” in there, that is dust from cloth and thread mixed with solidified oil. And then suddenly after two days in the open, the varnish started bubbling up. ☹️ Must be a reaction to open air and light, having been always covered with a heavy lid. So I took decisive action and varnished it!
But then I wanted to use it. This machine was a treadle, so it had neither a hand-crank nor a boss for one, and I am not keen on hand-cranks anyway. So I decided to see if I could fit it with a motor.
The motor
Even if there was a boss, I would not have been able to mount a motor onto it because the treadle belt guard was in the way.
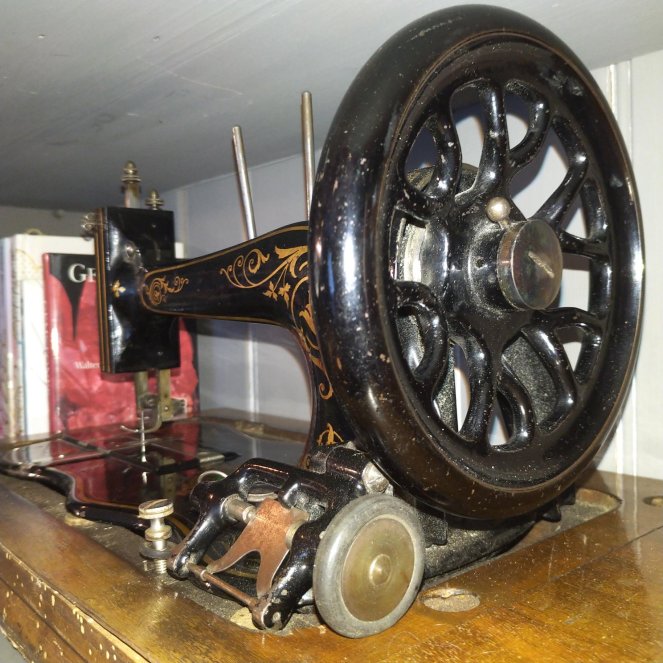
You can see in this photo how it completely encloses the belt path behind the balance wheel leading the belt to the holes in the table top and to the treadle. I needed the belt to go towards the back of the machine though.
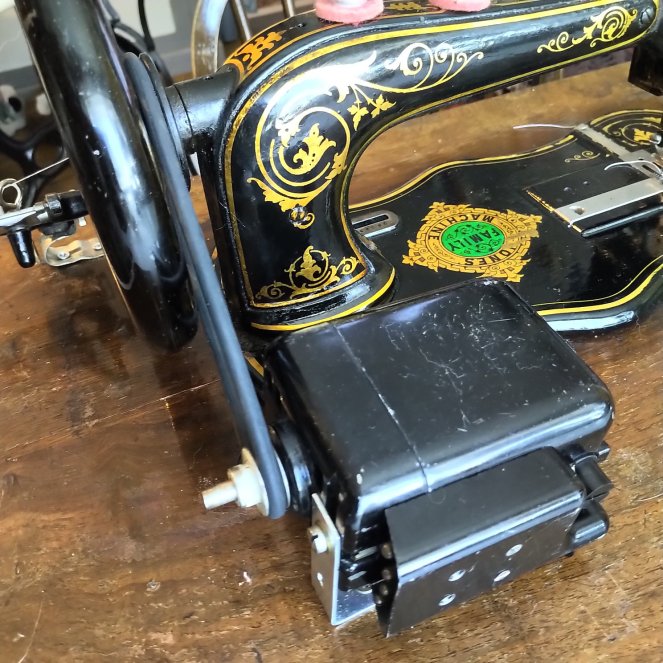
The only solution was to remove the belt guard and to install the motor at the back, mounting it to the table top.
I used a rubber belt here rather than a fixed length neoprene belt because I could not get the balance wheel off, and didn’t have a long enough neoprene belt in my stash. And I was too impatient to wait for a delivery, too. 😌
And then I found this in the manual:

The balance wheel screw turns in the opposite direction! So all I’ve been doing was tightening it… 😒
The motor had to be positioned far enough towards the back so as to allow the machine to flip back on its hinges for oiling. It just about worked with the rubber belt.
The bobbin winder
Having removed the belt guard, I also lost the bobbin winder because it was mounted on it.
So I had to re-attach the bobbin winder somehow.
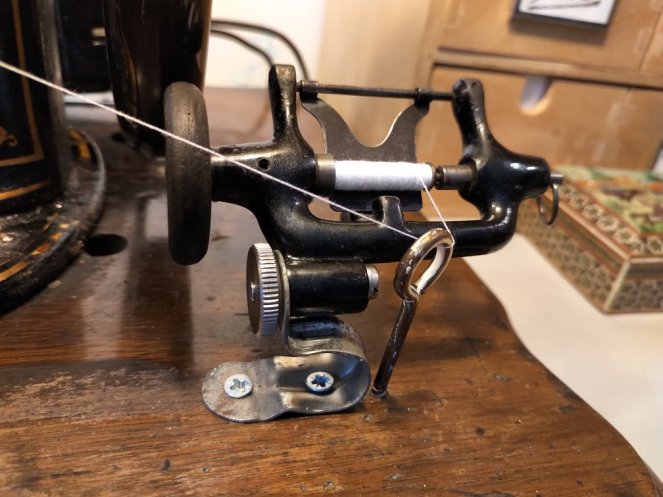
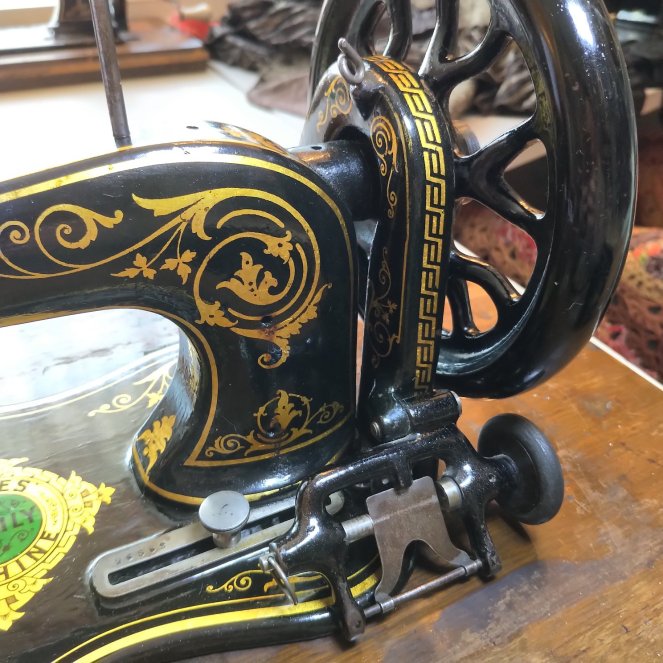
And this is why this is called “tinkering”: one pipe clip, with a straightened ear and an extra hole; one screw with a thumb nut; one screw eye from a previous project – and we have lift-off! 😆 Here too the position of the bobbin winder had to allow the machine to be flipped back. Mounting it on the right of the balance wheel was the easiest option.
The thumb screw actually works: release it and flip the bobbin winder back to disengage, flip back and tighten the nut to engage.
The thread guide is working similar to the original one on top of the belt guard, although there is no guide and the bobbin doesn’t get wound all too evenly (it wasn’t in the original setup either). But hey – it winds the bobbin, which is the main thing. Or so I thought, until I received the manual in the post (reprinted by Manual Master – very nice, in two booklets, one for the machine itself and the other for the attachments, a later edition, but applies to this machine also).
The bobbin winder is not threaded correctly in the above photo! This is not just any old bobbin winder, I’ll have you know, this is Jones’ Self-Acting Spool Winder – the latest and most important invention the sewing machine world has witnessed. Well, it is 1883, after all! 😆

So, to thread it correctly, I need to clean up the pin on the bobbin winder, wrap the thread around it and twist it onto itself. Then the bobbin winds beautifully, as advertised!


The head of this machine has two thread guides – the lower one is for the spool thread going to the needle and the upper one is for the braid when you’re using a braiding foot. I am using the upper guide here to get a good angle for the bobbin winder, now that I have a low thread guide for it instead of the high one in the original setup. The orientation of the screw eye that works as the thread guide is actually important – it needs to be parallel to the bobbin as you see it there, or you don’t get that even winding. The curvature of the eye acts as a guide itself! Pretty clever stuff.
The foot fitting
You’d think these old machines with square bars have their own foot fitting, but actually they don’t! In fact, this is where the standard low shank fitting comes from – any low shank foot fits this old presser bar! 😀 Except for the height, that is. This is a Jones machine, and it has its own special Jones foot fitting – the feet are 2mm shorter than Singer’s. This means that Singer feet will have exceedingly high foot pressure and an exceptionally low lift, making them rather unusable in my book. But any Jones feet will work beautifully!
The needle
This machine takes 13×1 needles. The needle clamp is very tight, so that modern needles such as DBx1 don’t fit into it – the shank is too thick. Or so it seemed. I tried may be 30 times, cleaned the groove in the needle bar, cleaned the needle clamp over and over again. And then – oh miracle! – DBx1 went in. 😍
But it wouldn’t sew – too short. So I turned to its longer variant – 108×3. That worked perfectly! 😃 It is not perfectly centred but it is good enough, the needle is not brushing against the needle hole edges.
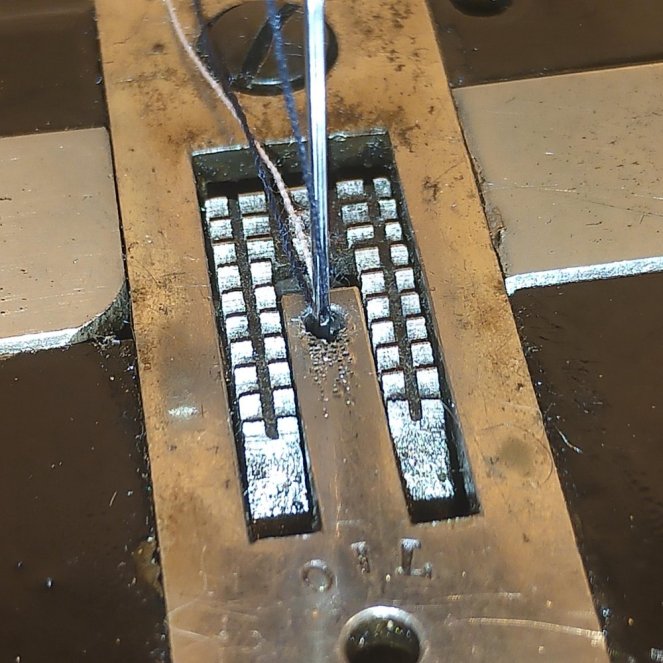
To set the height, use the same rule as described in any manual of a transverse shuttle machine: bring the needle bar to the height when the mark at the top aligns with the top of the head, then insert the needle so that the eye aligns with the top of the needle plate, as in the photo above.
The mark on the needle bar is a horizontal line like in this photo:

So this line should be level with the top of the head when setting the needle.
Some machines don’t have such a line. I believe they have a stop in the needle clamp instead, but you’d need to double check.
I followed this rule and set my 108×3 needle, and it worked! For the most part. It was skipping a few stitches. I tried setting it slightly higher or lower, but that only made things worse. Then I decided to twist it.
I noticed previously that my Singer 66K requires Singer needles because they are twisted. I read in the Jones manual that if the machine skips stitches, you should twist the needle slightly in the opposite direction of the twist of the thread. Hmmm… Which way is that? 😕 You can’t twist 15×1 needles because they have a flat side, so I was completely unfamiliar with this trick!
From the manual: If the thread is improperly twisted, it may throw the loop towards one side, instead of square into the shuttle-race. In that case the needle should be slightly turned in an opposite direction, to counteract this tendency to throw the loop away from its proper position.
I twisted the needle slightly to the right, so as to throw the loop towards the shuttle as it approaches. Look closely at the photo above, and you can just see it. It solved the problem completely! No more skipped stitches!
Plus another interesting effect: the bobbin thread tension went way down. Oh!
The shuttle
This machine has a patented Jones shuttle, and it is a very big deal.


This shuttle looks like any other boat shuttle, but it can deliver much lower thread tensions than most shuttles. In fact, it is as good as a bullet shuttle, and here is what makes it so:
- The bobbin lies freely in the shuttle, it is not held by a spring. This reduces friction when it is spinning.
- The thread hole in the lift-up spring and in the shuttle wall has thicker edges, so that the thread runs around them and does not snag.
- The hold-down on the outside of the shuttle is not actually pressing down on the thread, so it does not add any extra tension.
Each of these points does not appear to be of any great importance, yet together they add up to a shuttle that is capable of delivering very low thread tension for making loose or flexible stitch, something I have so far only been able to achieve with a bullet shuttle.
From the manual: There is no other shuttle in existence that possesses so beautiful and even a tension.
There is no need to be too modest. 😉
An extra plus point is that because the bobbin lies freely, the shape of its pips is of no importance. So while other shuttles are often restricted to their own proprietary bobbins, the Jones shuttle accepts them all, whatever their pips. Just make sure that the length and cap diameter is right, and most bobbins are quite standard in this respect.
From the manual (rephrased): After you’ve threaded the shuttle, oil each end of the bobbin and the face of the shuttle.
Make sure you only drop very little oil into the shuttle! Otherwise your thread will get saturated. There is no need to do it every single time, either. But I can confirm that it does help a lot, so get handy with it. It is also a good idea to clean and polish the shuttle on the inside, and to polish the pips of the bobbin and the edges of the caps. Sometimes there can be snags in the metal which then snag on the shuttle when the bobbin is spinning inside it.
Note how they recommend to oil the shuttle rather than the race. The “face” of the shuttle must be the flat side – or so I assume!
From the manual (rephrased): The tension screw is split on the end, so that if it becomes too loose, take it out and widen the split slightly.
Or, every 100 years or so, take out the screw and clean the split so that dirt and grime does not jam the screw too tight by widening the split! Mine was so tight, I didn’t even notice there was a split until I looked for it, having read the manual!
Foot pressure and thread tension adjustments
This is really sensitive and complicated with a transverse shuttle machine – there are a lot of things to adjust. Later designs removed some of the adjustments in order to simplify things. In most cases it’s good enough. But what do those adjustments do, in fact?
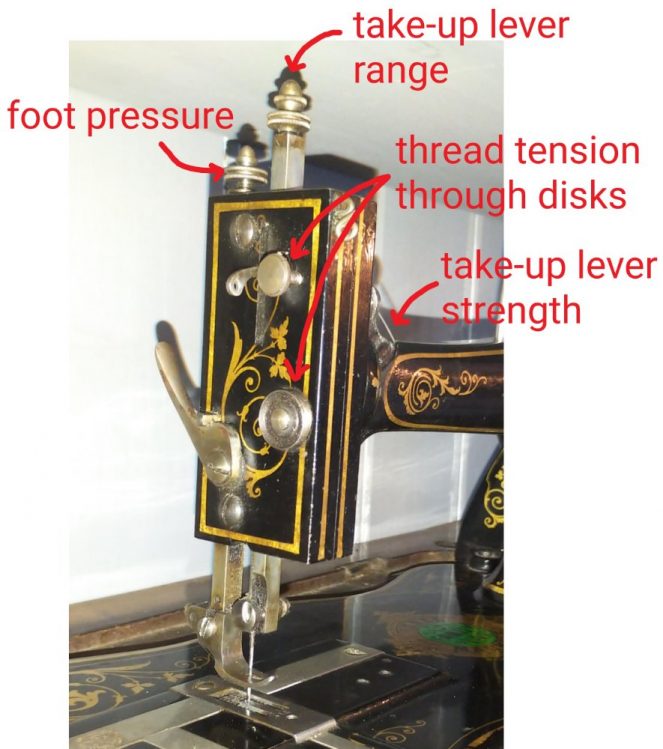
The head of a TS machine has two familiar adjustments and two “new” ones: the foot pressure and the thread tension adjusters do the same things as in later machines, although they look differently. But the two adjusters for the take-up lever performance are completely new. Or rather, they are of course old, since this is an older design of a sewing machine. These adjusters were removed in later models, and the take-up lever motion became fixed once and for all.
The adjusters on the bars protruding through the top of the machine have characteristic pips with a thumb nut underneath. This Jones TS has only two of them but the original Singer 12 has three – the thread tension on Jones is adjusted with a screw on the front but originally it was another bar on the top.
In all such adjusters it is the pip at the very top that is the actual adjuster – it is the top of a long screw. The thumb nut is there for your convenience: once you’ve found your favourite lowest level of the screw, lower the thumb nut until it reaches the top of the head to mark this level. Now you can loosen the main screw by turning the pip and the thumb nut will rise with the screw. To return to the original favourite level, turn the pip to tighten the main screw and it will only go as far as the thumb nut. Of course you can move the thumb nut later if you change your mind. If you want to use the whole range of the main screw, move the thumb nut as high as it will go – just under the pip.
Foot pressure
The foot pressure adjuster works as we are used to it: tighten the main screw to raise foot pressure. So the lower is the pip, the higher is the foot pressure. The thumb nut then marks the maximum foot pressure that you want to allow for your current project.
I noticed on several TS machines that the range of foot pressures was quite small and the foot pressure was rather weak, but those were all the machines with single-sided feed dogs. On Jones TS both the range of foot pressure and its amount is as high as it is with most later machines that use a new style pressure adjuster. The lowest foot pressure is also not negligible and is much higher than the lowest foot pressure on those other TS machines. Clearly, Jones has a serious spring in that adjuster. But then again, it has symmetrical double-sided feed dogs, so the sewing does not get pulled to one side by lopsided feed – this problem can occur with single-sided feed dogs, a strong feed and thin, stretchy or slippery material.
Overall, Jones feed is similar to the feed on many later designs of sewing machines.
Thread tension
The familiar thread tension adjustment where the upper thread passes between two disks is regulated with a thumb screw above the disks on the front panel of the head. It is in its function identical to the original Singer 12 design where the adjuster was on the top of the machine. I could not look inside the head because it had been sealed at the factory and was not meant to be opened (I could tell by the original paint and varnish and by the fact that the screws were absolutely unmoveable). However, I could tell from the action and from what was visible on the outside, that it was either exactly the same arrangement inside or a very similar one.
Thread tension adjustment here is extremely sensitive. On later designs with a spring pressing down on the disks, you can turn the nut half a turn and the tension only changes a little. Here it’s nothing like that – the smallest turn of the screw has a large effect on the tension, so go easy on it.
This thumb screw has a slot in it that tends to get clogged with dirt which makes tension adjustment rather jerky. You can safely take out the screw for cleaning.
Take-up lever range and strength adjustments
These adjustments were removed in later sewing machine designs, as well as in some of the later models of TS machines. The needle bar in TS machines is slotted and the take-up lever is threaded through it as you can see in this photo of a later TS machine:
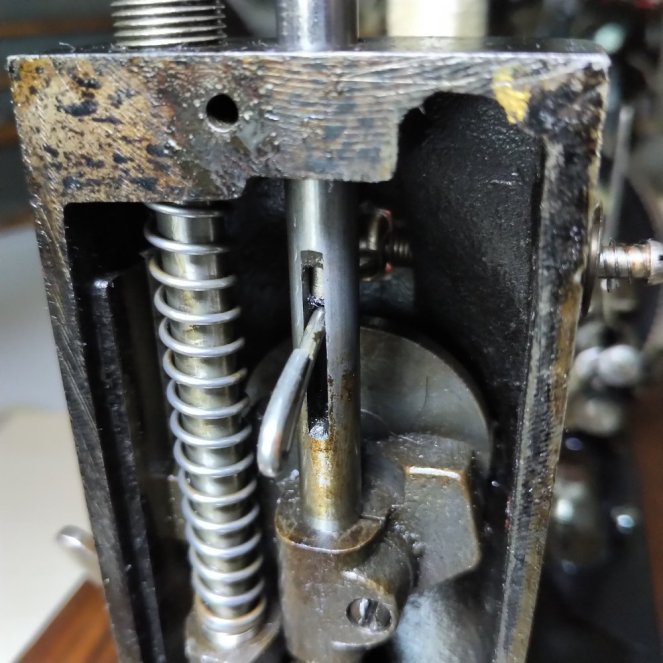
This photo also shows that the needle bar is hollow and there’s a rod descending into it. Jones TS still has a square needle bar but the design is essentially the same. The rod descending into the needle bar and pressing down on the take-up lever is the long screw that is adjusted with the pip on the top of the needle bar. Lower the screw to reduce the take-up range, raise the screw to increase it. Later TS models still have the rod but its length is barely adjustable with a very small range, practically non-existent. It is set for the maximum range.
The above photo also shows the attachment point of the take-up lever in the depth of the head. You can see a spring that makes the take-up lever go up. On the side of the machine this spring comes out as a straight angle wire that can be anchored into one of two or three little round holes. This is the take-up strength adjustment. The spring is quite tightly wound, so changing the anchor point has a significant effect by winding the spring more or less.
The range and strength of take-up has an effect on the upper thread tension and the force with which the bobbin thread is being pulled up during the second half of the stitch cycle. Greater take-up range and strength emulates a higher upper thread tension. I say “emulates” because this is what the stitches look like – as if you’ve simply increased upper tension, however the cause for this appearance is different. For example, a reduced take-up range and an increased upper tension has a similar effect as an increased take-up range and reduced upper tension, up to a point. This is very confusing, I know! No wonder that take-up range adjustment got lost in time.
From the manual (rephrased): the standard setting for the take-up lever range is that the pin should start pressing down on the lever when the needle gauge mark (the line) on the needle bar is 1/8 inch (3mm) above the top of the head.
This apparently should never be altered, unless required. Isn’t it always? They say that the standard setting is good for sewing all sorts of general cloth, but if the thread breaks when sewing extra thick material, then loosen the screw (increase take-up lever range). I can add that when sewing jersey, tighten the screw a little – a slightly reduced take-up lever range prevents upper and lower thread from forming loops. Loops can happen because for sewing jersey, we try to reduce both thread tensions below the standard setting, so reducing take-up range helps to balance that and get a nicer looking stitch.
Combined effects
These four adjustments plus the bobbin thread tension and the twist of the needle need to be taken together because they influence each other. So, when setting up the machine for a particular project, follow this sequence:
- Select stitch length based on the type of fabric you are sewing. If unsure, pick stitch length of 1.5mm-2mm.
- Set the foot pressure based on the type of fabric again. Do some sewing (never mind stitch quality at this point) and make sure that the feed is strong enough to move the fabric evenly yet light enough not to stretch it out. The top layer should not be sliding over the bottom layer too much, and there should be no ripples.
- Set the bobbin tension with the tension screw in the shuttle to “medium”: you should feel some resistance but should not have to pull the thread with a noticeable force. Sorry, it’s a bit vague. 🙂
- Twist the needle to the right slightly and make sure that it is at the correct height.
- Set the take-up strength to middle or low and set the take-up range to the standard setting – the pin starts pushing on the lever when the line on the needle bar is 3mm above the top of the head.
- Start sewing and try to regulate upper tension through the disks so as to get a well balanced stitch where the threads interlock in the centre of the fabric thickness.
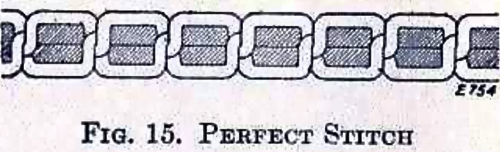
So far, this method was pretty standard. The final step is supposed to lead you to a perfectly balanced stitch, and it usually does. However, you still might not be happy with the result if the stitch is too tight overall, for example, and looks like a scar on the fabric.

The standard solution is to reduce both bobbin tension and upper thread tension and rebalance until a perfect stitch is obtained (see also this post on the topic of thread tension balancing). And in most cases this is enough! But on some difficult fabrics you might find yourself struggling and going in circles.
On a regular sewing machine you would have to settle for an imperfect stitch and just choose the lesser evil. But this is not a regular sewing machine – this is a Jones TS machine. The other adjustments are here to help you! 😃 (This might well work on other old style TS machines as well, if the range of those adjustments is large enough. It often is too small to make a real difference.)
Here are some hints showing how the adjustments influence each other. I’m sure I haven’t discovered them all, and I am also sure that the cloth makes a big difference. So experiment for yourself to find that perfect stitch.
- If the upper thread tension adjustment appears too sensitive and jumps from too tight to way too loose at the slightest turn of the screw, then increase foot pressure a bit. This should give you more control with upper thread tension.
- If the lowest bobbin thread tension seems still quite tight and the thread lies taut on the underside of the material, twist the needle to the right slightly. If that makes no difference, then set the needle dead centre and twist it to the left. The correct direction of the twist depends on the type of thread used.
- If the bobbin tension is set quite low so that you can pull the thread with almost no force at all, and yet the stitch is very tight on the underside and the loops from the upper thread show through, then increase the upper tension. If it shoots straight to too tight, then increase foot pressure – see the first point in this list. Alternatively, increase take-up range slightly (lower the screw).
- If the stitch is balanced but still too tight on both sides so that it looks like a scar on the fabric, then reduce upper tension very slightly and increase take-up range.
- If you are going in circles with these adjustments and still can’t get it right, then set the take-up lever range to a half way setting and try again. Try also reducing and increasing take-up strength and see what happens. Generally, reducing take-up strength and range results in looser upper thread with bigger loops on the bottom. Try to increase foot pressure first to tighten things up, then increase thread tension with disks to eliminate the loops while keeping bobbin tension quite low.
- If you are still having no luck, throw the sewing machine out of the window and have a cup of tea. 😉
It can be quite frustrating, so be prepared to get to know your machine first and to “waste” some time twiddling the knobs. It is not a waste of time though and will help you to get that perfect stitch quicker next time. Making notes also helps (why do you think I’m writing this blog?).
Settings for fine jersey
I have been sewing quite a lot of fine jersey recently, after all it is nearly summer. My Jones TS is still waking up, she will need more running before she’s back to her old performance. Some joints are still a bit stiff and coated with solidified oil, so I have to keep oiling and keep tuning her. But even so she’s been giving a solid performance. And fine jersey, in particular with lycra for extra stretch, is about as difficult as it gets! I found the following settings to work well:
- Bobbin tension quite light but not the lightest. On a scale of 0 to 10 probably 2, where 0 is the lightest completely loose setting and 10 is fully jammed.
- Upper tension medium, probably 4 on the same scale.
- Foot pressure light – just slightly heavier than the minimum which is quite heavy on this machine.
- Needle 108×3 (jersey point), size 80, slightly twisted to the right.
- Take-up strength set to low (upper hole).
- Take-up range set significantly smaller than standard – the screw is 6mm higher than the standard setting. The rod starts pressing on the take-up lever when the gauge mark on the needle bar is well below the top of the head.
What about that flexible stitch?
The reason I like Singer 48K so much is that it can make a stitch with 60% stretch on the finest jersey. But Singer 48K is a bit of a diva and is not always behaving as expected. Add a bit of lycra to the jersey or a bit of coating to make it extra stretchy, slippery or “sticky”, and the 48K starts throwing tantrums because her feed is too weak for fabric behaving badly. I started investigating machines like Jones TS and Cyclops because they have double-sided feed dogs to reign in those badly behaving fabrics. I was wondering whether I could strip out the feed dogs and put them into my Singer 48K for improved grip.
But Jones TS demonstrated to me all the wrongs of this way of thinking. Upgrading Singer 48K still might be a fine idea in itself, but why bother when you already have a machine that is ready, willing and more than capable to match Singer’s performance? I got 60% stretch on the same finest jersey with Jones TS, no problem. And even more stretch on lycra, perfectly sewn without tantrums. The adjustment of the take-up lever range and strength together with the needle twist allowed me to fine-tune the stitch into complete perfection on every badly behaving fabric that I’ve tried. And once you get the hang of it, it even becomes logical somehow…
Plus of course having double-sided feed dogs means that I can use both left-handed and right-handed feet for sewing piping and zips. Hurray!
In conclusion
Jones Family TS turned out to be one of those machines towards which I had no particular expectations but which took me in completely. It awed and amazed me, surprised and humbled – yes, she can sew your lycra, your jersey, your foiled and slippery nanotex, your vinyl and PVC, as well as your silk and satin, gauze, chiffon and loose woven toile. Yes, dear, no problem at all. Just twist those pips in the right direction.
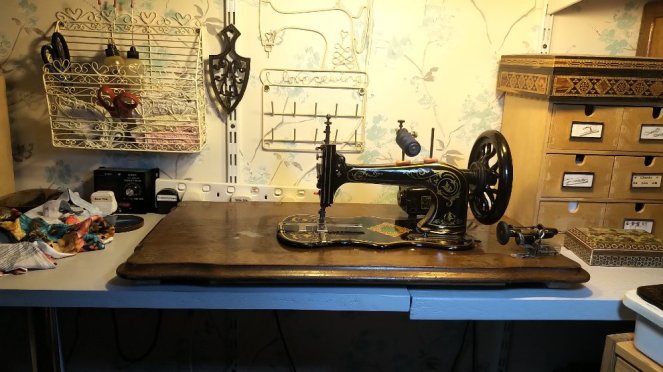
I now have a set-up that is both useful and convenient. Although it is only Family class, this machine is based on Singer 13 rather than 12 – the Medium version of Singer TS. It has the same arm length as Singer 48K, although being low arm, the harp space is smaller.
But then it came with this table top which allowed me to mount the motor further back so it isn’t getting in the way. Plus, I now have a large working surface with a levelled machine. This might just be my latest flame! 😲

These are some fascinating mods! I have a Singer 12 and a Frister and Rossman TS and both are strictly for display now, and chronicling the sewing machine evolution. Having entered retirement this year the garden and new greenhouse have taken precedence over the sewing studio, but I will bookmark this for the winter months when I get back to the (way too many) vintage machines. I do love that extra length below the arm- for garment sewing you don’t necessarily need a lot of height. Why the sewing machine manufacturers settled on a relatively short base between needle and arm is beyond me.
LikeLike
I’ve never had a Singer 12 – only other makes based on it. I noticed a lot of differences, in particular in performance, in the strengths of springs and ranges of adjustment. I suppose I should get a Singer 12 some day and see how it was all done in the original. And a Singer 13, for comparison, obviously… 😜 I still haven’t investigated the Cyclops which has double-sided feed dogs but is based on Singer 12 rather than 13 like Jones. When you buy several machines at the same time, queues start forming. 🙂
I agree that the length under the arm is more important than the height when working with thinner fabrics. I am interested in a machine that can handle my stretch and finery because all the other machines here can handle the heavier stuff – that’s the easy bit. So Jones TS has plenty of room for that. I think modern plastic wonders have such a small harp space because they can’t sew anything thick anyway, so it makes no difference. 😉 But actually I think it’s because they all started out with the Singer 15 mold, and have been progressively adding cams and levers to it that made the column and the arm thicker and thicker, eating away at the harp space. I think people didn’t want to have a huge machine at home, so there was no where else to go, really.
LikeLiked by 1 person
Yes, good point about the add-on machinery bloating up the modern stitchers. Plus the electronics and computer boards, and boom! no more real estate under the arm.
LikeLike
Hi Elena, You did it again! Great work 🙂 gotta wonder one thing. My friend has a Frister and Rossman model E. He likes the bobbin winder because he can put old wooden empty thread spools on it and wind them. I wonder if this machine can do it? I’m guessing probably not as the model E has a really substantial bobbin winder. Anyways what a great write-up and mechanical sleuth work. Best regards, Mike
LikeLike
No, I would not be able to wind big things on the Jones bobbin winder because it’s got that plate there that rests against the bobbin. Plus the cap of the bobbin is supposed to fit into the cup on the bobbin winder so as to engage the positioning pin, otherwise the bobbin would be slipping during winding.
LikeLike
Again Elena, this is extremely helpful for my continued faffing with my Nothmann. It has been so hard to just find a diagram with what all the adjustments actually do – the manuals I have looked at all seem to mainly have notes about how young ladies should adjust things as little as possible… love them. Anyway, another of your blog post to go in my favourites file – you have your own folder 🙂
LikeLike
Have you seen my post about Jones TS machine? It’s got explanations about the adjustments as I figured them out. Nothmann will be very similar. 🙂
LikeLike
ooo will relook… thank you. coffee is on its way…
LikeLike
Thank you! 😀 It’s a bit further down, there’s a picture with labels and explanations.
LikeLike
Sorry, I got confused there. This IS the post on Jones TS!! 😀
LikeLike