This is the system found in Kenmore and Frister+Rossmann machines from 1970s. It is made in Japan by Marutzen/Jaguar for forward-facing vertical oscillators, or class 15 machines (based on the mechanism of Singer model 15).

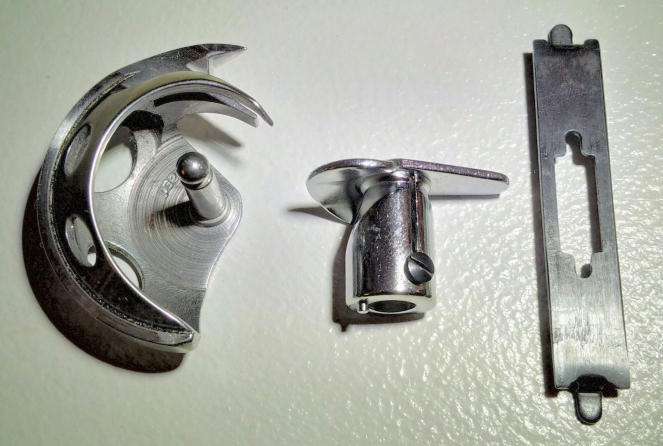
It consists of a modified hook, a clip-on adapter that replaces the bobbin case, and a special needle plate, or a needle plate insert. I wrote about it previously in more detail.
Since the hook is mostly standard, it fits into any class 15 machine, so I adapted the needle plate on my Haid & Neu Primatic for chain stitch – you need to alongate the needle hole towards the back.

I first left a little separation between the needle hole and the feed dogs, but I found that it interfered with the thread, so I drilled right through – and now it works so much better! However, I think I’ll solder a wire onto the underside later to prevent the thread getting into the feed dogs the way it is done on the Jaguar needle plate.

I am now able to sew reliable chain stitch, almost as good as the one from a real chain stitch machine with a propeller hook.
And why am I not using that machine if the results are better? But I am using it when I can, but it is absolutely tiny, so you can only sew near the edge with it, not in the middle of a panel as I needed to do now.

Essex is a lovely little machine, very useful for small projects or sewing in tight spaces. But unfortunately too small for larger things! Which is why I wanted chain stitch in a full sized machine in the first place. (I have plans brewing to convert my Jones Spool into a chain stitch machine with a propeller hook. Some day I’ll even do it!)
The project
For this particular project I’m sewing finely knit polyester jersey in a textured double knit. It is similar to Ponte Roma but less dense and made with finer spun yarn, calling for “stretch” needles as regular ball point are getting stuck in it… In a word: a breeze to sew. 😉

This jersey has some stretch along the length and a lot of stretch across the width, rather more than the 40%-50% that a vibrating shuttle stitch will give you. It calls for single thread chain stitch! When adjusted correctly, it can give you up to 200% stretch – that’s as far as I could test it, not having found a fabric that stretches even further! (Not counting nylon-lycra tights which I have no intention of sewing.)
Note that two-thread chain stitch found on overlockers and cover stitch machines, generally does not stretch at all in its modern version. Original old machines do make a flexible stitch, but only up to a point – similar to the vibrating shuttle.
Single thread chain stitch has one major drawback: if the thread breaks, the seam will quickly unravel from the break and towards the beginning of the seam. So we need to make our seams more secure. This can be done either by choosing a stronger thread, or by turning over the fabric and sewing the same seam again, over the first stitches and going in the opposite direction. This double stitch is undoubtedly strong and secure, but is somewhat bulky and a little less flexible than a single stitch. I always sew thicker knits with a double stitch, but for my thinner jersey I’d like to keep it single.
The things that matter
In my experience, the three important things for reliable chain stitch are: the right foot, the right needle and the right thread.

The foot: use a straight stitch foot without a heel – the bit that extends towards the back of the foot. Hinged feet often have a long heel, but it interferes with chain stitch somehow. Look at the foot on the Essex machine above: it has no heel at all.
The needle: the needle type generally depends on the fabric you’re sewing, but I found that thin overlocker needles work best in most cases. Note that they don’t seem to work so well for lockstitch on the same machine with the same fabric – they skip stitches. But great for chain stitch.
The thread: use a tightly spun smooth thread like Coats Duet or Gütermann – exactly the type of thread that gave me so much trouble with bobbin tension… But great for chain stitch 😀 and strong enough to avoid seams popping (and unravelling) when the fabric is stretched. Silky machine embroidery thread and smooth mercerised cotton also work well, but avoid soft spun or cheap and fluffy thread – it will skip more stitches than it’ll make (and don’t even think about lurex).
Fluffy thread is generally problematic in a vertical oscillator, chain stitch or lockstitch. The thread loop passes between the hook and the driver in two places:
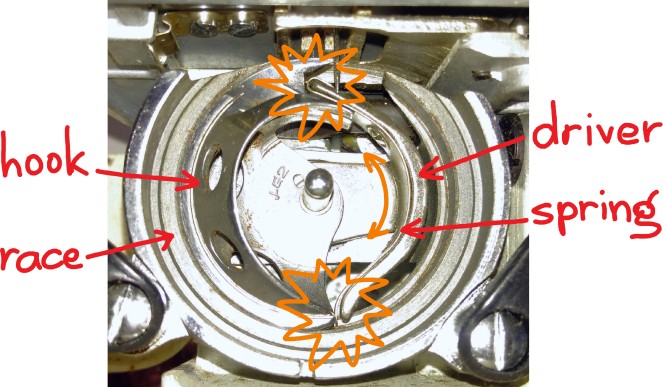
The amount of space available is regulated by the driver spring. Fluffy thread takes up more space than smooth thread, even when the smooth thread is actually thicker! It’s a paradox…
When the space is too tight, you need to pull harder to get the loop through, so you need a higher tension, and there is a greater risk of the loop getting stuck and forming a rat nest or jamming the machine completely.
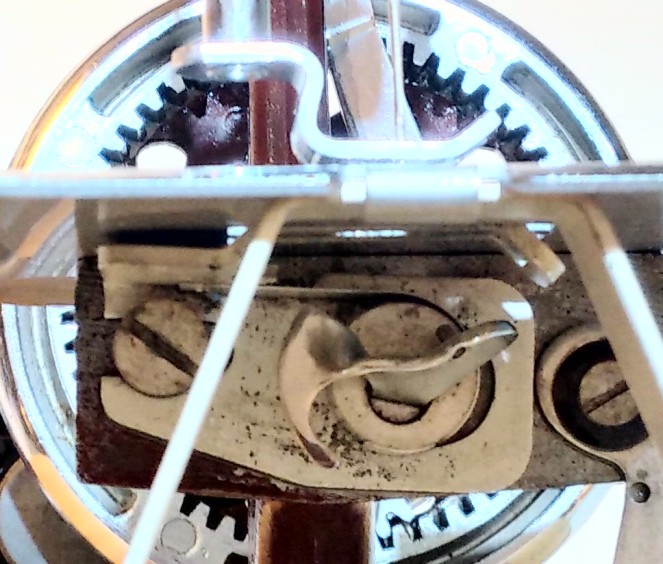
Chain stitch on a vertical oscillator requires much more space on the “butt-to-butt” end than lockstitch (bottom one in the photo above), as I discovered experimentally. I have two identical Haid & Neu Primatic machines but one of them has a broken off driver spring on the butt end. There was a gap of nearly 4mm there, so I soldered some tin onto the driver to close the gap.

This works well for lockstitch, but, I thought, even that 4mm gap also worked for lockstitch, although it made the machine very noisy. But it worked… So why don’t I file away some of that tin and make a larger gap for use with chain stitch? I will still work for lockstitch and in the worst case I can solder it back on…

This is the point when the thread is passing through that gap. Making a larger gap helped! I can now sew chain stitch with much lower tension than before, with bigger, rounder loops, and the machine is more tolerant to changes in thickness of the material, such as when going over seams. Previously I found it necessary to increase tension for going over seams or for doubling up chain stitch (sewing over the same seam on the reverse for reliability), but filing away that little bit of tin solved this problem completely. The gap is now about 1.5mm wide, so even on lockstitch the machine is reasonably quiet.
I think an alternative would be to grind a little off the butt of the chain stitching hook to make it shorter and achieve the same effect.
The machine settings
Single thread chain stitch consists of loops, and the rounder they are, the more stretch the seam will have. It can be sewn by hand too – with exactly the same results.


The propeller hook is side-facing, so the drawing above is the side view with the material moving from right to left. The hook picks up the thread from the needle and holds it opening it up towards the front. On the next stroke the needle lands inside that opened loop, the hook drops the old loop and picks up new thread from the needle…
The Jaguar adapter is forward-facing but works in the same way as the propeller hook. It picks up the thread from the needle, passes it onto that big clip-on thing that opens up the loop and extends it forward so that on the next stroke the needle lands into the loop.

Then the big thing swings back dropping the old loop and receiving the new one that the hook had just picked up.

The take-up lever pulls up the stitch the same way as for the usual lockstitch, except that there is a loop on the clip-on thing.

Magic.
A proper chain stitch machine like the Essex can produce even reliable chain stitch with low tension making almost circular loops. The Jaguar adapter does not do quite as well – as you reduce tension, you get uneven stitches that eventually turn into messy rat nests on the underside. However, you can still make a good even chain stitch with a respectable 80%-100% stretch with the right settings of stitch length and thread tension.
The actual ideal settings depend on the fabric and thread, and possibly the individual machine, the phase of the moon and the house that Saturn is in, but we can derive some common indications. 🙂
Foot pressure is important for pulling up the stitches properly, and works in conjunction with the heel of the foot. Keep it medium to high, increasing it for thicker fabrics.
Stitch length should be short, or the seam won’t be tight. Set it to 1mm to 2mm. Set the stitch length first as the thread tension depends on it.
Thread tension depends entirely on the situation. Experiment until you get a good stitch. Rat nests on the bottom mean it’s much too loose. Loops looking like straight stitches means it’s too tight – the seam will not stretch and stitches may be skipped, so the seam will unravel. Open the seam flat as well to check whether it’s tight. Thicker fabrics require higher tension, so test it with the actual fabric and thread you’ll be using. Different stitch lengths also require different tension, but the relationship is not straightforward, so experiment.
Use a spool stand or a horizontal spool pin to make sure that the thread comes off the spool without any resistance.

Chain stitch uses three times more thread than lockstitch on its top thread, so if you use a classical vertical spool pin and allow the spool to rotate on it, it will be pulled too hard and with jerks which will ruin your finely calibrated thread tension.
Needle length needs to be a bit longer than standard to avoid skipping stitches (that’s when the hook misses the eye of the needle and fails to pick up the stitch). So set the needle a bit lower – there is no bobbin case there for it to bump into.

Missed timing can happen because the chain stitch hook has a minutely shorter butt to allow more space for the thread to pass, resulting in the tip being slightly late picking up the thread. Ideally you should have different hooks for lockstitch and chain stitch because they are subtly different. A hook that can do both, will do neither well.
Sew slowly – your machine can do 900 stitches per minute, but that’s on lockstitch. Going too fast on chain stitch will cause skipped stitches.
And finally – this is for straight stitch only without reverse, the Jaguar adapter does not allow zig-zag (and you’ll break the needle on your straight stitch foot and the narrow hole in the needle plate).
Good luck and happy stitching! 🙂

Elena,
Lots of good tips here for chainstitch – many thanks. I haven’t used the Marutzen/Jaguar chain stitch system, but I have got a Singer 411g – the generally all round great machine that does chain stitch using a modified needle plate. I get the odd skipped chain stitch that I haven’t been able to overcome yet, so those tips are very welcome. I’m not familiar with overlockers or their needles but could give the alternative needles a go. Could the needle just be fitted a bit low rather than adjusting the needle bar height I wonder? worth a go as a trial at least I would have thought – the needle could be marked to make sure it was put in a sensible amount low….
Dan H
LikeLike
Dan, I’ve had a Singer 431G, and didn’t like it, I’m afraid. Couldn’t get my head around the fancy stitches. But regarding chain stitch, it is a very different system. I don’t think you should set the needle lower on a 411G – it’s a forward-facing horizontal oscillator without a bobbin case, so in terms of what the needle would bump into, nothing changes when you switch to chain stitch. I think you might break needles if you set it lower. The overlocker needles I meant are of the 15×1 fitting, i.e., standard domestic, but they have a special head, so Schmetz terms them 15x1SP. There’s also 15x1EL which is supposed to be different, but I think they are very similar. Organ calls them HAx1SP and Singer – 2022 or ELx705. Just make sure you get thin ones.
As far as I remember, skipped stitches in the Singer chain stitch system are caused by that little hook on the underside of the needle plate failing to keep the loop open for the next stroke. This is different problem than with Jaguar, but I think sacrificing a lamb and praying to the Sun God generally helps in both cases. 😉
LikeLike
Oh, and I don’t change the needle bar height! Just hold the needle a little lower and tighten the screw on the clamp well – that’s enough.
LikeLike
Elena,
Good point about the different hook system (rotary) on the Singers – thinking about it I agree lowering the needle height on those machines is more likely to result in a big crunch than a better stitch.
Setting the fancy stitches on the 400/500 series Singers is fiddly I can’t deny, but once they are set the stitches produced are very nice. The degree of fiddle does vary between machines too – I have two 411’s and one is much easier to set than the other.
Sounds like the Schmetz 15x1SP overlocker needles would be worth a go though. Otherwise, like you say, prayers are part of the equation.
LikeLike
Singer 411G is oscillating, Dan. Singer 600/700 “Touch and Sew” are rotary, and I don’t know the 500. Those hooks look similar and are easy to confuse! The important point for chain stitching though is that they are horizontal, whereas the Jaguar system is for vertical hooks with a bobbin case. They fit rotary hooks too, with the very same clip-on.
LikeLike
Elena,
I understand how the Jaguar system forms a stitch – thanks to your great article. All the 400 and 500 series Singers have essentially the same mechanicals though- and they’re rotary hooks, two rotations to one stitch – stated in the Singer service manuals for these machines.
LikeLike
This is interesting, Dan. Sorry, I must have remembered wrong! I was sure my 431G was an oscillator. But since they are rotary, the finer points of chain stitch formation may be even more different.
LikeLike
Agreed that the chain stitch formation is very different on the Singers. I’ll have to study how the chain stitch is formed on mine – I haven’t yet got my head round it.
LikeLike
Elena…I have been reading your great articles on chainstitching. Thank you for thinking and inventing! I have a forward facing, vertical oscillating machine and I have the race and the kenmore kit, but I dont know what to do about needle plate. I would like to send you a pic of the plate. Does not come with a straight stitch plate and the windows for feed dogs seem a little unusual. I would love go get some tips from you on next step.
LikeLike