This is one of the great classics from 1955: Pfaff 230 Automatic, not to be confused with Pfaff 230 that didn’t have any fancy stitches.

This machine has signature Pfaff forward-facing vertical rotary hook with internal belt transmission.

Zig-zag is done with a swing needle mechanism and all the fancy stuff is in the arm.

This machine came to me in its “original” condition minus the surface dirt which the seller very kindly cleaned up. Original condition then means “as found in the garage where it’s been left to rot for the last 50 years”. There were no accessories but the motor and pedal were both present and working. Actually, there was nothing fundamentally wrong with the machine, give or take a timing issue. 😉 The machine wouldn’t pick up the thread. But at least everything was moving!
The hook
The first thing to do was to fix the hook alignment. Remove the needle plate and the feed dogs under it, and you get a very good access to the hook.

Here you can see the hook approaching the needle ready to pick up the loop. In my machine the distance between the hook and the needle shown with a yellow arrow was too great – the hook was too far back to work. To solve this or any other timing issues, you need to loosen two holding screws on the collar of the hook shown with a red arrow. Rotate the balance wheel to bring the other screw into view.
In my case, the timing was fine, only the distance needed fixing, so I was very careful to pull the hook forward without rotating it – that would have changed the timing. The resulting close fit is what you see in the photo. Great!
But once I threaded the machine, it appeared I wasn’t quite done yet. As the thread goes around the bobbin case, it has to pass through the gap between the hook and the bracket holding it shown with a green arrow. But… what gap? There’s no gap there at all!
Precisely. So, I had to pull the finger back a bit to make a gap.

This is done from underneath. The top most screw in the above photo allows you to move the retaining bracket back and forth to work with the hook.
The machine was now picking up stitches! 😊 And not skipping any, so I managed not to mess up the timing! 😃 But something was still not right: what’s that horrible banging coming from the hook area and why are the stitches so very long?
Feed adjustment
The feed dogs were too high and banging against the needle plate.

To adjust feed dog height, bring the needle in its highest position, then loosen the screw marked with the red arrow and rotate the block circled in green.
You need to have the needle plate in place in order to judge the height of the feed dogs. The right height often depends on the type of material you intend to sew: a greater height gives stronger traction, which is great for heavy materials and detrimental for fine ones. You might have to experiment to see what works for you.
Don’t forget to tighten the screw again when you’re done!
Impossible tension
Trying to sew made it clear that upper tension was set to block the thread completely, at any setting. The only way to loosen it was to unscrew the nut fully, at which point you had no tension at all. 😒

The first thing to note is that this tension unit is not the same as the one described in the manual. This one is simpler, so I think I have an older model.
With a bit of experimentation I found that the culprit was the central spring – it was too long. Replaced it with a shorter spring from my box of bits, and we are in business! 😃
Considering that the machine could not sew with such high thread tension, I think it must have lost its original tension unit at some point, or possibly parts of it. This and other problems that I found, all shed light on the reason this machine had been abandoned: it was not maintained properly and was allowed to degrade into being unusable. Such a shame, since it only took me half a day to put everything right again!
The feet
Well, it’s a standard low shank foot fitting, so I’ll just use standard feet for 5mm wide zig-zag, right? Wrong!
It is a standard low shank fitting, but the feed dogs are extra wide, so even though the machine does 5mm wide zig-zag, the presser bar is aligned to take feet designed for 7mm wide zig-zag machines. Not only are they wider and match the feed dogs better, but more importantly they align with the needle!

This particular set of 7mm feet comes from Janome’s New Home 690. I haven’t got that machine itself, the feet were a part of a job lot of odds and ends that I bought for something else that was in it. So the Janome feet were sitting in the dreaded bottom draw for a few years because they didn’t fit any of the other low shank machines in my sewing room – the alignment was all wrong. As it appears, they were waiting for Pfaff 230 here! 😁
As an aside, I noticed the same alignment issue with high shank feet too. I now try to make up sets of feet for each individual machine, even if some feet are identical.
Stitch settings
The reason that Pfaff 230 and Pfaff 230 Automatic have the same model number is that they are the same machines essentially, but Automatic has a bolt-on fancy stitch module. It modifies plain zig-zag to create patterns. This machine has no back-and-forth stitches.

There are five knobs that set the stitch type, marked A to E. To access knob A you have to open the hatch in the top cover – you see the knob in the top photo. Note that knob E can only be used with the top cover on. Knobs F and G set stitch length and reverse, in a somewhat confusing combined fashion. Knob H is for drop feed.
First let’s look at stitch length. Metal lever F sets stitch length from 0 to 5, but plastic knob G activates it. More specifically, if you are reducing stitch length with lever F, knob G automatically moves with it and you are all set. But if you are increasing stitch length with lever F, knob G does not move and effectively leaves your stitch length unchanged. You have to rotate knob G anti-clockwise to engage the new stitch length setting.
To sew straight stitch and zig-zag, set dial B to zero. This releases needle position lever C and zig-zag width knob D. When you change needle position, the lever clicks into place for left, right and centre.
To sew fancy stitches, first of all set lever E to something other than zero. This lever regulates pattern elongation, with 4 being the shortest pattern and 0 being infinitely long pattern – no pattern at all. Useful values are therefore between 4 and 1. The numbering does seem counter-intuitive, I would have rather expected the higher number to give a longer pattern, but no, it’s visa versa. 😕
It looks like I wasn’t the only one who found this confusing. The manual that I downloaded from the Pfaff website, says that the numbering goes 1, 3, 5, 7 and 0, so they reversed it at some point. I’m not sure why not just leave it as 1, 2, 3, 4 though? But never mind. 🙂
Now to get different patterns, turn knobs A and B. Knob A switches between eight cams that do “line drawing” – move the needle left and right. Knob B switches between five cams that superimpose different zig-zag width modulation onto the “line drawing”. Some positions of knob B also allow to set needle position left, right or centre to get a one-sided or a centred design. In some cases you can also set zig-zag width, while in other cases the zig-zag width and needle position is modulated by a cam.
But how to know what you can do with each setting? You need a Pfaff fancy stitches disk that is supposed to come with the machine, but you can also buy a reproduction, as I did.
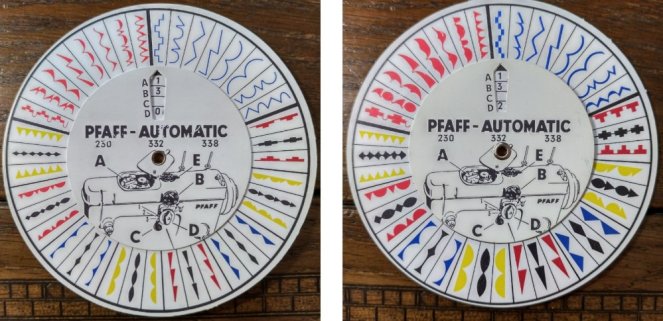
This two-sided disk shows all the patterns that the machine can sew. You rotate the inner disk so that the arrow points at the pattern of interest, and you read off the settings in the window.
The sewing test
My first question was whether this machine could make a stretching stitch for jersey. The answer is yes, to some extent.
The bobbin case can deliver very low tension needed for a flexible stitch, but the overall mechanism still pulls on the bobbin thread and can make it quite taut, in particular if you keep the upper tension low too. This is radically different than in other machines that I worked with! So here, in order to get a stretching stitch, you need to set the bobbin tension completely loose and then raise the upper tension until the stitch is balanced. I got 30% stretch on interlock jersey, which is much better than most machines but still not as good as Adler 87 or vibrating shuttle machines.
The next thing to try is sewing delicate fabrics, then thick fabrics, etc. Overall, I can say that this is a very capable machine, but if you want to be able to sew them all, you’ll find yourself adjusting and re-adjusting the height of the feed dogs and constantly popping the top cover off because the presser bar control is hidden underneath! Clearly not meant to be altered. So I would say, decide on the range of fabrics you want to sew and set up the machine accordingly. And if you really love it, get several of them and set them up differently – the factory strategy! 😃
Convenience
Is this machine well designed from the usage point of view? Or does it make you learn new swear words every time you use it?
It’s not bad! It’s actually pretty good! I like the pattern selection mechanism, the light at the front (on the underside of the arm) and the fact that this model (230) has a standard external motor that is easy to adjust or exchange. Model 260 is the same mechanically, from what I can tell, but it has an internal motor.
There is also a built-in needle threader, if you like such a thing, but I don’t, so I removed it.
The major drawback though is that you have to flip back the machine on its hinges in order to access the bobbin. The manual tells you to just reach from below which only works if you have it in a treadle cabinet. I also find it annoying that the foot pressure adjuster is hidden under the top lid. But actually you get used to these things. They are not going to put me off using it!
Applications
I have a lot of machines, from straight stitch only, to zig-zag and utility, to embroidery in varying degrees of madness. So where does Pfaff 230 Automatic fit in?
The following is a prediction, as usual time will be the real judge. Some machines surprised me in the past – something that looked so versatile and interesting during testing ended up gathering dust, while others that seemed to offer nothing special at the first glance, got plenty of use time and time again.
With this Pfaff I am not sure. I can use it on most fabrics that I usually sew, and the fact that it can make a reasonably stretchy stitch is a big plus. But it doesn’t have any utility stitches, and I tend to use that the most, in particular the faggoting stitch (a.k.a. random zig-zag). However, the manual hints that many of the fancy stitches when used without elongation and with a longer stitch length for less dense zig-zag, can actually produce useful utility stitches too. I’ll have to experiment with that.
I think Pfaff 230 can do useful satin stitch embroidery, in particular thanks to the elongation feature. And it can handle stretch fabrics much better than my Necchi Supernova made in the same year (1955 was a great year for sewing machines!). However, it’s been a while since I paid attention to Supernova, and I’ve learned a lot of new things about feed dog height and thread tension since then, so perhaps I should not count my Necchi chickens yet and should revisit it some time soon. Only time will tell!
![]()

What a great review, thanks a lot. I own a Pfaff 230 Automatic, but it is not in such a great condition. I still have to do a lot of work on it, I’m learning still, so this review is very helpful. Strange how the settings of your machine were so wrong, but it helped me understand how everything works. Happy sewing, regards, Liko.
LikeLike
Thanks Liko – glad it is helpful! It is actually quite common to find all sorts of things wrong in old machines, at least if you buy them cheaply in “original” condition as I do. 😉 After all, everything degrades without maintenance.
LikeLike
I always enjoy your classic sewing machine “tour” posts! Maybe in the future we can get an updated photo of your amazing collection (bet is keeps growing!) 🙂
LikeLike
Thank you, Tierney! There has not been much growth in the past year, what with buying a house and moving and all, but I still have a number of machines “in the rough” – bought but not had the time to do anything about them. So plenty of new things still to come! I keep telling myself that I shouldn’t be buying anything new until I sort out the ones I’ve got, but somehow it doesn’t always work that way… 😕 😉
LikeLiked by 2 people
Well . . . automatic, systematic, hydromatic – you have a greased lightening Pfaff! So many little things to adjust – well done for taking such a short time to figure it all out. I’d have been sitting and staring into space for most of that time!
LikeLiked by 1 person
Thank you for this nice tour of this machine. I just got one of these machines today and I spent the afternoon oiling it and getting to know it. One thing I found is that mine does not do a straight stitch even when I have it set for that. There is always at least some zig zag. Any ideas?
LikeLike
This is a common problem with zig-zag machines in general. There is a sweet spot in the zig-zag mechanism that gives straight stitch, and it is not always properly aligned. There might also still be some dirt or rust there preventing movement. You also need to oil the zig-zag width control, see https://vintagesewingmachinesblog.wordpress.com/2020/02/06/pfaff-230-not-stitching-patterns/
Other than that, give the machine a good run – a couple of days of intense sewing, such as a quilting project. It will warm up the joints and clear the dirt. I find that most smaller problems clear after some 15-20 hours of work, but be sure to run the machine for prolonged periods of time at a high speed to warm it up properly.
LikeLike
What a helpful resource! I just picked up this same machine yesterday and have the exact same issue with the tension. I am curious how the tension knob is supposed to be interpreted… there are markings on the metal cup that go from 1-5 and there are also markings on the knob. I have played with it quite a bit but the upper thread breaks pretty consistently. Also, could you confirm how you are threading your machine, especially through the tension mech? This may be contributing to my problem and there are many conflicting resources online. I also can’t seem to move the E knob above 0 to get to the fun stitch patterns, but that is a problem for another day! Thanks so much!
LikeLike
Hi, if the upper thread breaks all the time, then either it’s threaded incorrectly or more likely the tension is too high. I think the markings should be read like 1.5, 2.3, etc. where the first number is the one on the side of the knob and the second one is on the dial. Reduce the tension all the way down and see what happens.
You can download the manual from Pfaff website here: http://www.pfaff.com/en-US/Support-and-Updates/Support
Select machine name then click on the red button “Documents” and there you have the manual.
Regarding the E knob, it is very stiff. Pop off the lid and oil the mechanism underneath, everywhere and not just in the oiling holes. The knob will eventually move. It won’t be so stiff anymore once the machine has loosened up.
LikeLike
I did just as you said and reviewed how I was threading and she runs like a dream! I haven’t tried all the stitch functions but the ones I have look wonderful. Thank you so much, it is a dream to have your expertise on my exact machine especially 🙂
LikeLiked by 1 person
Thank you, Ariana, I’m glad it all worked out! 🙂
LikeLike
I would like to sew leather with mine 230 Automatic, straight stitch only. Do i need a walking foot attachment (which one) or will adjusting the feed dog height be enough
LikeLike
Hi, a walking foot attachment is normally used for slippery materials and not so much for leather. I would rather recommend a roller foot. It is a kind of foot that has rollers in it so that it does not stick to the leather. You can buy either a low shank roller foot or a clip-on foot with a separate low shank adapter. Feed dog height adjustment might not be necessary.
LikeLike