Janome’s New Home 551 is one of those machines that you think you can easily do without, only to discover that nope, you can’t. Which is why, having sold my previous one because it was “surplus to requirements”, I had to chase for a replacement because it left a gaping hole in those requirements…
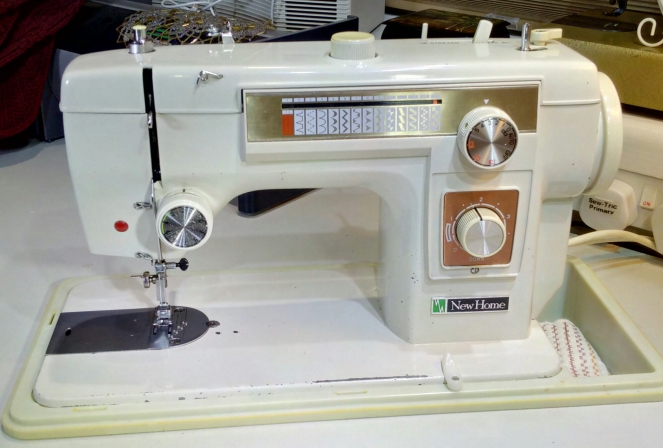
This is a Japanese-made machine by Janome from 1970s, I think, and oozing quality. It’s a heavy machine weighing 15kg and having a cast iron body, although it does use plastic gears to drive fancy stitches, but at least it is not in the main mechanism. It does zig-zag, back-and-forth “stretch” stitch and 14 patterns which combine with stretch stitch and added zig-zag to actually produce 56 patterns all together. I’ve done a stitch overview separately.
I think I may have figured out how to tell quickly which New Home machines were made by Janome Japan and which by Janome Taiwan: it’s in the colour of the logo. Japanese machines have a green square and Taiwanese ones a blue one. There’s usually also a label with model number which states where the machine was made.
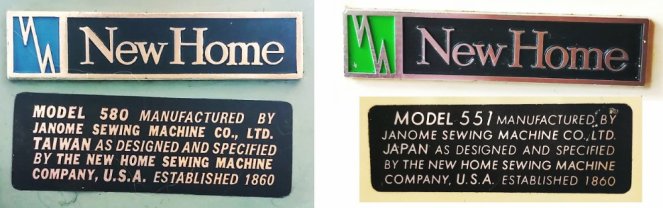
However, the text is rather misleading. “As designed and specified by New Home USA”? Hardly! New Home USA didn’t design any of these machines, they are all designed by Janome based on Singer 15 architecture… Janome bought the New Home company and their designs in 1950s after which New Home USA seized to exist. New Home did have their own designs, just not these.
Replacing the balance wheel
I bought this second machine in untested condition from a house clearance sale, and it got damaged in the post – the balance wheel got broken.

Upon inspection I discovered it was made of porcelain!
I had another balance wheel in my box, so I figured it would be an easy fix – not so. The internal diameter was the same, as both machines were once based on a Singer 15 design, but the depth of the balance wheel and its profile where all wrong and didn’t fit in the existing space. If the balance wheel is not deep enough, the end nut doesn’t hold it in place and you get no rotation of the shaft; if it is too deep, you can’t even fit the end nut. It’s got to be just right, or nearly so. And it’s got to have the right profile so as to engage the bobbin winder and to fit in the cavity in the body of the machine.
A balance wheel from another New Home 551 would have been ideal, but none were available. I found something that looked like it might fit: a wheel from Jones 942 made by Brother – another Japanese machine stemming from the Singer 15 design.

The profile was right but unfortunately the depth was a little too shallow – the nut didn’t grip. I solved it by adding the second clutch ring on top of the first. I also had to replace the stop screw in the end nut by a longer one that would catch both rings.

Now we have power! 😃
The pattern selector
This is a nifty contraption which moves the finger up and down the cam stack. At the same time it also moves the indicator along a line of patterns to show you what’s currently selected.
The pattern selector is normally locked – don’t force it! To unlock it, set the zig-zag width knob to OFF.

On OFF, the pattern selector knob on top of the machine should turn very easily. If it doesn’t, if it’s stiff or if the indicator is not moving, it needs attention.
Pop off the top lid and pull off the cover of the stitch selection knob.

The small gear shown with a red arrow is the one that actually moves the finger up and down the cam stack. It meshes with the pattern selection knob. The screw shown with a yellow arrow keeps this knob in place and also presses down on a plate with notches that provide a tactile feedback for when you’ve moved to the next cam in the stack. Remove this screw and pop off the knob. It has another small gear on the bottom.
This small gear on the underside of the knob meshes with the zig-zag edge of the pattern indicator strip which moves along a scale with pattern pictures on the front of the machine. Undo the two screws marked with green arrows. They hold down a plastic strip over the stitch indicator “saw”, this strip has a groove and the “saw” has a raised edge. The raised edge is meant to ride in the groove when you turn the selector knob.
But in my machine the indicator was not moving. 😕 First it was very stiff and then it stopped altogether, so when I looked to see what the problem was, I found that the “saw” strip had slipped out of position so that the teeth of the strip were no longer meshing with the gear on the underside of the selection knob. The knob was still working and changing patterns but you could no longer tell which pattern was currently selected. 😒
I fiddled with it for a couple of hours – couldn’t see anything wrong with any of the bits and couldn’t figure out why it wasn’t working. The solution was so simple, it’s painful: dirt and thickened oil between the “saw” strip and the plastic holder strip. All I had to do was clean it up! 😤 The “saw” strip is meant to move very lightly between the metal base and the plastic cover, and that thick goo was giving enough resistance to push the raised edge of the strip out of the groove in the plastic cover which displaced the strip away from the gear on the underside of the pattern selection knob.
Putting everything back together I had to synchronise the position of the finger against the cam stack with the correct pattern being pointed at by the indicator. It is easiest to synchronise with the first pattern (number 1) because it’s the bottom cam on the stack.
- Remove the selector knob and turn the gear with red arrow until the finger comes all the way down. You can see the finger if you turn the zig-zag width knob to AUTO. Don’t forget to turn it back to OFF!
- If the finger does not move easily, you have a different problem. Solve that first, then return here.
- Now fit the pattern indicator such that it points at pattern 1 and tighten the two screws with green arrows. The screw holes in the plastic holder are oblong to allow for fine adjustments later. You need to tighten the screws fully though, or the “saw” strip might slip while you’re fitting the knob.
- Put the pattern selector knob on and make sure that it meshes both with the finger moving gear with the red arrow and the “saw” strip on the bottom. The knob should move both things when you turn it.
- Put the round notched plate on the pattern selection knob with one of the notches over the metal pip on the knob. Tighten the screw with the yellow arrow.
- Check that everything works on all patterns – go through the entire range a few times to make sure it doesn’t stick anywhere.
- Pop the knob cover on and the top lid on the machine. Done! 😃
Adjusting needle position
This machine does not have free needle positioning, so it sews straight stitch with the needle left. And because this is a side-facing vertical hook, the whole hook assembly moves left and right with zig-zag, so the relative position of the needle and the hook is always the same for every stitch in every pattern – see this post on zig-zag hooks.
On my machine the needle always hits the hook!!! 😖 So the needle is too far right with respect to the hook. By about half a millimetre.
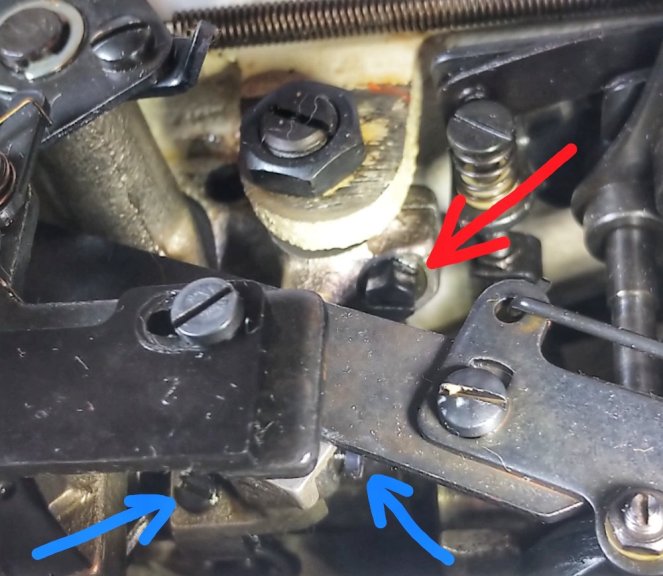
This is the view of the zig-zag mechanism under the top lid. You can get to all three screws by setting the stitch pattern to 1 and varying zig-zag width.
The screw with the red arrow holds the lateral synchronisation of the needle with the hook. If you undo it, you will eventually be able to break the synchronisation – and to reset it. I have also undone the screws marked with blue arrows in order to get some movement into the mechanism, but I think you don’t need them.
The red arrow screw does not change the hook timing! When the screw is undone, the hook does not move left and right for zig-zag, so it allows you to set a distance between the needle and the hook and hold it for all patterns.
It is also possible to achieve the same thing by adjusting the hook depth as described in this post. It is not necessary to do both! 😉
It’s all zig-zag!
I’ve been messing about under the top lid undoing all sorts of screws that I shouldn’t have, and as a result I lost straight stitch. 😥
When I change the zig-zag width from small to large, everything works fine, but when I go back to narrow zig-zag or straight stitch, nothing happens. What have I done? 😫
In this machine reduction of zig-zag width is done with a spring, and I obviously unwound it. 😟

The red arrow marks the spring and the blue one marks the holding screw that I should have left well alone! The principle of winding the spring is obvious: turn the slotted pin clockwise to wind the spring, then tighten the holding screw to fix. The implementation however is rather challenging because you cannot let go of the spring winding pin and have to tighten the holding screw without letting the spring unwind again. If you think this is easy, try it! Or better don’t.
But eventually it was done. 🙂
I also found that the zig-zag “elbow” screw shown in the previous photo with the right blue arrow, should not be made too tight. This makes the zig-zag elbow too stiff to control with the spring, at least as far as I could wind it.
Everything working now! 😁

Hi Elena, Another amazing job! Porcelain hand wheel. Very cool right until it breaks….the cheaper porcelain is called “bone porcelain” and uses….ground up bones likely straight from the butcher to be added. Higher grade porcelain not the case and porcelain is much stronger (but also much higher firing temperature). Our Singer 600e had a mostly disintegrated hand wheel that was hollow and plastic. We filled layer by layer with solid fiberglass but it is just a tad off as machine turns. It works however. I bought that machine for it’s single thread chain stitch to be able to set it up and leave it that way (and never ended up needing that stitch yet…). My understanding is the 600e’s motor is 3 wire instead of 2 and slightly more powerful (someone put one in a 401a to hot rod it). So, another side facing zig zag but this one has decorative stitches! Too bad about the plastic gear even if it is in the stitch selector. I found on our 158.1247 side facing hook Kenmore machines there is a zig zag gear (helical) and when it goes it binds and causes the machine to lock up. I’m working on replacing both with brass gears I was lucky to find. Our side facing White also has a plastic gear and I need to figure out the adjustment screw to get the stretch working. Same as our 1247 but we finally figured that one out. Best regards, Mike
LikeLike
Yes, I know bone china from cups and saucers. But there, it makes for finer and stronger porcelain which is also a lot more expensive than plain earthenware. Mind you, it all depends on the type of clay used, and so it’s different from place to place. The replacement balance wheel is metal and very heavy. Probably cast iron (it’s magnetic).
I’m not so worried about those plastic gears. Yes, normally I am paranoid about them but I also have a New Home 580, also a replacement of the one that I had sold because I thought I found something better. I’ve had my first one for about 4 years and I really used it heavily, also on heavy upholstery materials, and it didn’t show any problems. That model also has plastic gears to drive fancy stitches and “stretch” stitch. This is a radically different experience from New Home 632 which has a plastic gear driving the bobbin assembly – that one wore out very quickly and was causing me lots of trouble. Of course I would have preferred not to have plastic gears! But the machine is so nice and so useful otherwise, that I’ll take it. It seems that New Home 500 series is much more robust than 600 series. Also the material of the gears is different.
Regarding chain stitch on general purpose machines: the best one by far that I found is on Janome’s New Home 609. It’s a forward-facing rotary free arm. There’s a similar model that’s flat bed, but watch out – it’s an oscillator. I haven’t seen a Janome rotary as a flat bed. The 609 is also Japanese-made and a fantastic quality machine overall. There’s also a newer version (900, I think) with the same hook and chain stitch but full of plastic gears, so avoid. See this post on Jaguar chain stitch versus Janome: https://vintagesewingmachinesblog.wordpress.com/2018/11/19/woolly-knits-knit-crochet-sew/
Regarding the motor of Singer 400G series – I’ve had a 431G and was not impressed. It’s ok, better than most Singer motors I guess, but doesn’t compare to others. Don’t know about 600 series though.
Where do you get your brass gears from? I might look into that… 🙂
LikeLike
You are like a Sherlock Holmes of non-working sewing machines! Magnifying glass to find the clue that solves the mystery! LOL!
LikeLiked by 1 person
I would also like to dust for prints and bring sewing machine abusers to justice! 😃
LikeLiked by 1 person
🤣
LikeLike
I love my Janome New Home. It was a gift back in the 70″s. I sewed for all my family and friends. But now I am sad because the thread tensioner no longer adjusts the stitches! Where can I find a replacement part? And an assembly guide?
LikeLike
Hi Jana, unfortunately you can’t just buy replacement parts for old machines – they are no longer made. You will need to repair yours. As for the assembly guide, it has never been written! But someone might have written a blog post on fixing Janome tension units – they were very much the same on model series 500, 600 and 700.
LikeLike
This is my current problem. Looking for a replacement Tension take up check spring for a new home 552. suggestions please.
LikeLike
Hi Elena, thanks for this superb article. So much clarity on resolving issues. Thanks
I’m curious… I’ve recently picked up a Janome, there was no indication of the model, even on the user’s manual. Finally found a similar one on YouTube by Tia Drysdale, labeled as janome newhome 660. It’s a truly solid machine, came in full package including the user’s manual and warranty from Myers and in a nice leather like case.
LikeLike
Lizz, with Janome you can tell the model number from the serial number: the first three digits are the model number! 😀
LikeLike
Hello Elena, thank you for your very informative posts. I have a New Home 551 which I bought in 1978 just after I was
married in order to make curtains etc. At the time both my mother and sister had Singer sewing machines and told me my New Home wouldn’t last. I have got to say both Singer’s have long since given up the ghost but my wonderful New Home Model is still working beautifully! I have at times thought I would love an automatic buttonhole function rather than my 4 steps, however it hasn’t let me down yet.
Do you know if there is an adapter (high shank) for allowing clip on feet to fit my machine? I recently accidentally purchased a universal low shank adapter before realising my mistake. I also found that the needle placement on my machine was a couple of millimetres too far forwards and would potentially hit the foot, I am guessing this would also be the case with a universal high shank. Do you think I am right. Thanks
LikeLike
Hi Eileen, yes high shank adaptors are available, have a look online, or even on eBay. It is true that high shank foot fitting has a 2-2.5mm larger needle to foot distance than the low shank fitting, it is not only the height of the shank. So a high shank adapter should work, mostly.
In my experience with “standard” clip-on feet is that they are not at all standard, so there is no universal answer. I have a high shank adapter and some feet work but others don’t.
Machines also vary slightly in the needle alignment left to right, so you might find that some feet are not properly centred. But it’s worth a try if you need something in particular.
Hope this helps! 551 is a great machine. 😄
LikeLike
Hello again Elena many thanks for your information and speedy reply. Very helpful. I’ll order a high shank adapter and let you know how I get on with some clip on feet.
LikeLiked by 2 people
Hi Eileen.Do you have a manual for your machine.I got the machine but didn’t get the manual
LikeLike
Hello Inca, yes a manual was included with my New Home 551 machine when I bought it in 1978. Sorry to hear you didn’t get everything that should have been included with yours. Is there anything you would like me to check for you in my manual? Let me know if I can help.
LikeLike
Light Switch for Jenome New Home 551 sewing machine.
Forgive me for being so daft that I can’t find the light switch for the sewing machine. Also I have a special problem with my 551 sewing machine which I bought it the other day. The machine is in a reasonable condition with a bit of
“ cosmetic disfigurement “ due to its age. After thoroughly cleaning it with TriFlo and “ generously oiling “ it I found that the machine was running “not at its full speed despite of depressing the foot pedal. After a close look at the sewing machine motor I found there was “ thread wound “ around the main shaft of the motor which I guess is causing resistance and making the motor run slowly. As I am not an expert on “ electrical circuitry “ of the sewing machines ( especially “non- grounded circuit “ ) I was reluctant to dismantle the motor and clear the thread around the main shaft because it is very firmly attached. Just wondering if you/ any of your followers could give me tips to “ untangle this “ bugging problem please. Thanks, Ramana .
LikeLike
Hello, this model has no light switch.
As for the thread wound on the motor axis, you definitely need to remove it. Try cutting it with a sharp blade like a razor blade or a Stanley knife.
LikeLiked by 1 person
Hi Elena , thanks for your
“ lightening reply “ . Much appreciated. However “about the entangled thread” I did remove almost everything from the visible part of the motor shaft . But my worry is about the part of the shaft concealed inside the housing of the motor unit which is inaccessible. Any tips / suggestions, please! . As I said, this “solid chunky work- horse “ is very good for heavy fabrics and materials but due to this ongoing problem I am worried that I might not be able to exploit it’s full potential. Indeed, I am worried that the motor might snap due to this “unseen & unquantifiable “ resistance. Is it safe to
“ dismember “ the motor and reassemble after cleaning the mess . Would “ this adventure “ turn into a “irreplaceable & irreconcilable “ mishap ! Any thoughts? Regards & thanks, Ramana .
LikeLike
Hi, first of all I don’t know what type of motor you have, or even what voltage it is. But generally, it is perfectly safe and quite easy to remove the covers – but obviously UNPLUG the motor first! I don’t think there is any other way to remove that thread from the shaft. Also, shafts don’t snap, don’t worry. Alternatively you could replace the motor if you don’t want to open it.
LikeLike
Hi, I have bought a vintage Jenome New Home 551 sewing machine ( made in Japan) recently. After religiously, meticulously and thoroughly cleaning it, I am all “set for a trial run “ . But I am experiencing a very peculiar and equally frustrating problem. No matter however hard I am struggling repeatedly to insert the bobbin along with its case ( which in itself is an awkward task because it is a vertical side loading mechanism with very little space to to work your way through! ) I am unable to hear the “ CLICK “ which confirms its “ SNUG & PROPER FIT “ . This is an annoying situation which is stopping me from using this sturdy work horse ! Any suggestions & tips please.
Thanks & regards, Ram.
LikeLike
Personally, I find side-facing insertion easier – it’s a matter of practice! 😉 But if you find it tricky, flip back the machine and do it from the underbelly. You definitely need to hear a “click”. Another test is to see whether the catch is pulled in or not. The catch is the little “handle” that you hold the bobbin case with. When the bobbin case is clicked in properly, this catch is being pulled in with a spring, so there is a resistance when you try to grab it. However, if the bobbin case is not properly clicked in, then the catch flaps about quite loosely. If you can’t get the bobbin case inserted propely, may be it is defective, so try a different one – they are standard class 15 bobbin cases.
LikeLike
Hello,
Wondering if you have experience with New Home 900 machines from the 1970’s? My needle selection knob was stuck and now I have really made a mess of things trying to fix/clean myself with the internet 😳🤔😬.
LikeLike
I know the models but don’t remember how they are built inside, sorry. I found the electronic component confusing.
LikeLike
I have a New Home 552. Looking for a Bobbin and Bobbin shuttle. Any ideas where I can get the parts?
Thank you!
Julie
LikeLike
I don’t know 552. But assuming that it is similar to 551, then the bobbin shuttle and bobbins are just what is known as “standard domestic”. More specifically, it is Singer 15 type. This is by far the most widely used type among the domestic machines and is available in every store.
LikeLike
Thank you so much!!
LikeLike
Thank you so much!!
LikeLike
Thank you so much?
LikeLike
I don’t know if this lady can help, but I have found her very good for parts required in my old machines.
https://www.helenhowes-sewingmachines.co.uk/
Kerry
LikeLike
Do you know if a Singer type 15 tensioner assembly would work on a New Home (Jenome) model 552 machine?
LikeLike
I don’t have a 552. However, tensioner assemblies are usually very model-dependent, although the principle is the same everywhere. You might run into “stupid” issues like the screw not being of the right diameter, disks not fitting, and so on.
LikeLike
ok, thank you. I have a 552 that a lady gave me that fell or got knocked off of a table and broke the tensioner. I’ve looked at all the places I know of and can’t find parts nor a used machine to scavenge from.
LikeLike