It happened again – I rescued another poor soul.
- Start here
- First impressions
- 189?
- The ships
- The head
- The feed
- The mechanism compared to Singer 12
- The first transformation
2 February 2018
Despite the looks, it is a rather special old dear: a Hengstenberg/Anker transverse vibrating shuttle known as the Wittler mechanism (no, I’ve never heard of it either – see needlebar.org). It’s a hybrid between the transverse shuttle and a vibrating shuttle: a VS swinging arm rotated by 90 degrees but using a boat shuttle (albeit curved) and the transport mechanism from a TS.
This photo is from a different machine – in a much better condition. 🙂 I hope mine to look as good once I’m through with it. But it hasn’t arrived yet so I don’t even know if it’s got its shuttle, but I hope it might do. It simply looks like it spent the last hundred years in a shed judging by the state of the wood, what’s left of it…
Besides the unusual shuttle mechanism, it also has a Saxonia balance wheel. That’s a type of geared balance wheel found on German machines of various makes.
Here it is, again from a different machine (actually, this one is also a Hengstenberg but badged as “Simplicity” – currently for sale on eBay). This balance wheel has a hand-crank handle attached directly to it, so it turns clockwise and makes three stitches per revolution (see this nice thread at Quilting Board about it).
Now, where have we seen this more recently?
Oh yes, the little Essex chain stitch machine.
My Essex is motorised, with a clockwise motor. The Hengstenberg also has a groove on the balance wheel and holes in the base meant for a treadle belt, so it too can be motorised with a clockwise motor, which I intend to do.
A regular sewing machine does one stitch per revolution of the balance wheel, so if I use the same diametre pulley on the motor for Hengstenberg, I’ll get three times less speed but three times more torque here. In theory. We’ll see how it fares in practice and what it means for practical sewing.
It seems that Elena’s Home for Wayward Machines is accepting new residents… 🙂
First impressions
8 February 2018
She’s here! Arrived last night, dusty as advertised. But she’s got her shuttle! 😀
The veneer was no longer attached to the wood, so I removed it. I wiped the machine with a damp cloth to remove loose dirt, then covered it in 3-in-1 to soak. While doing it, I also squirted some oil into the oiling holes, not hoping for any movement so soon, really. Two minutes later she was stitching!! This girl means business. 😎
However, the feed dogs are stuck and will need some rust eater.
Perhaps the hardest thing to do will be to get the slide plates moving so that I could get to the shuttle – they are completely stuck. But that’s ok – I’ve got a big hammer and my husband is a master at precision wacking. 🙂 (His record so far is wacking something with lots of force in order to achieve exactly 0.3mm displacement – and getting it right!)
This machine has a badge of J. Silberberg & Co. from Hamburg who was a distributor selling to the UK. But Anker always incorporated anchors into its decals, and sure enough, they are present, along with the bed decal of a sailing ship (and a big anchor).
189?
11 February 2018
Dating these machines is not easy as there are no records about. However, there are a few pointers.
According to needlebar.org, Hengstenberg/Anker registered the name “Gloria” and the anchor logo in 1895, and my machine bears them – so it is post-1895.
Of all Hengstenberg/Anker machines with the Wittler mechanism that I’ve seen, the oldest one bears the serial number 161120 – that’s the one badged “Simplicity” currently on eBay.

So, let’s suppose that they started with serial number 150000 in 1895.
SewMuse shows one such machine, serial number 449402. They say it was manufactured around 1900, that’s 300,000 numbers since 1895, or 60,000 per year.
My machine’s serial number is 239514, that’s almost 90,000 since 1895, or 1.5 years. So my machine most likely dates to 1896-1897, taking into account uncertainties in the assumptions.
The ships
Nosing about the internet, I noticed that the bed decal of the ship has been undergoing changes.


The head
14 February 2018
Over the weekend I cleaned her up using generous amounts of rust removers, sandpapers, 3-in-1, varnish and elbow grease.
The first peculiar thing that struck me was a completely redesigned head on this machine as compared to Singer 12 which was where they started. In Singer 12, the head contained two square bars and one flat bar that all fell out when you opened it: the presser bar, the needle bar and the tension control bar. The new head is a self-contained unit with round bars instead of square ones, but otherwise similar to the original. But nothing falls out when you unscrew it!
The needle bar is integrated into a lattice that slides along the walls of the head.
The presser bar is hollow, as is the presser bar thumb screw. There is a pin with a collar that pushes down onto a spring. The spring is inserted into the bar, and the free upper end of the pin is inserted into the thumb screw.
The tension unit is a curved flat bar that pulls or pushes a pin with tension disks on the outside of the head. When you screw in the tension thumb screw, it pushes on the flat bar which pivots and with the other end pulls the pin into the head tightening the tension. It’s a very simple mechanism but it works well. There should also be a tension release mechanism but it’s missing on my machine.
The head is attached to the body with two screws as usual, but now you can adjust the left-right angle of the needle bar by loosening and tightening those screws. You don’t need to remove the head for oiling, so this could be set once and left alone.
The feed
The feed mechanism here is quite different from Singer 12 which has a long feed dog rocking inside a shaft in the base. When I started cleaning, the Wittler feed looked like one big rusty block screwed onto the base, and I couldn’t quite see how it was supposed to move. But it turned out to be two separate pieces – a shaft and a feed dog.
The mechanism compared to Singer 12
I really like these modifications. 🙂
Overall, the Wittler mechanism is very similar to Singer 12 in the way it transfers the rotation of the balance wheel to the upper and lower mechanism. It has the same gears in the “ramp” of the machine, and the same way to move the needle bar up and down.
The rotation of the main vertical shaft is translated into a transverse oscillating movement of the shuttle, but rather than pushing the shuttle left and right along a straight bar, the Whittler mechanism pivots an arm on a joint so that the shuttle moves along an arch. This makes for a much smoother movement!
The feed mechanism is essentially the same, although the feed dog has been redesigned.
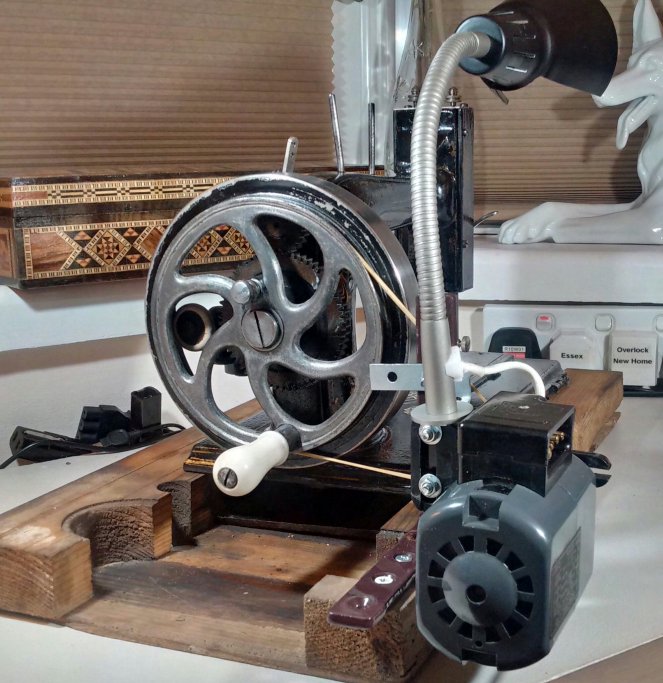
And then of course there’s the geared Saxonia balance wheel with its integrated hand-crank and clockwise movement, although the main shaft of the machine still moves counter-clockwise.
In fact, different parts of this design were used on their own in various other machines. For example, you could easily replace the Singer 12 head with this self-contained unit leaving everything else unchanged, or just swap the feed dogs, or just the balance wheel. You could even just take the shuttle mechanism and leave everything else alone. Of course it wouldn’t be easy to do it on an existing machine because you’d need to modify the base, but for a sewing machine manufacturer those were all valid options.
The first transformation
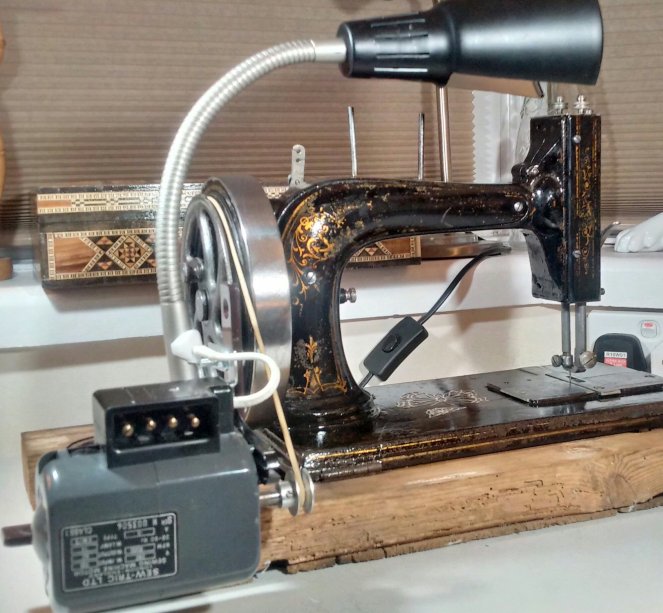
My own machine, however, was going to get a motor. 🙂 There is no boss for mounting it and the large balance wheel is getting in the way, so rather than trying to squeeze a motor behind the machine in the usual fashion, I put it on the right behind the hand-crank.
Yes, I have already ordered a proper motor belt, I don’t intend to run it on that rubber band! But it’s a great prototyping tool. :-)
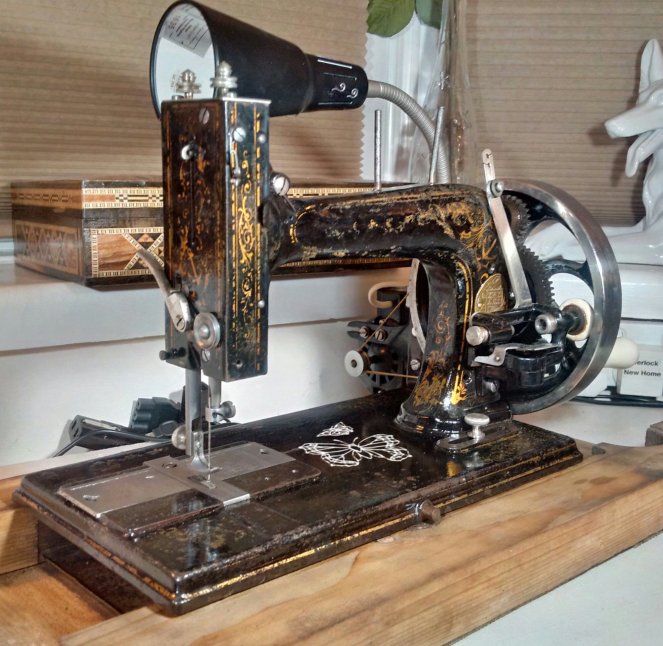
Under all the dust, the varnish and even paint was badly degraded. Shellac turned into yucky yellow lumps that were coming off at the touch taking the decals with them. The ship could not be saved, although I kept most of the swirls. I even considered repainting parts of the bed where the paint was at its worst, but then I decided against it. It is not a restoration but neither is it a back-to-shiny refurbishment. That worn paint speaks of years and years of use, and then neglect. It tells this machine’s story, it forms its memory, and I did not wish to erase that. So I covered it all in polyurethane varnish as I normally do – it stops any new rust from forming and gives a smooth and durable surface for sewing. A butterfly has emerged from its dusty cocoon.
The nickel coating on the slide plates and the balance wheel was also gone, and the steel underneath it was rusty. I removed remaining flakes of nickel, gave the steel a good helping of rust eater and polished it to get a smooth surface. Modern polishing pastes for brushed steel leave a fine protective film on the metal preventing tarnishing and rust. It is not fool-proof of course and won’t stand up to submerging under water, but I have no plans of lending my Anker to the local mermaids. 🙂
The back of the balance wheel was painted, but there the paint was more than half gone, so I stripped it completely.
This should also polish out to a lighter colour and a much better shine, but I ran out of elbow grease at that point. I might have another go later!
And here we are – stage 1 of the transformation.
The varnish will still be polished after it’s cured; the wooden base will need attention, especially that it is now carrying the motor; I’ll need to get a proper bracket for that light or might try a different lamp; and finally – the needle!
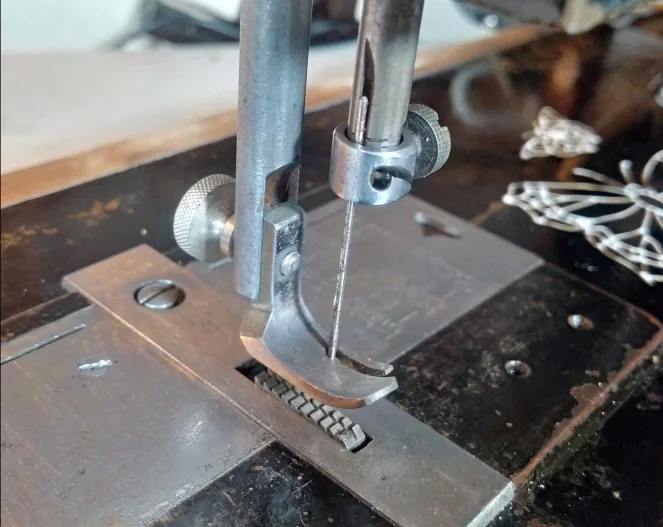
This machine takes old 12×1 needles, so will need to be converted to something modern. However, it has a special foot fitting and an interesting needle clamp, and I don’t want to mess with any of it. So I don’t want to do anything as invasive as I did with Vesta. Hmmm…


 Buy me a coffee 🙂
Another interesting machine…..Judging by the balance wheel I reckon the condition won’t be too bad under all that dust and crud. I think the veneer on the wooden base has had it though! Looking forward to how this one turns out – your “to do” list is not getting any shorter….
LikeLiked by 1 person
Oh but I’m done with Vesta, at least for now! So there’s room for another fixer-upper. 🙂
I agree with your assessment: it’s dusty but doesn’t look too bad, except for the wood. Just neglected. And considering how well Vesta cleaned up, I’m hopeful. 🙂
LikeLike
Wow that is a serious rescue! Many would just say “trash” but you see the beauty and potential and honor these old machines! 🙂
LikeLike
I think it is mostly just dirty. It will make for a very dramatic rescue, at any rate. 🙂
The reason I bought this one, in this poor condition, is that it only cost me £21 including postage, whereas one in a nice condition just sold for £80. I mostly just want to play, not buy prime real estate. 😉
LikeLike
Funny, I was just reading about Hengstenberg machines today on Sewalot. And a local charity shop has got one of those Essex chain stitch machines – but it’s marked as not for sale.
I had to steadfastly walk past a Jones Family CS in another charity shop today as funds are very limited, but I think I’ll be going back to see if it’s still there……
LikeLike
Jones Family CS are of course very common here – just look on eBay! There’s plenty of Essex machines too, although motorised ones are relatively rare. I’m not saying anything against your local ones, just mentioning a few more options. 🙂
Yes, I am very excited about the Hengstenberg hybrid (they made “normal” machines too). Fingers crossed for the shuttle though – I won’t be able to find one if it’s not there.
LikeLike
Yes I actually had my Great Grandmother’s Jones Family CS,but gave it away, although the one I’ve seen locally is a bit prettier.
LikeLike
It will be so amazing to see you bring this lovely machine back to life!!
LikeLike
It’s a project all right. I’m sure you give as well as you get when it comes to precision wacking (or is it whacking?)!
Why the big vertical bar coming up from the bobbin winder?
Dan H
LikeLike
The big vertical bar by the bobbin winder has a thread guide and a tensioner on the top for winding the bobbin. You see it on many German machines. I admit – I don’t particularly like the look of it but it does function very well.
Does w[h]acking have an “h” in it? No idea! 🙂
LikeLike
You might try a Wire brush on those rusted parts. the German machines were made with excellent steel and should respond well to that. You can add a cleaner like Brasso or CLR tot he wire brushing process to make it faster, but take great care of the japanned portions
LikeLike
Thanks – I plan to do something similar. I usually find that rust eater gel like that from Hammerite works well with a stiff nylon brush, but I’ll “upgrade” to a wire brush if necessary. 🙂 The japanned bits usually get cleaned up with a toothbrush or just with my nail – the shellac is completely disintegrated on most of it. It now lies in big lumps after soaking in 3-in-1.
LikeLike
Evapo-rust does an awesome job of removing rust.
LikeLike
Generally, yes, but you have to take those parts off and put into a container filled with Evaporust. This is not always possible.
LikeLike
Ia Singer Ph love your blog on these old machines. Thank you for posting them and your work.
LikeLike
Sorry; didn’t check typos. I was writing that I have a Singer Phoenix Treadle in excellent condition, but decided against it. It didn’t delete so my post is a mess.
LikeLike
That’s ok 🙂 Thanks! 🙂
LikeLike
Hy Elena.I have a Hengstenberg machine too. Oldest, serie lite more den 90000.
LikeLike
I purchased one of these machines today.. A close cousin tho yours as the serial numbers go. Mine is 281665.
I knew nothing about the machine but was impressed with its condition, so I bought it.
Not
Now to get into it and get it clean, shiny, and beautiful!
Thanks for your help with an approximate dating!
LikeLike
I wonder whether the machine was quiter running on the rubber band than when you later got it a (non-elastic) v-belt? Electric sewing machines usually make this annoying deep rumble, because the motor only supplies torque in pulses at 100 Hz. It’s actually the tabletop that emits the sound, since lifting the machine into the air mostly removes the rumbling, but that is sort of an impractical solution.Very soft rubber feet or pad remove the rumble too, but allow the machine to rock and sway while sewing… I thought that an elastic belt would mostly prevent the transmission of the pulses into the machine in the first place. Though the elastic might increase wear on the motor’s front bearing…
Anyway, I love the quietness of treadled machines, that’s why I’m looking for a solution to recreate that experience when treadling is not an option.
LikeLike
I never noticed any rumble with old motors, although I did notice it with some modern ones. I’m not sure what causes it. Also, my machines are sunk into the table, so may be that helps. I do not like my machines to rock or to sway, or to walk away from me across the table! This always happens with modern wonders. They walk right back into the box they came in! 😉
You could try rubber motor belts instead of V-belts. Rubber motor belts actually do exist, they are somewhat elastic and round.
LikeLike
Most people I think take the rumbling to be a normal part of electric sewing. I’ve only discovered that rumbling is not neccessary when I got the portable Lada T132 and picked it up while it was running (for other reasons) — I was very surprised. Lada actually has 3 rather soft rubber feet, but the fourth adjustable one is hard and transfers vibration into the table. Screwing it in and putting something softer under it helps, it’s worth trying…
I’ve noticed your white tabletops are very thick! I think it helps somewhat against the deep noises.
LikeLike
I do know what you mean. I’m only saying that I don’t have this problem with old motors. I think they were better made. Also, you need to make sure that the motor is mounted to the machine very securely. Perhaps the vibrations are simply due to the bracket wobbling about? I have no vibrations with my Lada either, it’s a very quiet machine, even at high speeds.
LikeLike
i have the same machine with a anker and serial number 137545
so I think it’s older
LikeLike
I recently bought a “Regina” Hengstenberg machine and it is beautifully made. I just LOVE the way they look and work. A lot of the decals were worn or faded, but I wanted it to look as good as I could. The decals on it are a deep, rich old gold color that has a hint of glisten to them. Almost like micro glitter embedded decal. Real gold perhaps? I don’t know. Anyway I wanted to restore the missing areas of the decals in worn areas. I found the most PERFECT acrylic paint color for my machine. The manufacturer is DecoArt and the paint is called Dazzling Metallics in the color Venetian Gold. This color is a dead ringer to the original decal color. I was amazed. My old machine is slowly looking close to how she looked when new. It is a painstaking process to do this as I use a needle point to put the paint on. Some of the swirls and lines are so narrow, you really can’t use anything else. I tried the point of a toothpick and that was still to big, believe it or not. For the plated metal parts, I used Flitz polish. Gojo, NON Pumice, for general cleaning outer surface and sewing machine oil for the oil ports, under neath on all the moving parts and where ever I think it need oiling. She is a hand crank. She is still a work in progress as the decal restoration is a super slow undertaking. But in the end I will be rewarded with a lovely outcome. I know some people may frown on what I’m doing and argue that it should be left with all it’s “history” of use. But I don’t plan on selling it, but using it and enjoying what it looked like when she rolled off the assembly line in the 1890’s. Happy sewing machine hunting!
LikeLike
Thanks for sharing! She’s yours and you are absolutely right to restore her the way you like it!
LikeLike
I’ve rescued a beauty, an old hand crank machine that was put out as kerbside rubbish. Where can I find info out on where to oil it and how to restore it without damaging it?
LikeLike
Hi, oil in the oiling holes and also every moving joint. Just turn the balance wheel slowly and observe the motion. As for the info – you are on the right track, search the internet!
LikeLike