I have four long bobbin machines, five if you count the little one too. Three are vibrating shuttle machines, one is a cylindrical transverse shuttle – all four “medium” tailors’ machines. The fifth one is a Wittler hybrid – a transverse vibrating shuttle.
These five machines between them not only can sew any fabric under any circumstances (single layer, stretch and jersey, thick seams, edges or corset ribs), but they can do it with distinction and minimal adjustment. I have finally given up trying to use “all-purpose” zig-zag machines for straight stitch – the quality just doesn’t compare, not when I know how good it can be with a long bobbin machine!
But why do I need five of them when in fact each one can sew every fabric? Because they have different strengths, and the setup varies quite a bit, and so rather than redo all the tensions again and reset feed dog height on occasion, I prefer to switch to a different machine that is already set up, and just change the thread to the right colour.
And here they are, described below in further detail:
- Jones Medium CS, 1908
- Bernhard Stoewer’s Serata VS2, 1914
- Clemens Müller’s Veritas VS2, 1910
- Singer 48K, 1902
- Hengstenberg/Anker Wittler hybrid, 1890s
Jones Medium CS

This is my heavy duty machine. It is a long arm vibrating shuttle, or cylindrical shuttle as Jones called it (CS). “Long arm” here refers to the vibrating arm in the underbelly – this design has the centre of rotation closer to the main column, and the shuttle moves on a shallow arch (see a separate post for more details).
This longer arm carries a greater force, certainly in a full size machine like Medium CS (the more common Family CS is 3/4 size). I find that this machine has the greatest punching power of them all, and although it is gentle enough also for fine fabrics, I have it set up for heavy duty work.
This machine was made between 1901 and 1910 – during the reign of King Edward, and we know it because it says on the front “As supplied to Her Majesty Queen Alexandra” – King Edward’s wife.

I estimate the year of manufacture to be 1908 based on the serial number as compared to other known examples.
I got rather lucky with this machine: the previous owner had it updated some time in 1980s. Jones machines from early 1900s normally take old Jones needles – impossible to find today. Although there are some substitutes, they don’t always work very well. But this machine was converted to modern standard domestic needles, and it also received a boss for attaching a hand-crank or a motor. All the work had been done for me already! 🙂
This machine has large double-sided feed dogs (there’s a strip on both sides of the needle, not just on the left) which sit quite low, and a light foot pressure. The original foot is symmetrical – with an equally wide finger left and right, matching the feed dogs.

This setup gives an excellent grip and feed without squashing the material. It reduces slipping of the layers and allows to sew over uneven thicknesses without flinching. I can even keep using the same foot for sewing on edging to a corset with bones inserted: varying thickness with bones on the left and without bones on the right – no problem! Jones Medium CS sews as if it was plain sailing on cotton poplin… 😀 And of course having a feed dog on the right of the needle means that I can use a right-sided zipper foot, too. ☺
The only remaining non-standard feature on my Jones CS is the foot fitting. It is low shank, but lower than standard by about 2mm, so I cannot really use any of my special feet: the foot lift becomes too small and foot pressure too strong. Yet I want to keep using the original straight stitch foot because it works so well with the feed dogs. There is a solution to this: raise the presser bar to the standard height and add a cushion to the fitting groove of the foot (solder on a bit of tin to form that cushion). It’s on my “to do” list. 🙂
Bernhard Stoewer’s Serata VS2

In my opinion, the Serata is the best of the vibrating shuttle machines, and one of the very best straight stitchers overall. And I am so lucky to have the larger model – this machine is full size.
“Serata” was a trade mark registered by Bernhard Stoewer in 1905 – they used it for their vibrating shuttle machines. Stoewer (see www.stoewer-museum.de) was a German manufacturer from Stettin, they made machines for various distributors, so you’ll find them bearing various names and badges. Mine actually has the original Stoewer badge!

But the name frame on the arm was empty – this wasn’t badged for anyone. I put “Serata” into the frame, since this was the original name. Stoewer Museum kindly dated this machine for me to January 1914.
This is my second Serata – I had a smaller version before, and it was the best machine in the house (see for example this post). But “family” size (3/4) really doesn’t work for me – I like large harp space, and finally I found one! It belonged to an old seamstress – that figures.
Stoewer vibrating shuttle machines are based on the Singer design with the short vibrating arm moving the shuttle in a curved arch.

So my Serata VS2 is similar to Singer 127K (the improved 27K), except that Serata can also sew in reverse, has a better shuttle and a gentler feed. The feed dogs are very similar to Singer, but the foot has a somewhat wider right finger.

The feed mechanism in the underbelly has a retaining spring that prevents it from jerking about, making for a smoother sewing overall.
I don’t want to say that Singer 27/127 is not a good machine – it is, it really is. It is reliable, smooth and very capable in sewing all sorts of fabrics; it’s got an excellent feed – in particular the improved 127. But Serata is better still.
I was also very lucky to inherit Serata’s accessories, in particular the second needle plate for delicate fabrics – the one with a tiny needle hole. The size of the needle hole indicates the weights of fabrics that the machine is built for. My Jones Medium CS has a needle hole of 2.2mm for needles up to size 140/24 – clearly set up for heavy duty work. Serata’s regular needle plate has a hole of 1.8mm – a size common to many other machines, including modern ones. This is good for needle sizes up to 110/18. But the plate for delicate fabrics has a needle hole of only 1.5mm – for needle sizes up to 80/12, and for fine thread.
Swapping out a needle plate on these machines is quite an easy job – just the one screw on the side. So Serata is set up for medium to delicate fabrics, mostly woven – because I’ve got another girl to sew jersey.
Clemens Müller’s Veritas VS2
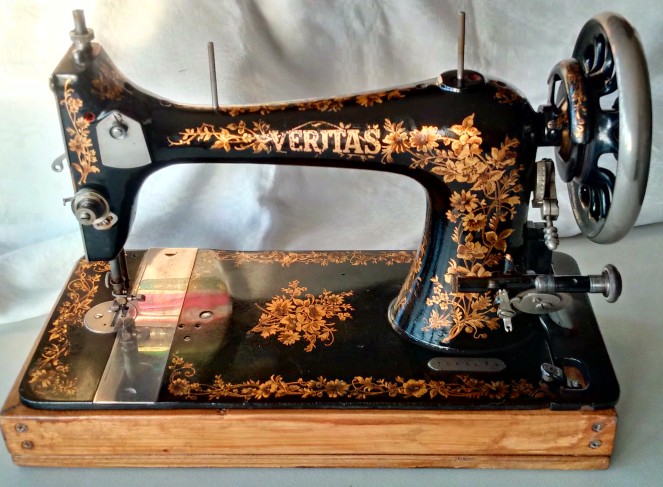
In many ways Clemens Müller’s Veritas is similar to Serata: it’s based on Singer’s VS2 design with the addition of reverse, and it has a modified feed and shuttle. It was made in Dresden, Germany around 1910, and “Veritas” was a trade mark registered by Clemens Müller in 1894.
But then, Veritas is as different from Serata as it is different from Singer. Veritas’ feed dogs are on the right smaller than Serata’s, so a right-sided zipper foot works only just. The right finger on the foot is also narrower, but not as thin as Singer’s.

The feed has a retaining spring like Serata, but the foot pressure is a little stronger and “sharper” due to smaller feed dogs. The needle hole is fairly large, similar to Jones Medium CS.
This setup proves ideal for jersey and other stretchy materials. To make a flexible stitch, both the bobbin tension and the upper tension need to be quite low, so that the thread could weave in and out of the fabric “storing” extra length in coils that would open when the fabric is stretched. Trying to sew smooth woven fabric with the same low tension results in uneven stitching – in particular when using modern highly twisted thread (that bit gave me headaches upon headaches!). So, although my Veritas is perfectly capable of sewing both jersey and woven fabrics even with highly twisted thread, I am too lazy to fiddle with the tensions, and I have her setup for jersey and stretch. And as I sew quite a lot of it, it saves me time and frustration! 🙂
Singer 48K

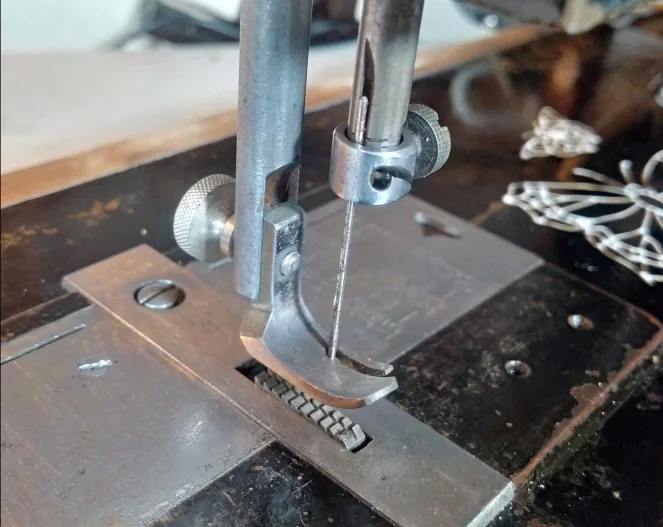
Ah, this is a different beast altogether! Singer 48K is a cylindrical transverse shuttle machine – it is based on the tailors’ “medium” model 13 with many improvements. Built in 1902, it was ahead of its time. It has a new, redesigned “bullet” shuttle like the vibrating shuttle machines, and takes the same bobbins. It takes standard domestic needles and standard low shank feet. And although the harp space is not as large as on a full size VS, it is larger than a domestic 3/4 size.
And yet it is a transverse shuttle machine with its characteristic very gentle feed. The feed dogs are one-sided (so no right-sided zipper foot here), and the right finger on the foot is very thin indeed.

This is a true fine worker. It can weave the thread in and out of fabric so that the sewing thread becomes a part of the fabric, indistinguishable from the threads used in the weave or in the knit. This gives the largest stretch for jersey and the lightest stitch for chiffon and voile. It also works miracles on quilts! 😀
But this machine is not an “automatic” – thread tension depends on the stitch length and foot pressure, and requires a careful adjustment for each project. That blending of threads does not happen on its own – it requires practice, but is so worth it!
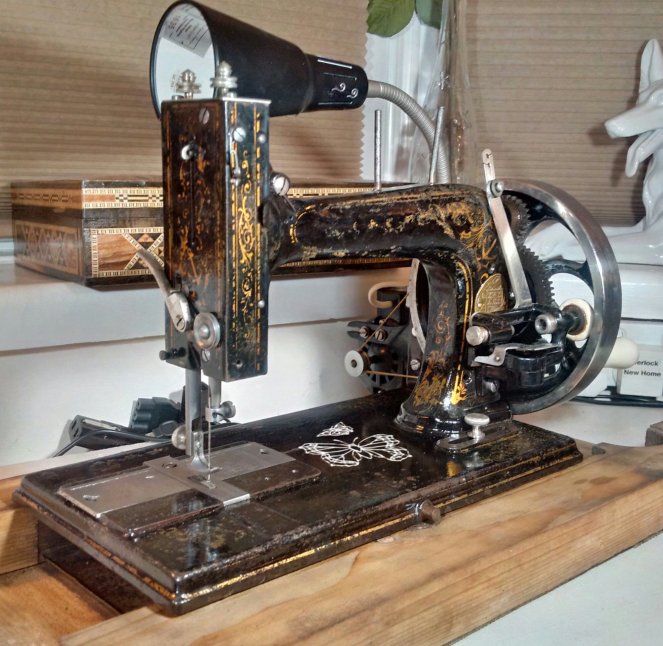
The little one
This is a Hengstenberg/Anker Wittler machine made in Bielefeld, Germany in 1890s. It is a vibrating shuttle turned 90 degrees to make a transverse vibrating shuttle. This is a small 1/2 size model with a Saxonia balance wheel – a large geared balance wheel with both a hand-crank handle and a groove for a treadle belt.
This machine is still a bit of work in progress, mainly because of that balance wheel. Firstly, it turns clockwise (away from you), and so requires either a clockwise motor to put behind the column as usual, or a regular motor to put to the right of the machine as I’ve done at first.
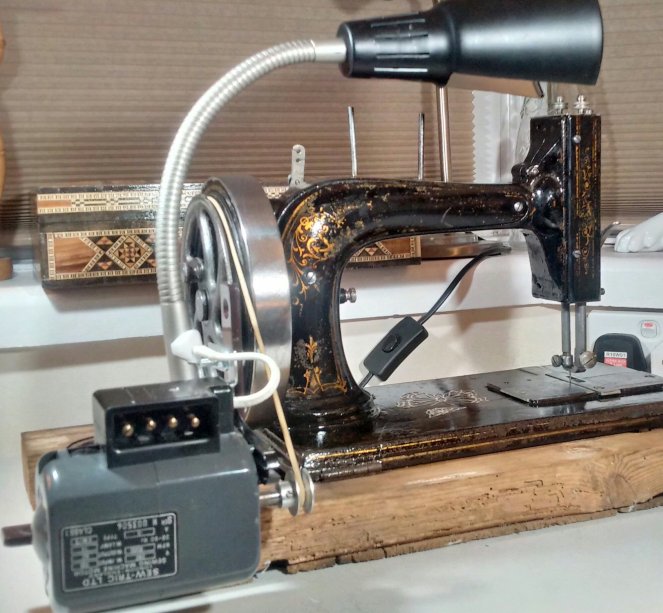
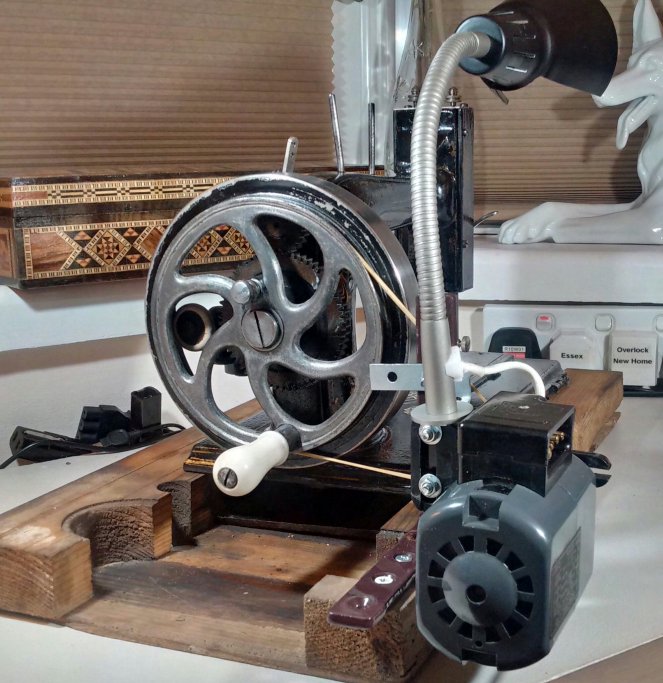
Well, that puts the motor rather far out and the machine does not fit on the table properly, so I’ll be using a clockwise motor in a more compact manner.
The main problem however is the size of the balance wheel. I tried using the usual sewing machine pulley on the motor, but that immediately tripped the circuit breaker in the house – not because the motor was faulty but because it had to go full power to deliver a decent stitching speed, and that was mistaken by the circuit as a surge. The motor had to rotate a lot faster than usual because the ratio of the diameters of the balance wheel to pulley was too great.
There are two ways to sort it out: either reduce the balance wheel diameter, or use a larger pulley. I toyed with the idea of replacing the Saxonia balance wheel with a regular one, but I rather like the geared wheel because it makes the machine go so very light, and anyhow I couldn’t get it off. 😉 I did find a larger pulley for the motor, but it still needs a hole for the positioning screw drilled and threaded – it’s in the queue. 🙂 It will be worth it: this will make a very light going little machine with a tremendous punching power delivered by the Saxonia gears.
Other than being a fantastic fun project to do, it will be a useful little helper to sit next to the overlocker on the small table (hence the need for a compact motor layout) and to do quick “auxillary” jobs that would otherwise require to swap out the main machine. The Wittler mechanism combines features of a transverse shuttle machine with those of a vibrating shuttle machine: it has that gentle spring-driven feed of a transverse shuttle machine made a bit stronger by the Wittler modifications; it uses the swinging arm of a vibrating shuttle machine for a much lighter movement; it has a forward-facing needle allowing me to convert it to twin needle – just add a needle groove on the other side of the bar, easy in this design. And then of course there’s the Wittler shuttle with an improved thread path that actually runs unobstructed and can deliver a full range of tensions (this was a problem I could not solve on the Vesta prototype).
So this little machine is not on active duty yet, but it is already working – as a hand-crank with the original single 12×1 needle.
I’ve tested it and found it useful and unique, and one day it will be finished and will join my sewing crew as another secret weapon next to its bigger sisters.

Your article was a delight to read. I feel affirmed in my decision to hold on to multiple machines and have them set up for different uses. (Though most of mine are younger than yours, ranging from 1901 through 1980-something).
I am hoping you will be able to help me with one of my darlings – I have a Clemens Müller Veritas that looks very similar to yours except mine has a flexible double spool holder in the middle as well as the straight pin on the right and the decals are what I think is a Griffin. I only have one bobbin and have not been able to find any useful information about how to get more (nobody in my area has seen one like it and they have a lot of old machines that take every imaginable size of long bobbin)
Thank you for any insight you might have.
Linda McGivern
LikeLike
Hello Linda, and thank you for your kind words. Regarding multiple machines, just look how they do it in industry. Not only do they never go twiddling knobs in the middle of a project, but also they use different models of machines for different fabrics, because – guess what – no machine can do it all, as we expect from our domestics. The domestic result is of course the same as with one-size-fits-all T-shirts: they fit no one properly. Consider also that Merrow for example actually make machines specifically for your cloth. You send them your cloth, and they make a machine to sew it. (Merrow invented overlock back in the 19th century. They still make their own machines, themselves, as always. Not in China. Check out their website.)
Regarding Veritas, it sounds like you have the “family” model (3/4 size) while mine is “medium” (full size). Some makes have differences between them, in more than just the size of the bed. After all, they were intended for different markets – domestic versus professional (tailors’ shops). I don’t know about Veritas, so please check what I tell you about mine.
Bobbins for vibrating shuttle machines are generally easy. The shuttle usually takes all sorts of long bobbins, both from other makes and from TS machines. TS “boat” shuttles are smaller than VS “bullet” shuttles, so a TS bobbin easily fits into a VS shuttle and works just fine, in my experience. Also VS bobbins of different makes are very similar in size and can swap between shuttles without problems. Generally. There are exceptions among the shuttles, notably Pfaff and early White have a pin inside the shuttle, and Frister & Rossmann (Gritzner) bullet TS shuttle is smaller in diameter than the rest, and so I’m sure there are other exceptions. However, my Veritas shuttle is well-behaved and happily takes whatever bobbin you give it.
The bobbin winder however is more specific. Firstly, you can’t wind TS bobbins on a VS machine because they are too short for the bobbin winder and fall out. Secondly, you can’t wind Singer bobbins on most other makes because most makes (including Veritas) have a positioning pin in the bobbin winder which requires a matching hole in the cap of the bobbin, which Singer bobbins don’t have.
You can hunt for vintage long bobbins on eBay, or you can buy a modern reproduction. I use modern bobbins and they work just fine. Make sure you get the ones with the hole in the cap though – there are both types out there, with or without the hole. I buy mine here: https://www.sewingmachinesales.co.uk/sewingmachineparts/bobbin-holder/singer-boat-bobbin-shuttle-127k-128k-27k-28k.htm (never mind incorrect description, but these are the right bobbins, see photo). But may be you can find the same ones locally.
Hope this helps!
Elena
LikeLike
I’m wondering whether the benefits of VS machines you describe, like the ability to sew over thick seams and sew the widest range of fabrics, come easily to these machines or need to be unleashed first by an experienced adjustment. In other words, if I get a dusty (though not rusty) VS, should I expect it to just barely sew and to only show its potential after I study Singer’s adjustment manual (I don’t expect one to be available for anything but Singer) and spend many hours on trial and error?
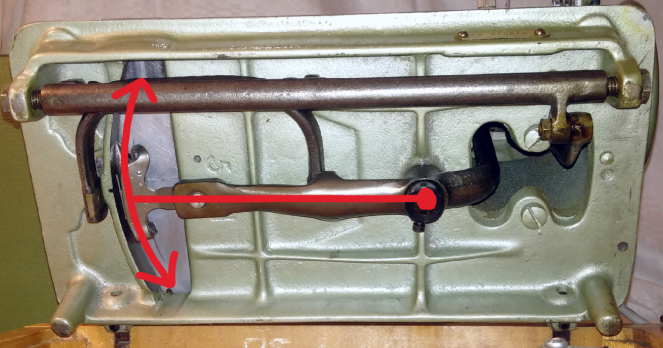
I’ve also been thinking about the Jones CS and the reason for its punching power. You suggest it might be connected with length and weight of the shuttle-carrying arm. I think that this arm is both much lighter and slower moving than the balance wheel – the arm’s end travels about 20 cm per stitch, while the balance wheel rim travels about 60 cm. So I don’t think the arm should have a big influence on punching power.
On the other hand, if the V of the needlebar drive had a more acute angle, it might provide a greater mechanical advantage (“gear ratio” of sorts). In theory, if the V-groove would be replaced with an bottom-half-circle-groove of the same diameter as the circle the disc’s knob travels on, there would be zero needlebar movement from 3 to 9 o’clock of knob position and twice the speed and length of movement from 9 to 3 (twice of what a horizontal groove would give). Zero movement means infinite force 🙂
So could you perhaps check if the V-groove shape on the heavy-duty Jones CS seems to differ from the other VSs, like having a “deeper smile”? 🙂
LikeLike
I’ve had some 20 VS machines over the last few years, and they could all sew nicely after the first oiling. It’s in their design.
Regarding the punching power of the White design, I can only speculate as to where it comes from. I describe what I experience. The head construction is the same as on Singer. I am less interested in why things are as they are, and more interested in practical applications. For me the important thing is the sewing test, everything else is secondary. When I discover how to fix things or how to spot the right thing, I write about it but I claim no theoretical background on any of it. Looks like you’ll need to do some tests of your own if you want to know about the forces inside the machine! 😀
LikeLike
Jana, please remember that this is a blog – a recount of my personal experiences, opinions and findings. I claim no expert knowledge and give no guarantees that your experiences will be the same as mine. Don’t over-think it! 😉
LikeLike
Not overthinking it is actually spot-on advice, since whatever I become interested in tends to turn into science eventually and I’m not exactly happy about that… I admire that you are able not to let computers into your sewing despite your day job 🙂
My question about whether perfect stitching comes naturally to VS machines was motivated by your post about a machine which had been “put together by monkeys”, as you put it 🙂 , and became a very fine machine after you’ve adjusted it. That made me wonder that perhaps many of your machines now perform better than new, as there might not have been enough time for fine adjustment in a factory assembly line.
LikeLike
You are overthinking things again and over-generalising. 🙂 My comment about a machine that was put together by monkeys referred to machines from late 1960s and later made in some parts of the Far East. Those are all zig-zag machines, often with fancy stitches, meaning that they have far more parts to assemble than simple designs of the early 1900s. Besides, neither Europe nor USA or Japan ever employed monkeys, as far as I can tell. 😉
Bottom line is: this comment does NOT apply to everything! And: there is no such thing as “any VS machine”. There were several distinct designs and many different makes with different quality standards. Do not generalise. 🙂
LikeLike
Regarding what to expect: you are buying a 120 year old machine that has been neglected for 50 years. Why do you expect it to be in working order? That’s a bit unrealistic. Any vintage machine – including VS – will require many hours of TLC and stitching before it works well. This is why they are so cheap to buy, or should be cheap, anyway, unless you are paying for the looks.
Regarding service manuals: I never read one but there are many more available than just Singer. But they are not free, so I never bothered. I can fix everything mechanical on my own, and if parts are needed, it’s usually a lost cause anyway.
LikeLike
Could you please tell me what is usually the maximum stitch length of VS machines? And is it normal for them not to have a take-up spring? (I just hope my first VS machine isn’t missing a part 🙂 I’m still working on freeing some parts up, so can’t just test it…)
LikeLike
There is no universal standard for VS machines. You need to research your particular make and model.
LikeLike
In general, stitch length on general purpose domestic machines of any design runs up to 4-5mm and depends on the height of the feed dogs – it’s a setting and not a fixed feature. However, this is not universal and not a general rule – there are plenty of exceptions.
The same can be said for the take-up spring. You do not need it to make stitches but it is believed to be helpful, so many machines have it but not all. It depends on your make and model.
LikeLike
Thank you. The max. stitch length on my Dürkopp 4 VS is 3 mm, both as marked on the scale and on the fabric. Unscrewing the stops that limit the stitch length lever’s travel allows the lever to move beyond “3”, but the shuttle carrier then collides with the feed dogs 😦 So I hoped that 3 as a maximum is not a usual things on VSs. I understand that setting the feed dogs high would make the stitch longer.
LikeLike
The numbers on the scale are not necessarily millimetres. They might be just numbers.
LikeLike
Yes – I’ve measured the length of actual stitches on fabric, 3.0 mm on max. I’ll have to use a different machine for that decorative 5 mm topstitching I’d like to copy 🙂
LikeLike
Are you sure that your Dürkopp is adjusted correctly? It’s been a while since it left the factory.
LikeLike
The “Queen Alexandra” model continued after the death of Edward VII, until Alexandra’s death in 1925.
LikeLike